Toshiba Tecra A3-S611 Maintenance Manual - Page 126
Installing an Expansion Memory Module,
 |
View all Toshiba Tecra A3-S611 manuals
Add to My Manuals
Save this manual to your list of manuals |
Page 126 highlights
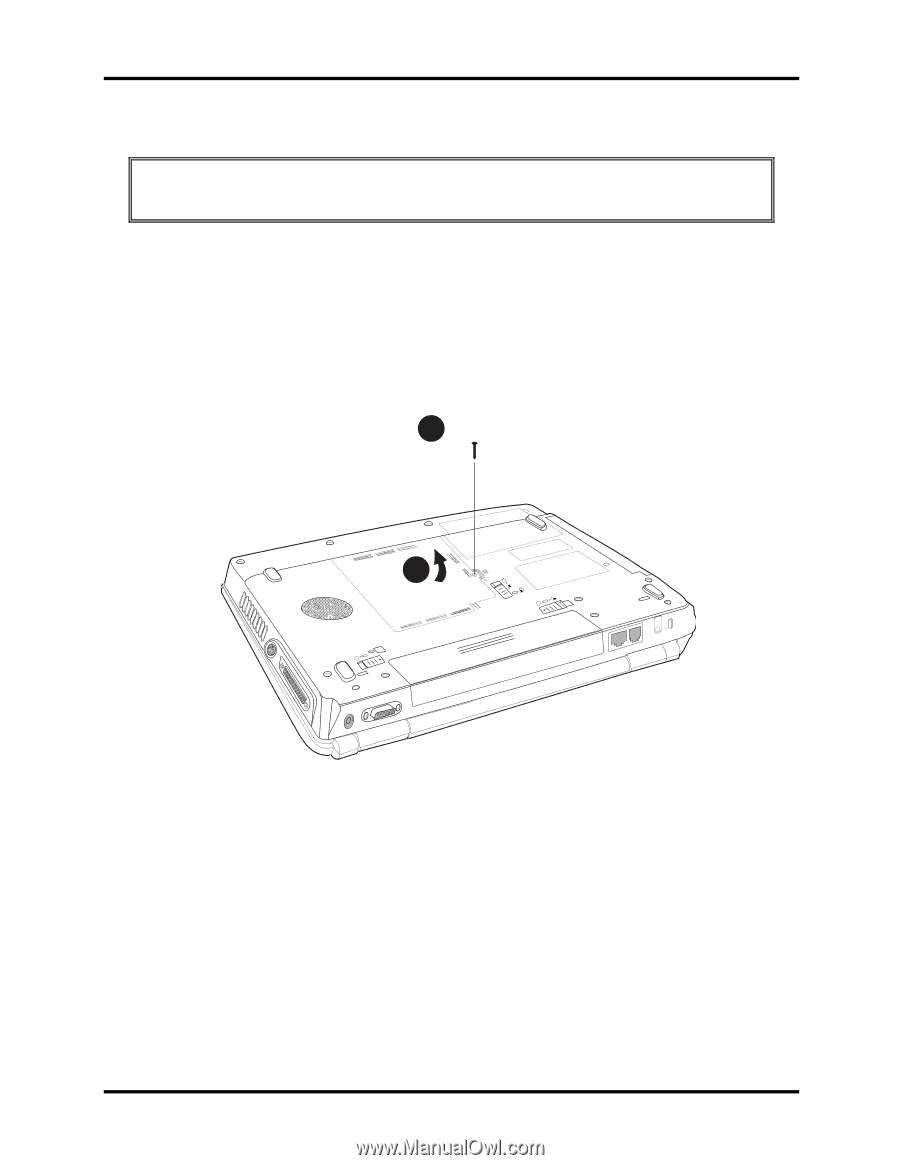
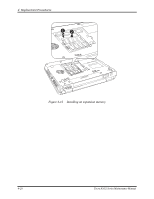
4 Replacement Procedures Installing an Expansion Memory Module CAUTION: Do not touch the connectors on the expansion memory or on the computer. Debris on the connectors may cause memory access problems. Follow these steps to install a memory module: 1. Set the computer to boot mode and turn off the power. 2. Remove all cables connected to the computer. 3. Turn the computer upside down and remove the battery. Loosen the embedded M2.5x5 screw securing the memory module socket cover. 1 M2.5x5 2 2 1 Figure 4-14 Removing an expansion memory cover 4. Slide your fingernail or a thin object under the cover and lift it off. 5. Fit the module's connectors into the computer's connectors at about a 45-degree angle and press the module carefully to ensure a firm connection. 6. Push the module down so it lies flat. Latches on either side will click into place to secure the module. Tecra A3/S2 Series Maintenance Manual 4-19
-
 1
1 -
2
-
3
-
4
-
5
-
6
-
7
-
8
-
9
-
10
-
11
-
12
-
13
-
14
-
15
-
16
-
17
-
18
-
19
-
20
-
21
-
22
-
23
-
24
-
25
-
26
-
27
-
28
-
29
-
30
-
31
-
32
-
33
-
34
-
35
-
36
-
37
-
38
-
39
-
40
-
41
-
42
-
43
-
44
-
45
-
46
-
47
-
48
-
49
-
50
-
51
-
52
-
53
-
54
-
55
-
56
-
57
-
58
-
59
-
60
-
61
-
62
-
63
-
64
-
65
-
66
-
67
-
68
-
69
-
70
-
71
-
72
-
73
-
74
-
75
-
76
-
77
-
78
-
79
-
80
-
81
-
82
-
83
-
84
-
85
-
86
-
87
-
88
-
89
-
90
-
91
-
92
-
93
-
94
-
95
-
96
-
97
-
98
-
99
-
100
-
101
-
102
-
103
-
104
-
105
-
106
-
107
-
108
-
109
-
110
-
111
-
112
-
113
-
114
-
115
-
116
-
117
-
118
-
119
-
120
-
 121
121 -
 122
122 -
 123
123 -
 124
124 -
 125
125 -
 126
126 -
 127
127 -
 128
128 -
 129
129 -
 130
130 -
 131
131 -
132
-
133
-
134
-
135
-
136
-
137
-
138
-
139
-
140
-
141
-
142
-
143
-
144
-
145
-
146
-
147
-
148
-
149
-
150
-
151
-
152
-
153
-
154
-
155
-
156
-
157
-
158
-
159
-
160
-
161
-
162
-
163
-
164
-
165
-
166
-
167
-
168
-
169
-
170
-
171
-
172
-
173
-
174
-
175
-
176
-
177
-
178
-
179
-
180
-
181
-
182
-
183
-
184
-
185
-
186
-
187
-
188
-
189
-
190
-
191
-
192
-
193
-
194
-
195
-
196
-
197
-
198
-
199
-
200
-
201
-
202
 |
 |