Tripp Lite SU3000XL Owner's Manual for SmartOnline UPS 932470 - Page 3
Connection and Start-Up, Optional Connections - ups model
 |
View all Tripp Lite SU3000XL manuals
Add to My Manuals
Save this manual to your list of manuals |
Page 3 highlights
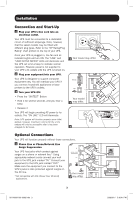
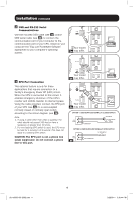
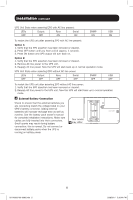
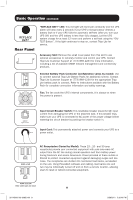
Installation Connection and Start-Up 1 Plug your UPS's line cord into an electrical outlet. Your UPS must be connected to a dedicated circuit of sufficient amperage. Note, however, that the select models may be fitted with different plug types. Refer to the "OP Rating/Plug Rating" chart printed on the top of your UPS. Once your UPS is plugged in, the fan and all Indicator Lights will turn ON. The "LINE" and "LOAD ACTIVE METER" LEDs will illuminate and the UPS will emit a beep to indicate normal operation. However, power is not supplied to your UPS's AC outlets until the UPS is turned on. 2 Plug your equipment into your UPS. Your UPS is designed to support computer equipment only. You will overload your UPS if you connect household appliances or laser printers to the UPS's outlets. 3 Turn your UPS ON: • Press the "ON/TEST" Button • Hold it for several seconds until you hear a beep • Release it Your UPS will begin providing AC power to its outlets. The "ON LINE" LED will illuminate. Note: UPS system will function properly upon initial startup; however, maximum runtime for the unit's battery will only be accessible after it has been charged for 24 hours. 1 Your model may differ. Your model 2 may differ. 3 Optional Connections Your UPS will function properly without these connections. 1 Phone Line or Phone/Network Line Surge Suppression Your UPS has jacks which protect against surges on a phone or network line.* Using appropriate network cords connect your wall jack to the UPS jack marked "IN." Connect your equipment to the UPS jack marked "OUT." Make sure the equipment you connect to the UPS's jacks is also protected against surges on the AC line. * Not compatible with PoE (Power Over Ethernet) applications. Your model 1 may differ. 3 201102091 93-3092.indb 3 3/29/2011 5:36:41 PM
-
 1
1 -
 2
2 -
 3
3 -
 4
4 -
 5
5 -
 6
6 -
 7
7 -
 8
8 -
 9
9 -
10
-
11
-
12
-
13
-
14
-
15
-
16
-
17
-
18
-
19
-
20
-
21
-
22
-
23
-
24
-
25
-
26
-
27
-
28
-
29
-
30
-
31
-
32
-
33
-
34
-
35
-
36
-
37
-
38
-
39
-
40
 |
 |
