Vaddio RoboSHOT 30 HDMI User Guide - Page 10
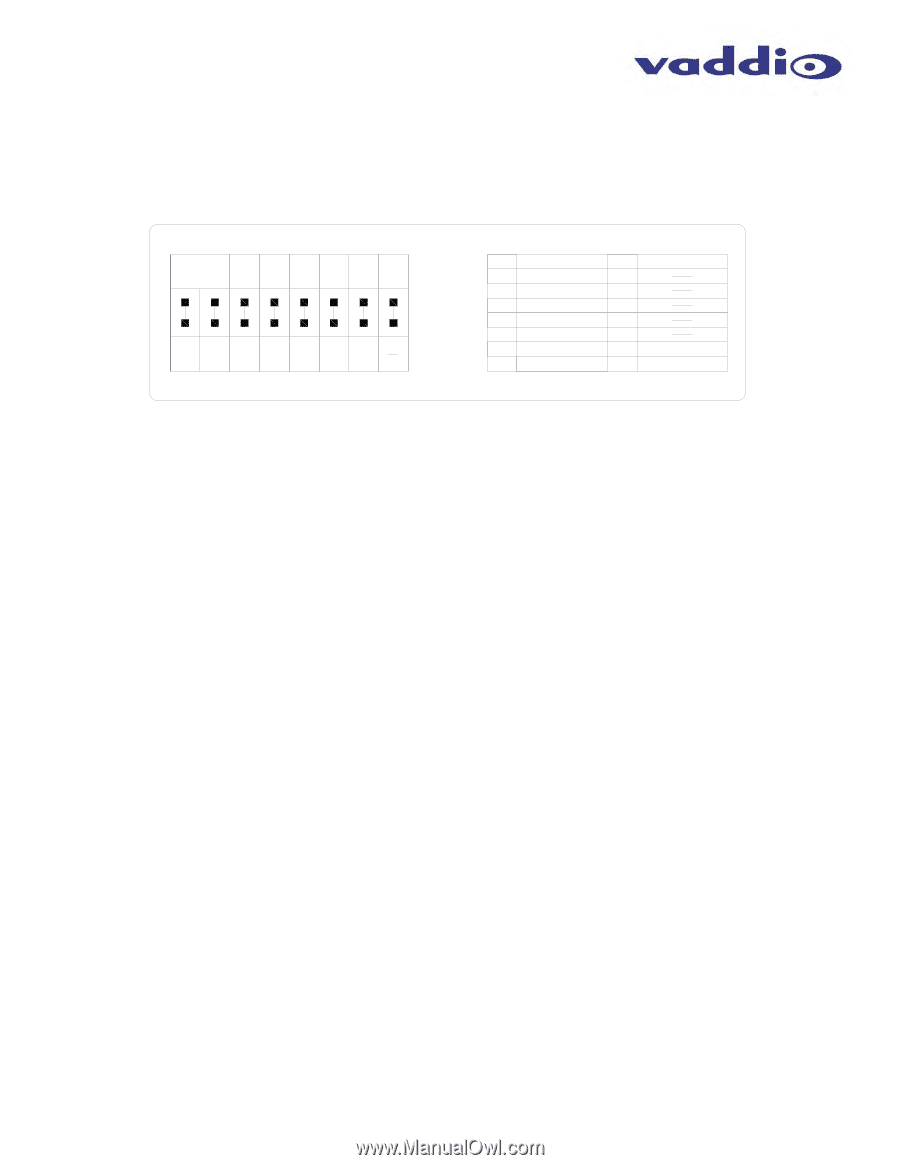
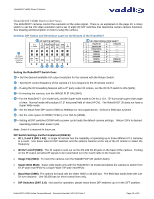
Drawing: DIP Switch and Resolution Label on the Bottom of the RoboSHOT
 |
View all Vaddio RoboSHOT 30 HDMI manuals
Add to My Manuals
Save this manual to your list of manuals |
Page 10 highlights
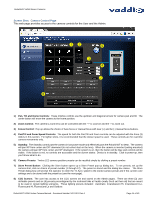
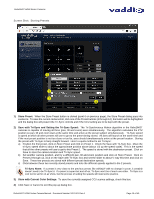
RoboSHOT HDMI Series Cameras ROBOSHOT HDMI SWITCH SETTINGS The RoboSHOT cameras control the resolution of the video signal. There is, as explained on the page 10, a rotary switch to set the HD video resolution and a set of eight (8) DIP switches that determine certain camera functions. See drawing and Description on how to setup the camera. Drawing: DIP Switch and Resolution Label on the Bottom of the RoboSHOT ⑧ All Down with Power Cycle for Defaults ② DIP SWITCH SETTINGS IR 1 1 & 2 UP IR OUT OFF IMAGE SUPER BAUD HDMI FLIP WIDE 9600 COLOR OFF OFF bps YCbCr 8 OFF IR 2 IR 3 ON ON ON ON 38,400 sRGB ON bps COLOR 12345678 ① HD VIDEO RESOLUTION SELECT 0 720p/59.94 8 1080p/50 1 1080i/59.94 9 2 1080p/59.94 A 3 720p/60 B 4 1080i/60 C 5 1080p/60 D 6 720p/50 E 1080p/30 7 1080i/50 F 1080p/25 Setting the RoboSHOT Switch Gear: ① - Set the desired available HD output resolution for the camera with the Rotary Switch. ② - Set the IR control frequency of the camera if it is to respond to the IR remote control. ③ - If using the IR forwarding features with a 3rd party codec IR remote, set the IR OUT switch to ON (SW3). ④ - If inverting the camera, turn the IMAGE FLIP ON (SW4). ⑤ - For the RoboSHOT 12X model only, set the Super-wide mode to ON for a 12X, 73º horizontal super-wide angle of view. Normal mode will produce 67.2º horizontal field of view (HFOV). The RoboSHOT 30 does not have a Super Wide mode. ⑥ - Set the Baud Rate DIP switch (SW6) to 9600bps for most applications. Default is 9600 bps systems. ⑦ - Set the color space for HDMI (YCbCr) or for DVI-D (sRGB). ⑧ - Setting all DIP switches DOWN with a power cycle loads the default camera settings. Return DIPs to desired operating position after power cycle. Note: Switch 8 is reserved for future use. DIP Switch Settings Further Explained (DSSFE): IR 1, 2 and 3 (SW 1 &2): A single IR remote has the capability of operating up to three different PTZ cameras in a room. Use these selector DIP switches and the selector buttons at the top of the IR remote to select the frequency. IR OUT on/off (SW3): The IR output is sent out on the RS-232 RJ-45 jack on the back of the camera. Turning on the IR output will allow IR signals to be transmitted over the Cat-5 cable to the head end. Image Flip (SW4): To invert the camera, turn the IMAGE FLIP ON (switch down). Super-Wide Mode: Super-wide works only with the RoboSHOT 12 model and allows the camera to switch from 67.3º wide end HFOV to a Super Wide 73º wide end HFOV. Baud Rate (SW6): The options for baud rate are either 9600 or 38,400 bps. The 9600 bps works best with Cat5e over distance. Use 38,400 bps for short control lines only. DIP Switches (SW7 & 8): Not used for operation, please leave these DIP switches up or in the OFF position. RoboSHOT HDMI Series Camera Manual - Document Number 342-1001 Rev A Page 10 of 40
-
 1
1 -
2
-
3
-
4
-
 5
5 -
 6
6 -
 7
7 -
 8
8 -
 9
9 -
 10
10 -
 11
11 -
 12
12 -
 13
13 -
 14
14 -
 15
15 -
16
-
17
-
18
-
19
-
20
-
21
-
22
-
23
-
24
-
25
-
26
-
27
-
28
-
29
-
30
-
31
-
32
-
33
-
34
-
35
-
36
-
37
-
38
-
39
-
40
 |
 |