Vaddio RoboSHOT 30 HDMI User Guide - Page 11
Pre-Installation, RS-232 Cabling Notes, Determine Camera Mount Location and Mount, Power Up
 |
View all Vaddio RoboSHOT 30 HDMI manuals
Add to My Manuals
Save this manual to your list of manuals |
Page 11 highlights
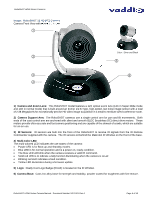
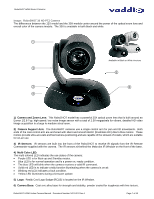
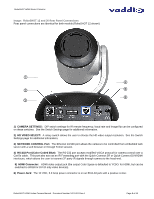
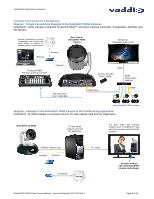
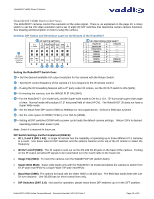
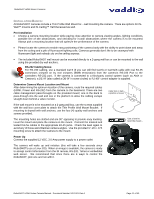
RoboSHOT HDMI Series Cameras INSTALLATION BASICS: All RoboSHOT cameras include a Thin Profile Wall Mount for...wall mounting the camera. There are options for INWall™ mounts and IN-Ceiling™ Half-Recessed as well. Pre-Installation Choose a camera mounting location while paying close attention to camera viewing angles, lighting conditions, possible line of site obstructions, and checking for in-wall obstructions where the camera is to be mounted. Always pick a mounting location that will optimize the performance of the camera. Please locate the camera to enable easy positioning of the camera body with the ability to point down and away from the ceiling and a pile of fluorescent lighting cells. Cameras generally don't like to be swamped with fluorescent light and nobody sits on the ceiling anyway. The included RoboSHOT wall mount can be mounted directly to a 2-gang wall box or can be mounted to the wall using the provided dry wall anchors. RS-232 Cabling Notes: For RS-232 cabling, use a standard Cat-5 (if you can still find Cat-5) or Cat-5e/6 cable with real RJ-45 connectors crimped on by real crimpers (568B termination) from the camera's RS-232 Port to the controllers RS-232 port. If the camera is connected to a third-party control system (such as AMX or Crestron), a DE-9F (also called a DB-9F in some circles) to RJ-45F control adapter is supplied. Determine Camera Mount Location and Mount After determining the optimum location of the camera, route the required cables (HDMI, Power and RS-232) from the camera to the head-end. There are two cable management pass-throughs on the provided mount; one in the back to pass-through into the wall and one in the platform to allow the cabling escape straight down behind a video monitor. Cable Slots in back & platform of mount If the wall mount is to be mounted on a 2-gang wall box, use the screws supplied with the wall box cover plate to attach the Thin Profile Wall Mount Bracket. If mounting to drywall with wall anchors, use the four (4) quality wall anchors and screws provided. The mounting holes are slotted and are 90° opposing to provide easy leveling. Level the mount and place the camera on the mount. Connect the marked and tested Cat-5e cables to the appropriate RJ-45 jacks. Check the level again to avoid any of those weird Batman camera angles. Use the provided ¼"-20 x .375 mounting screw to attach the Camera to the mount. Use a level to level the mount... Power Up Connect the supplied 12 VDC, 3.0 Amp power supply to a power outlet The camera will wake up and initialize (this will take a few seconds since RoboSHOTs use a Linux OS). When an image is available, the camera is ready to accept control information from the IR remote, RS-232, Telnet or embedded web server. We recommend that since there are 4 ways to control the RoboSHOT, pick one and run with it. RoboSHOT HDMI Series Camera Manual - Document Number 342-1001 Rev A Page 11 of 40
-
 1
1 -
2
-
3
-
4
-
5
-
 6
6 -
 7
7 -
 8
8 -
 9
9 -
 10
10 -
 11
11 -
 12
12 -
 13
13 -
 14
14 -
 15
15 -
 16
16 -
17
-
18
-
19
-
20
-
21
-
22
-
23
-
24
-
25
-
26
-
27
-
28
-
29
-
30
-
31
-
32
-
33
-
34
-
35
-
36
-
37
-
38
-
39
-
40
 |
 |
