ViewSonic LS800HD LS800HD User Guide English - Page 15
Controls and functions, Projector
 |
View all ViewSonic LS800HD manuals
Add to My Manuals
Save this manual to your list of manuals |
Page 15 highlights
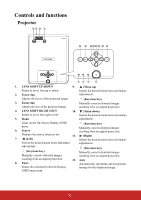
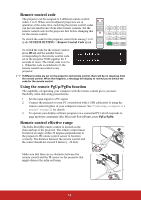
Controls and functions Projector 12 3 4 25 26 27 28 29 120 121 122 13 14 15 16 1. LENS SHIFT UP/DOWN 9. (Menu up) Rotate to move lens up or down. Selects the desired menu items and makes 2. Focus ring adjustments. Adjusts the focus of the projected image. (Keystone key) 3. Zoom ring Adjusts the size of the projected image. Manually corrects distorted images resulting from an angled projection. 4. LENS SHIFT RIGHT/LEFT 10. (Menu down) Rotate to move lens right or left. Selects the desired menu items and makes 5. Menu adjustments. Turns on the On-Screen Display (OSD) (Keystone key) menu. Manually corrects distorted images 6. Source resulting from an angled projection. Displays the source selection bar. 11. (Right) 7. (Left) Selects the desired menu items and makes Selects the desired menu items and makes adjustments. adjustments. (Keystone key) (Keystone key) Manually corrects distorted images Manually corrects distorted images resulting from an angled projection. resulting from an angled projection. 12. Auto 8. Enter Automatically determines the best picture Enacts the selected On-Screen Display timings for the displayed image. (OSD) menu item. 10
-
 1
1 -
2
-
3
-
4
-
5
-
6
-
7
-
8
-
9
-
 10
10 -
 11
11 -
 12
12 -
 13
13 -
 14
14 -
 15
15 -
 16
16 -
 17
17 -
 18
18 -
 19
19 -
 20
20 -
21
-
22
-
23
-
24
-
25
-
26
-
27
-
28
-
29
-
30
-
31
-
32
-
33
-
34
-
35
-
36
-
37
-
38
-
39
-
40
-
41
-
42
-
43
-
44
-
45
-
46
-
47
-
48
-
49
-
50
-
51
-
52
-
53
-
54
-
55
-
56
-
57
-
58
-
59
-
60
-
61
-
62
-
63
-
64
-
65
-
66
-
67
-
68
-
69
-
70
-
71
-
72
-
73
-
74
-
75
-
76
-
77
-
78
-
79
-
80
-
81
-
82
-
83
-
84
-
85
-
86
-
87
-
88
-
89
-
90
-
91
-
92
-
93
-
94
-
95
-
96
-
97
-
98
-
99
-
100
-
101
 |
 |
