ViewSonic PJD6683ws PJD5126, PJD6223, PJD6253, PJD6553W, PJD5226, PJD5226W, PJ - Page 23
Connecting a computer or monitor
 |
View all ViewSonic PJD6683ws manuals
Add to My Manuals
Save this manual to your list of manuals |
Page 23 highlights
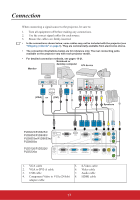
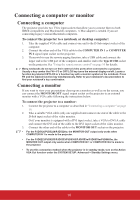
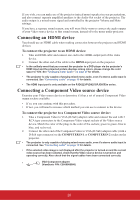
Connecting a computer or monitor Connecting a computer The projector provides two VGA input sockets that allow you to connect them to both IBM® compatibles and Macintosh® computers. A Mac adapter is needed if you are connecting legacy version Macintosh computers. To connect the projector to a notebook or desktop computer: 1. Take the supplied VGA cable and connect one end to the D-Sub output socket of the computer. 2. Connect the other end of the VGA cable to the COMPUTER IN 1 or COMPUTER IN 2 signal input socket on the projector. 3. If you wish to use the remote paging function, take a USB cable and connect the larger end to the USB port of the computer, and smaller end to the Type B USB socket on the projector. See "Using the remote mouse control" on page 10 for details. Many notebooks do not turn on their external video ports when connected to a projector. Usually a key combo like FN + F3 or CRT/LCD key turns the external display on/off. Locate a function key labeled CRT/LCD or a function key with a monitor symbol on the notebook. Press FN and the labeled function key simultaneously. Refer to your notebook's documentation to find your notebook's key combination. Connecting a monitor If you want to view your presentation close-up on a monitor as well as on the screen, you can connect the MONITOR OUT signal output socket on the projector to an external monitor with a VGA cable following the instructions below: To connect the projector to a monitor: 1. Connect the projector to a computer as described in "Connecting a computer" on page 18. 2. Take a suitable VGA cable (only one supplied) and connect one end of the cable to the D-Sub input socket of the video monitor. Or if your monitor is equipped with a DVI input socket, take a VGA to DVI-A cable and connect the DVI end of the cable to the DVI input socket of the video monitor. 3. Connect the other end of the cable to the MONITOR OUT socket on the projector. • For the PJD5126/PJD5226/PJD5226w, the MONITOR OUT output only works when COMPUTER IN 1 is made to the projector. • For the PJD6223/PJD6253/PJD6353/PJD6383/PJD6553w/PJD6653w/PJD6683w, the MONITOR OUT output only works when COMPUTER IN 1 or COMPUTER IN 2 is made to the projector. • To use this connection method when the projector is in standby mode, turn on the Active VGA Out function under the SYSTEM SETUP: Advanced > Standby Settings menu. 18
-
 1
1 -
2
-
3
-
4
-
5
-
6
-
7
-
8
-
9
-
10
-
11
-
12
-
13
-
14
-
15
-
16
-
17
-
 18
18 -
 19
19 -
 20
20 -
 21
21 -
 22
22 -
 23
23 -
 24
24 -
 25
25 -
 26
26 -
 27
27 -
 28
28 -
29
-
30
-
31
-
32
-
33
-
34
-
35
-
36
-
37
-
38
-
39
-
40
-
41
-
42
-
43
-
44
-
45
-
46
-
47
-
48
-
49
-
50
-
51
-
52
-
53
-
54
-
55
-
56
-
57
-
58
-
59
-
60
-
61
-
62
-
63
-
64
-
65
-
66
-
67
-
68
-
69
-
70
-
71
-
72
-
73
-
74
-
75
-
76
-
77
-
78
-
79
-
80
-
81
-
82
-
83
-
84
-
85
-
86
-
87
-
88
-
89
 |
 |