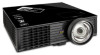
ViewSonic PJD6683ws PJD5126, PJD6223, PJD6253, PJD6553W, PJD5226, PJD5226W, PJ - Page 28
Using the menus
 |
View all ViewSonic PJD6683ws manuals
Add to My Manuals
Save this manual to your list of manuals |
Page 28 highlights
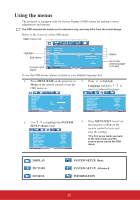
Using the menus The projector is equipped with On-Screen Display (OSD) menus for making various adjustments and settings. The OSD screenshots below are for reference only, and may differ from the actual design. Below is the overview of the OSD menu. Main menu icon Highlight Sub-menu Current input signal Screen Color Aspect Ratio Keystone Position Phase H. Size Zoom 3D Sync 3D Sync Invert Color Management Analog RGB Off Auto ENTER 16 0 Status On Disable MENU Exit Go to the previous page or to exit. To use the OSD menus, please set them to your familiar language first. 1. Press MENU/EXIT on the projector or Menu on the remote control to turn the OSD menu on. 3. Press to highlight Language and press / to select a preferred language. Screen Color Aspect Ratio Keystone Position Phase H. Size Zoom 3D Sync 3D Sync Invert Color Management Analog RGB Off Auto 16 0 On Disable MENU Exit Language Projector Position Auto Power Off Blank Timer Panel Key Lock Timer Controller Splash Screen Screen Capture Message LAN Control Settings Analog RGB English Front Table Disable Disable Off Disable ViewSonic On MENU Exit 2. Use / to highlight the SYSTEM SETUP: Basic menu. Language Projector Position Auto Power Off Blank Timer Panel Key Lock Timer Controller Splash Screen Screen Capture Message LAN Control Settings Analog RGB English Front Table Disable Disable Off Disable ViewSonic On MENU Exit 4. Press MENU/EXIT twice* on the projector or Exit on the remote control to leave and save the settings. *The first press leads you back to the main menu and the second press closes the OSD menu. : DISPLAY : PICTURE : SOURCE : SYSTEM SETUP: Basic : SYSTEM SETUP: Advanced : INFORMATION 23
-
 1
1 -
2
-
3
-
4
-
5
-
6
-
7
-
8
-
9
-
10
-
11
-
12
-
13
-
14
-
15
-
16
-
17
-
18
-
19
-
20
-
21
-
22
-
 23
23 -
 24
24 -
 25
25 -
 26
26 -
 27
27 -
 28
28 -
 29
29 -
 30
30 -
 31
31 -
 32
32 -
 33
33 -
34
-
35
-
36
-
37
-
38
-
39
-
40
-
41
-
42
-
43
-
44
-
45
-
46
-
47
-
48
-
49
-
50
-
51
-
52
-
53
-
54
-
55
-
56
-
57
-
58
-
59
-
60
-
61
-
62
-
63
-
64
-
65
-
66
-
67
-
68
-
69
-
70
-
71
-
72
-
73
-
74
-
75
-
76
-
77
-
78
-
79
-
80
-
81
-
82
-
83
-
84
-
85
-
86
-
87
-
88
-
89
 |
 |
