ViewSonic Pro8600 PRO8600 User Guide (English)
ViewSonic Pro8600 Manual
 |
View all ViewSonic Pro8600 manuals
Add to My Manuals
Save this manual to your list of manuals |
ViewSonic Pro8600 manual content summary:
- ViewSonic Pro8600 | PRO8600 User Guide (English) - Page 1
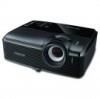
Pro8600 DLP Projector User Guide IMPORTANT: Please read this User Guide to obtain important information on installing and using your product in a safe manner, as well as registering your product for future service. Warranty information contained in this User Guide will describe your limited coverage - ViewSonic Pro8600 | PRO8600 User Guide (English) - Page 2
. This equipment generates, uses, and can radiate radio frequency energy, and if not installed and used in accordance with the instructions, may cause harmful interference to radio communications. However, there is no guarantee that interference will not occur in a particular installation - ViewSonic Pro8600 | PRO8600 User Guide (English) - Page 3
ventilation openings. Install the unit in accordance with the manufacturer's instructions. 8. Do not install near any heat sources such as radiators unused for long periods of time. 14. Refer all servicing to qualified service personnel. Servicing is required when the unit has been damaged in any - ViewSonic Pro8600 | PRO8600 User Guide (English) - Page 4
Declaration of RoHS Compliance This product has been designed and manufactured in compliance with Directive 2002/95/EC of the European Parliament and the Council on restriction of the use of certain hazardous substances in electrical and electronic equipment (RoHS Directive) and is deemed to comply - ViewSonic Pro8600 | PRO8600 User Guide (English) - Page 5
. PS/2, VGA and XGA are registered trademarks of International Business Machines Corporation. Disclaimer: ViewSonic Corporation shall not be please see the "Customer Support" section in this guide. For Your Records Product Name: Pro8600 ViewSonic DLP Projector Model Number: VS14805 Document - ViewSonic Pro8600 | PRO8600 User Guide (English) - Page 6
Cord must meet the requirement of countries where you use this projector. Please confirm your AC plug type with the graphics below Power Cord does not match your AC outlet, please contact your sales dealer. This projector is equipped with a grounding type AC line plug. Please ensure that your outlet - ViewSonic Pro8600 | PRO8600 User Guide (English) - Page 7
the Lens ...47 Cleaning the Projector Housing ...47 Cleaning the Filter Cover ...47 Replacing the Lamp ...48 Specifications 50 Dimensions ...51 Ceiling mount installation ...51 Appendix 52 LED Indicator Messages ...52 Compatibility Modes ...53 Troubleshooting ...54 RS-232 Command and Configuration - ViewSonic Pro8600 | PRO8600 User Guide (English) - Page 8
optical engine projection and a user - friendly design to deliver high reliability and ease of use. The projector offers the following features: • Single chip 0.7" Texas Instruments DLP® technology • XGA (1024 x 768 pixels) • Auto image re-sizing (Auto-Sync.) up to 1600 x 1200 full screen with - ViewSonic Pro8600 | PRO8600 User Guide (English) - Page 9
AC Power Cord Remote Control (IR) & batteries (AAA *2 PCS) VGA cable (D-SUB to D- ViewSonic CD Wizard SUB) Optional accessories Quick Start Guide Filter cover RS232 cable RGB to component adapter Projector Carrying Case Note • Contact you dealer immediately if any items are missing, appear - ViewSonic Pro8600 | PRO8600 User Guide (English) - Page 10
Projector Overview Front View 13 12 11 10 9 1 234 5 6 7 8 1. Lens cap 3. Elevator foot 5. Projection lens 7. Ventilation holes (intake) 9. Speaker 11. Zoom ring 13. Lamp cover 2. Elevator button 4. Lens cap strap 6. Front IR remote control sensor 8. Filter cover 10. Focus ring 12. Control - ViewSonic Pro8600 | PRO8600 User Guide (English) - Page 11
control sensor 6. Ventilation holes (exhaust) 3 1 2 1. Ceiling mount holes (M4*8) 3. Security bar 2. Tilt-adjustment feet Note • This projector can be used with a ceiling mount for support. The ceiling mount is not included in the package. • Contact your dealer for information to mount the - ViewSonic Pro8600 | PRO8600 User Guide (English) - Page 12
Indicator Messages". 3. LAMP (Lamp LED indicator) Refer to "LED Indicator Messages". 4. Keystone/Arrow keys ( /Up, /Down) Manually correct distorted images exit the on-screen display menus. 9. Power Turn the projector on or off. 10. Right/Panel key Activate panel key lock. 11. Left/Blank Hide - ViewSonic Pro8600 | PRO8600 User Guide (English) - Page 13
18 17 16 15 14 13 12 11 10 1. RS-232 When operating the projector via a computer, connect this to the controlling computer's RS-232C port. 2. to this jack. 5. Service This connector is for firmware update and mouse function support. 6. USB B USB display supports computer connection via USB mini - ViewSonic Pro8600 | PRO8600 User Guide (English) - Page 14
Connect an audio output from video equipment or computer to this jack. 15. Audio 3 (L/R) Connect an audio output from video equipment to this jack. 16. Video Connect composite video output from video equipment to this jack. 17. Computer in 2 Connect image input signal (analog RGB or component) to - ViewSonic Pro8600 | PRO8600 User Guide (English) - Page 15
Remote Control 13 14 3 15 4 16 17 5 18 4 6 19 7 20 8 21 9 22 10 23 11 24 12 25 1. Power Turn the projector on or off. 2. VGA Switch input source to Computer in 1 (analog RGB or component)/Computer in 2 (analog RGB or component) by sequence. 3. Source/Page up - ViewSonic Pro8600 | PRO8600 User Guide (English) - Page 16
15. HDMI Display HDMI signal. 16. Auto/Page down Resynchronize the projector to the input signal from a computer. This function is available for mode is activated. 20. Volume Adjust the volume level. 21. Lamp Off/On Turn off or on the lamp power. 22. P-Timer Activate P-Timer OSD menu. 23. Aspect - ViewSonic Pro8600 | PRO8600 User Guide (English) - Page 17
the remote mouse control The capability of operating your computer with the remote control gives you more flexibility when delivering presentations. 1. Connect the projector to your PC or notebook with a USB cable prior to using the remote control in place of your computer's mouse. See "Connecting - ViewSonic Pro8600 | PRO8600 User Guide (English) - Page 18
the battery cover into position. Caution • Risk of explosion if battery is replaced by an incorrect type. • Dispose of used batteries according to the instructions. • Make sure the plus and minus terminals are correctly aligned when loading a battery. Note • Keep the batteries out of the reach of - ViewSonic Pro8600 | PRO8600 User Guide (English) - Page 19
sensor and press a button. • Operating the projector from the front 5m • Operating the projector from the rear 15 15 5m 5m 9m 7m not operate when there is sunlight or other strong light such as a fluorescent lamp shining on the remote sensor. • Operate the remote control from a position where - ViewSonic Pro8600 | PRO8600 User Guide (English) - Page 20
cable 10. HDMI cable 12. USB flash drive Important • In the connections shown above, some cables may not be included with the projector (see "Package Contents" on page 2). They are commercially available from electronics stores. • The connection illustrations above are for reference only. The rear - ViewSonic Pro8600 | PRO8600 User Guide (English) - Page 21
the USB port of the computer, and the other end to the Service socket on the projector. See "Using the remote mouse control" on page 10 for details projector to an external monitor with a VGA cable following the instructions below: To connect the projector to a monitor: 1. Connect the projector to - ViewSonic Pro8600 | PRO8600 User Guide (English) - Page 22
source device, you should elect to use the S-Video option. See "Connecting an S-Video source device" on page 16 for how to connect the projector to an S-Video device. Least video quality Composite Video is an analog video and will result in a perfectly acceptable, but less than optimal result from - ViewSonic Pro8600 | PRO8600 User Guide (English) - Page 23
image is not displayed after the projector is turned on and the correct video source has been selected, check that the Video source device is turned on and operating correctly. Also check that the signal cables have been connected correctly. • RGB to component adapter (ViewSonic P/N: J2552-0212-00 - ViewSonic Pro8600 | PRO8600 User Guide (English) - Page 24
can continue with this procedure. • If not, you will need to reassess which method you can use to connect to the device. To connect the projector to a composite Video source device: 1. Take a Video cable and connect one end to the composite Video output socket of the Video source device. 2. Connect - ViewSonic Pro8600 | PRO8600 User Guide (English) - Page 25
This focal point concentrates high temperature. Do not place any object near it to avoid possible fire hazard. Powering Off the Projector: 1. Press to turn off the projector lamp. You will see a message "Power off" appear on the screen. 2. Press again to confirm. • When the Power LED begins flashing - ViewSonic Pro8600 | PRO8600 User Guide (English) - Page 26
height. To raise or lower the image: 1. To raise or lower the image, press the elevator button and raise or lower the front of the projector. Release the button to lock the adjustment. 2. To level the image on the screen, turn the tilt-adjustment feet to fine-tune the height. Note - ViewSonic Pro8600 | PRO8600 User Guide (English) - Page 27
among these numbers due to optical component variations. It is recommended that if you intend to permanently install the projector, you should physically test the projection size and distance using the actual projector in situ before you permanently install it, so as to make allowance for this - ViewSonic Pro8600 | PRO8600 User Guide (English) - Page 28
will still be in locked status the next time it is turned on. Creating your own startup screen In addition to selecting the projector preset startup screen from ViewSonic logo or User screen, you can make your own startup screen that is an image projected from your computer or video source. 1. Press - ViewSonic Pro8600 | PRO8600 User Guide (English) - Page 29
from the preset time to 0. 6. To activate the presentation timer, highlight Presentation Timer and press / to select On and press ENTER on the projector or Enter on the remote control. To cancel the timer, perform the following steps: 1. Go to the Setting > Presentation Timer > Presentation Timer - ViewSonic Pro8600 | PRO8600 User Guide (English) - Page 30
Menu Operation The projector has multilingual on-screen display menus that allow you to make image adjustments and change a variety of settings. Video/Audio Auto Keystone Color Temp. Red - ViewSonic Pro8600 | PRO8600 User Guide (English) - Page 31
, T2 On, Off On, Off Message 0 - 240 Min Always, 1 Min, 2 Min, 3 Min, Never Top-Left, Bottom-Left, Top-Right, Bottom-Right Count Down, Count Up ViewSonic, User -5 - +5 On, Off On, Off On, Off On, Off 24 - ViewSonic Pro8600 | PRO8600 User Guide (English) - Page 32
Hours*2 Filter Hours Reset*2 Lamp Hours Lamp Hours Reset Factory Default function is only available when the projector is installed an optional filter supported under Component, Video and S-Video modes. *5 Sharpness is supported under HDMI, Component, Video and S-Video modes. *6 Tint is supported - ViewSonic Pro8600 | PRO8600 User Guide (English) - Page 33
item and adjust the settings with / . 5. Press MENU on the projector or Menu on the remote control, the screen will return to the main menu. 6. To exit correct distorted images resulting from an angled projection. Keystone Manually correct distorted images resulting from an angled projection. • - ViewSonic Pro8600 | PRO8600 User Guide (English) - Page 34
With greater gamma value, dark scenery will look brighter. 3D Sync (for TI 3D DLP-LINK only) • On: Enable 3D function. • Off: Disable 3D function 3D Sync Frequency Adjust the timing of the projector relative to the computer. Tracking Adjust the phase of the projector relative to the computer. H - ViewSonic Pro8600 | PRO8600 User Guide (English) - Page 35
turn off. Auto Source Automatically scan through all the input sources. ECO Mode Use this function to dim the projector lamp light output which will lower power consumption and increase lamp life. • This function will be unavailable when the DCR function is on. Filter Mode Use this function to - ViewSonic Pro8600 | PRO8600 User Guide (English) - Page 36
full speed continuously to achieve proper high altitude cooling of the projector. OSD Timeout Duration of OSD menu display countly starts (at is under 0.5W. DC 12V 1. When Green Mode is off and the projector is under standby mode, you can enable or disable to trigger external devices such as - ViewSonic Pro8600 | PRO8600 User Guide (English) - Page 37
contrast performance. DCR will impact lamp life and system noise performance. Off", that means user will set IP address by manually. • IP Address: Numerical address to identify networked computers The IP Address is the number that identifies this projector on the network. You cannot have two devices - ViewSonic Pro8600 | PRO8600 User Guide (English) - Page 38
DHCP is set to Off. • The IP Address is the number that identifies this projector on the network. You cannot have two devices with the same IP Address on the filter Hour to 0 hours. Lamp Hours Display the lamp's elapsed operating time (in hours). Lamp Hours Reset Reset the lamp Hour to 0 hours. - ViewSonic Pro8600 | PRO8600 User Guide (English) - Page 39
control. 4. Make sure the Status is Connect. 5. Press to highlight DHCP and press / to select On. 6. Press to highlight Apply and press ENTER on the projector or Enter on the remote control. 7. Please wait for around 15 - 20 seconds, and then re-enter the Wired LAN page. The IP Address, Subnet - ViewSonic Pro8600 | PRO8600 User Guide (English) - Page 40
DNS settings will display 0.0.0.0. Make sure the cables are properly connected and perform the procedures above again. • If you wish to connect to the projector in its standby mode, be sure you have selected RJ45 and obtained the IP Address, Subnet Mask, Default Gateway, and DNS information when the - ViewSonic Pro8600 | PRO8600 User Guide (English) - Page 41
dongle To connect to the projector wirelessly, you have to plug a ViewSonic wireless dongle (optional) to the USB Type A connector on the projector, and then only a few OSD configuration steps are required. 1. Make sure the projector is turned on. 2. Press MENU/EXIT on the projector or Menu on the - ViewSonic Pro8600 | PRO8600 User Guide (English) - Page 42
7.0 or higher. • The screenshots in this manual are for reference only, and may differ from the actual design. 1. Enter the address of the projector in the address bar of your browser and press Enter. 2. The main page of the ViewSonic webpage control system appears. 3 5 6 4 3. To change - ViewSonic Pro8600 | PRO8600 User Guide (English) - Page 43
to go back to previous OSD menus, exit and save menu settings. • The source list varies according to the connectors available on the projector. • When you use the projector control panel or remote control to change the OSD menu settings, it may take a while for the web browser to synchronize these - ViewSonic Pro8600 | PRO8600 User Guide (English) - Page 44
only used with the Crestron Control System. Please contact Creston or refer to its user manual for setup information. v. Click the down arrow to reveal a drop down list and select a default language. vi. You can name the projector, keep track of its location and the person in charge of it. vii. You - ViewSonic Pro8600 | PRO8600 User Guide (English) - Page 45
(N/A) New Password 20 Confirm 2 Admin Password Enabled (N/A) New Password 20 Confirm 20 The info page displays the information and status of this projector. Press Exit to go back to the remote network operation page. After pressing the button "Help", the Title window will appear in the - ViewSonic Pro8600 | PRO8600 User Guide (English) - Page 46
On the "Edit Room" page, enter the IP Address (or hostname) as shown on the projector's on-screen display (OSD) menu, and "05" for IPID, "41794" for the reserved method, please access below website to get RoomView User Guide and more information: http://www.crestron.com/features/roomview_connected_embedded_projectors_devices/ resources. - ViewSonic Pro8600 | PRO8600 User Guide (English) - Page 47
in the Search result list, and click Connect directly. You can also type a desired projector name and click Search. iii. You can link to the ViewSonic webpage control system on page 35. • If you are the first time user, choose your identity as a Normal user or Administrator. Both require no - ViewSonic Pro8600 | PRO8600 User Guide (English) - Page 48
2. If you want to freeze the projected image on the screen, press . Any further movements will be not been seen on the screen until is pressed. 3. You can choose a capture mode from here. i. To display a full screen, click FullScreen. ii. To display a partial screen, click FixedSize. A square - ViewSonic Pro8600 | PRO8600 User Guide (English) - Page 49
To adjust the capture rate, move the slide bar. The network bandwidth may also affect the performance. iii. Network port setting for fixed or manual type. 6. You can manage the connected projectors listed under Device Management. • Under a conference mode: 1. Only the administrator can take control - ViewSonic Pro8600 | PRO8600 User Guide (English) - Page 50
an administrator and have authority to change the password. You are the user of the projector. Icon You are an administrator of the projector. Sets a display zone for the projector. Description Disconnects from the projector. Opens the web page of the Network Control. There is another user of the - ViewSonic Pro8600 | PRO8600 User Guide (English) - Page 51
automatically displays the main screen. Or your can manually select USB A from the source selection bar. 3. Press ENTER on the projector or Enter on the remote control to display the content of your USB storage device. 4. Folders and supported files are represented in thumbnail mode. • To scroll - ViewSonic Pro8600 | PRO8600 User Guide (English) - Page 52
When viewing thumbnails • Next: Selects the next folder/image. • Previous: Selects the previous folder/image. • Thumbnail/Full Screen/SlideShow: Displays the selected image in thumbnail/ Full Screen/SlideShow mode. • NameOrder/ExtendOrder/SizeOrder/TimeOrder: Sets the images to be displayed in the - ViewSonic Pro8600 | PRO8600 User Guide (English) - Page 53
formats are recommended for the USB hard disk: FAT12/FAT16/ FAT32 (NTFS format is not supported). • Some USB flash drives may not work correctly with the projector. • The security USB flash drive is not supported. • Do not connect any apparatus other than USB storage devices and other equipment for - ViewSonic Pro8600 | PRO8600 User Guide (English) - Page 54
first. Warning • Never open any of the covers on the projector. Dangerous electrical voltages inside the projector can cause severe injury. Do not attempt to service this product yourself. Refer all servicing to qualified service personnel. Cleaning the Lens Gently wipe the lens with lens cleaning - ViewSonic Pro8600 | PRO8600 User Guide (English) - Page 55
if a warning message is displayed. Do not attempt to replace the lamp yourself. Contact the qualified service personnel for replacement. Type number: RLC-076 Note • The lamp is extremely hot right after turning off the projector. If you touch the lamp, you may scald your finger. When you replace the - ViewSonic Pro8600 | PRO8600 User Guide (English) - Page 56
remove the cover. 5. Remove the screws from the lamp module, raise the handle, and lift out the module. 6. Insert the new lamp module into the projector and tighten the screws. 7. Replace the lamp cover and tighten the screw. 8. Turn on the projector. If the lamp does not turn on after the warm-up - ViewSonic Pro8600 | PRO8600 User Guide (English) - Page 57
0.7" DLP panel Resolution XGA (1024 × 768 pixels) Zoom 1.5X F/No. 2.41 - 2.97 Focal length 20.72 - 31mm Screen size 30" - 300" Lamp 350W mini jack) x 1 Control terminal RS-232 x 1, USB B type x 1 (supports firmware upgrade and remote mouse control), RJ45 x 1, 12-Vdc trigger output x 1 - ViewSonic Pro8600 | PRO8600 User Guide (English) - Page 58
Dimensions 335 mm (W) x 267 mm (D) x 132 mm (H) 267 132 Ceiling mount installation 227 174 103 335 64.5 84.9 Ceiling mount screws: M4 x 8 (Max. L = 8 mm) Unit: mm 51 - ViewSonic Pro8600 | PRO8600 User Guide (English) - Page 59
Power LED (Blue) Solid Lamp LED (Red) Off Temp LED (Red) Off Flash Off Off Flash Flash Solid Solid Solid Solid Off Flash Solid Solid Off Off Off Off Flash Meaning Standby mode when green mode is turned on. Standby mode when green mode is turned off. Lamp ignition fail Cooling mode - ViewSonic Pro8600 | PRO8600 User Guide (English) - Page 60
Compatibility Modes Computer: Compatibility VGA (Expanded) DOS/Text mode visible Resolution 640 x 480 SVGA (Expanded) 800 x 600 XGA (Native) 1024 x 768 SXGA (Compressed) 1280 x 1024 UXGA (Compressed) Mac 13 Mac 16 Mac 19 Others 1600 x 1200 640 x 480 832 x 624 1024 x 768 1280 x - ViewSonic Pro8600 | PRO8600 User Guide (English) - Page 61
Troubleshooting Refer to the symptoms and measures listed below before sending the projector for repairs. If the problem persists, contact your local reseller or service center. Please refer to "LED Indicator Messages" as well. Start-up problems If no lights turn on: • Be sure that the power cord is - ViewSonic Pro8600 | PRO8600 User Guide (English) - Page 62
RS-232 Command and Configuration D-Sub 9 pin 1 1 CD 2 RXD 3 TXD 4 DTR 5 GND 6 DSR 7 RTS 8 CTS 9 RI Baud Rate Data Length Parity Check Stop Bit Flow Control POWER ON POWER OFF Computer 1 Computer 2 COMPONENT COMPOSITE S-VIDEO HDMI USB A USB B LAN MENU UP DOWN LEFT RIGHT ENTER Wire List C1 COLOR 1 - ViewSonic Pro8600 | PRO8600 User Guide (English) - Page 63
RESYNC ASPECT MUTE FREEZE BLANK SOURCE DCR ON DCR OFF ECO ON ECO OFF VOLUME INC VOLUME DEC KEYSTONE INC KEYSTONE DEC LAMP HOURS RESET FILTER HOURS RESET FACTORY RESET FIRMWARE VERSION BE,EF,02,06,00,86,D1,2F,00,00,00,00,00 BE,EF,03, - ViewSonic Pro8600 | PRO8600 User Guide (English) - Page 64
IR Control Code System Code: 83F4 Format : NEC 87 08 6C 67 02 64 82 83 8C 81 85 84 8D 0A 69 60 0D 0E 0F 63 80 8E 6B 8F 57 - ViewSonic Pro8600 | PRO8600 User Guide (English) - Page 65
.com/uk/support/call-desk/ Hong Kong www.hk.viewsonic.com T= 852 3102 2900 [email protected] India www.in.viewsonic.com T= 1800 266 0101 [email protected] Korea www.kr.viewsonic.com T= 080 333 2131 [email protected] Latin America (Argentina) www.viewsonic.com/la - ViewSonic Pro8600 | PRO8600 User Guide (English) - Page 66
lamp from the date of the first consumer purchase. Other regions or countries: Please check with your local dealer or local ViewSonic office for the warranty information. Limited One (1) year Heavy Usage Warranty: Under heavy usage settings, where a projector instructions authorized by ViewSonic. e. - ViewSonic Pro8600 | PRO8600 User Guide (English) - Page 67
, contact ViewSonic Customer Support (please refer to "Customer Support" page). You will need to provide your product's serial number. 2. To obtain warranted service, you will be required to provide (a) the original dated sales slip, (b) your name, (c) your address, (d) a description of the problem - ViewSonic Pro8600 | PRO8600 User Guide (English) - Page 68
lamp, 3 years for labor, 1 year for the original lamp from the date of the first consumer purchase. Lamp instructions service charges. How to get service: For information about receiving service under warranty, contact ViewSonic Customer Support (Please refer to the attached Customer Support - ViewSonic Pro8600 | PRO8600 User Guide (English) - Page 69
Service (Centro Autorizado de Servicio) within Mexico: Name, address, of manufacturer and importers: México, Av. de la Palma #8 Piso 2 Despacho 203, Corporativo Interpalmas, Col. San Fernando Huixquilucan, Estado de México Tel: (55) 3605-1099 http://www.viewsonic Services USA SUPPORT: ViewSonic - ViewSonic Pro8600 | PRO8600 User Guide (English) - Page 70
-
 1
1 -
 2
2 -
 3
3 -
 4
4 -
 5
5 -
 6
6 -
 7
7 -
8
-
9
-
10
-
11
-
12
-
13
-
14
-
15
-
16
-
17
-
18
-
19
-
20
-
21
-
22
-
23
-
24
-
25
-
26
-
27
-
28
-
29
-
30
-
31
-
32
-
33
-
34
-
35
-
36
-
37
-
38
-
39
-
40
-
41
-
42
-
43
-
44
-
45
-
46
-
47
-
48
-
49
-
50
-
51
-
52
-
53
-
54
-
55
-
56
-
57
-
58
-
59
-
60
-
61
-
62
-
63
-
64
-
65
-
66
-
67
-
68
-
69
-
70
 |
 |

Pro8600
DLP Projector
User Guide
Model No. VS14805
IMPORTANT: Please read this User Guide to obtain important information on installing
and using your product in a safe manner, as well as registering your product for future
service. Warranty information contained in this User Guide will describe your limited
coverage from ViewSonic Corporation, which is also found on our web site at http://
www.viewsonic.com in English, or in specific languages using the Regional selection
box in the upper right corner of our website. “Antes de operar su equipo lea cu
idadosamente las instrucciones en este manual”