ViewSonic Pro8600 PRO8600 User Guide (English) - Page 47
Displaying images through vsPresenter, Downloading and installing vsPresenter, Using vsPresenter
 |
View all ViewSonic Pro8600 manuals
Add to My Manuals
Save this manual to your list of manuals |
Page 47 highlights
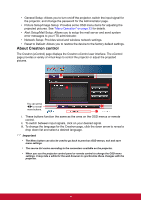
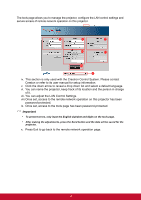
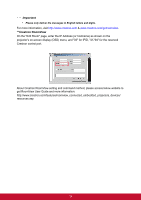
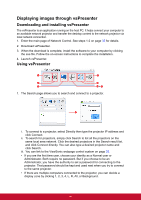
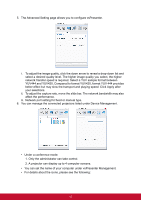
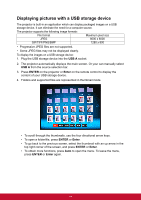
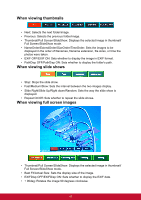
Displaying images through vsPresenter Downloading and installing vsPresenter The vsPresenter is an application running on the host PC. It helps connect your computer to an available network projector and transfer the desktop content to the network projector via local network connection. 1. Enter the main page of Network Control. See steps 1-2 on page 35 for details. 2. Download vsPresenter. 3. When the download is complete, install the software to your computer by clicking the exe file. Follow the on-screen instructions to complete the installation. 4. Launch vsPresenter. Using vsPresenter 1 7 2 6 3 4&5 1. The Search page allows you to search and connect to a projector. i. To connect to a projector, select Directly then type the projector IP address and click Connect. ii. To search for projectors, simply click Search to list all the projectors on the same local area network. Click the desired projectors in the Search result list, and click Connect directly. You can also type a desired projector name and click Search. iii. You can link to the ViewSonic webpage control system on page 35. • If you are the first time user, choose your identity as a Normal user or Administrator. Both require no password. But if you choose to be an Administrator, you have the authority to set a password for connecting to the projector. That password should be kept and used next when you try to connect to the same projector. • If there are multiple computers connected to the projector, you can decide a display zone by clicking 1, 2, 3, 4, L, R, All, or Background. 40
-
 1
1 -
2
-
3
-
4
-
5
-
6
-
7
-
8
-
9
-
10
-
11
-
12
-
13
-
14
-
15
-
16
-
17
-
18
-
19
-
20
-
21
-
22
-
23
-
24
-
25
-
26
-
27
-
28
-
29
-
30
-
31
-
32
-
33
-
34
-
35
-
36
-
37
-
38
-
39
-
40
-
41
-
 42
42 -
 43
43 -
 44
44 -
 45
45 -
 46
46 -
 47
47 -
 48
48 -
 49
49 -
 50
50 -
 51
51 -
 52
52 -
53
-
54
-
55
-
56
-
57
-
58
-
59
-
60
-
61
-
62
-
63
-
64
-
65
-
66
-
67
-
68
-
69
-
70
 |
 |
