Viking VGSO100SS Installation Instructions - Page 10
Installation (30”W., Door Replacement & Adjustment (30”W
 |
View all Viking VGSO100SS manuals
Add to My Manuals
Save this manual to your list of manuals |
Page 10 highlights
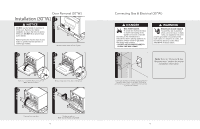
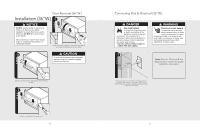
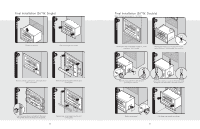
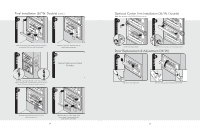
Final Installation (30"W.) 1 2 Remove racks. 3 Unscrew pallet screws from side of oven. 4 Lift oven into position. 5 Push oven straight into cabinet. 6 Attach screws to the side of the framing. Note: Four screws (two on each side). (Screws not included.) 18 Replace racks. Door Replacement & Adjustment (30"W.) 1 2 Replace door. 3 Open door completely. Reinstall hinge trim plates. Note: Screw holes may need to be re-aligned. 4 Take out pins. Note: To adjust door turn adjustment screw clockwise (up) or counterclockwise (down). Close door. 19
-
 1
1 -
2
-
3
-
4
-
 5
5 -
 6
6 -
 7
7 -
 8
8 -
 9
9 -
 10
10 -
 11
11 -
 12
12 -
 13
13 -
 14
14 -
 15
15 -
16
 |
 |

19
1
2
Replace door.
Open door completely. Reinstall hinge trim plates.
Note:
Screw holes may need to be re-aligned.
3
4
Take out pins.
Note:
To adjust door turn adjustment screw
clockwise (up) or counterclockwise (down).
Close door.
Door Replacement & Adjustment (30”W.)
18
1
2
Remove racks.
Unscrew pallet screws from side of oven.
3
4
Lift oven into position.
Push oven straight into cabinet.
5
6
Attach screws to the side of the framing.
Note:
Four screws (two on each side).
(Screws not included.)
Replace racks.
Final Installation (30”W.)