Viking VGSO100SS Installation Instructions - Page 8
General Informatio, Installation (30”W., Door Removal (30”W., Site Preparation - wall oven
 |
View all Viking VGSO100SS manuals
Add to My Manuals
Save this manual to your list of manuals |
Page 8 highlights
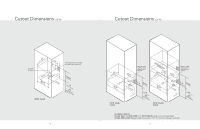
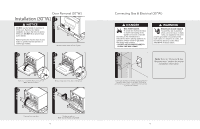
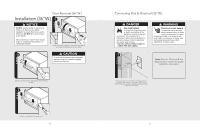
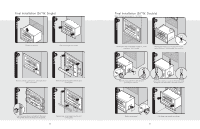
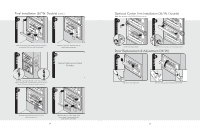
General Information READ AND FOLLOW ALL WARNING AND CAUTION INFORMATION WHEN INSTALLING THIS APPLIANCE. • All openings in the wall behind the appliance or in the floor under the appliance should be sealed. • Keep appliance area clear and free from combustible materials, gasoline and other flammable vapors. • Disconnect the electrical supply prior to servicing or cleaning. • When removing the appliance for cleaning or service, disconnect AC power supply and carefully remove the appliance by pulling forward. • Electrical requirements are listed in the product specifications under the "Electrical & Gas Requirements" section. • Do not obstruct the flow of combustion and ventilation air. CAUTION Avoid any damage to oven vents. The vents need to be unobstructed and open to provide proper airflow for optimal oven performance. CAUTION The cooling fan should be operating when the unit is in operation. If you notice the cooling fan is not operating or you observe unusual or excessive noise coming from the cooling fan, contact a Viking Authorized Service Center before continuing operation. Failure to do so can result in damage to the oven or surrounding cabinets. Moving, Handling, and Unpacking Remove and discard all packing materials, including cardboard and tape on the outside and inside of the ovens. Some stainless steel parts may have a plastic protective wrap which must be peeled off. The interior should be washed thoroughly with hot, soapy water to remove film residues and any dust or debris before being used, then rinsed and wiped dry. Solutions stronger than soap and water are rarely needed. Recommendations for Unpacking • Products are shipped on pallets with foam footings and corrugated inner-packing and exterior hoods. • Products are anchored to the pallet using metal straps that are screwed to the bottom of the product and the pallet. • DO NOT remove protective packaging until you are ready to perform the installation. • To remove the packaging, first remove the staples located at the bottom perimeter of the corrugated cover. • Remove the corrugated cover by lifting it off the product and remove the innerpacking. • Detach the product from the metal anchor strip by removing the attachment screw. 14 General Information (cont.) Recommendations for Moving • The appliance is heavy - use extreme care when handling! NOTICE DO NOT use the handle or oven door to lift the oven. Remove door before installation to ensure that it is not used to lift the unit. DO NOT lift or carry the door by the handle. Removing the door must be done by your dealer, a qualified licensed plumber, or certified gas installer. • Only proper equipment should be used to move products. • ALWAYS take steps to protect flooring at the installation location when moving products. Installation Site Preparation Note: It is recommended that a thorough site inspection be conducted PRIOR to unpacking and moving this appliance. • WARNING: DO NOT use the handle or oven door to lift the oven. Remove door before installation to ensure that it is not used to lift the unit. Make sure pins are inserted into hinges before removing door to prevent personal injury to hands and/or fingers. Do not lift or carry the door by the handle. • Confirm available access to adequate power - see electrical requirements. -Single oven units require a 30 amp circuit -Double oven units require a 50 amp circuit Note: A minimum of 2" spacing above and below the oven to any adjacent items is required for ventilation purposes. • It is recommended that 3/4" or larger material be utilized to create a support platform for this appliance. • BE SURE that support for this appliance is perpendicular to the front facing of the wall or cabinet before you perform the installation. • Use of a hydraulic lift is recommended for the installation of double oven units. • All openings in the wall behind the appliance or in the floor under the appliance should be sealed. • Keep appliance area clear and free from combustible materials, gasoline and other flammable vapors. • WARNING: DO NOT USE AN EXTENSION CORD WITH THIS APPLIANCE. SUCH USE MAY RESULT IN FIRE, ELECTRICAL SHOCK OR OTHER PERSONAL INJURY. 15
-
 1
1 -
2
-
 3
3 -
 4
4 -
 5
5 -
 6
6 -
 7
7 -
 8
8 -
 9
9 -
 10
10 -
 11
11 -
 12
12 -
 13
13 -
14
-
15
-
16
 |
 |