Viking VGSO100SS Installation Instructions - Page 11
Installation (36”W. Singl, Connecting Gas & Electrical 36W., Door Removal 36W.
 |
View all Viking VGSO100SS manuals
Add to My Manuals
Save this manual to your list of manuals |
Page 11 highlights
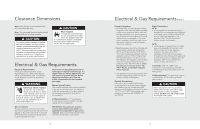
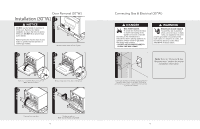
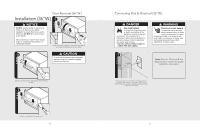
Door Removal (36"W.) Installation (36"W.) 1 2 2 NOTICE DO NOT use the handle or oven door to lift the oven. Remove door before installation to ensure that it is not used to lift the unit. DO NOT lift or carry the door by the handle. Removing the door must be done by your dealer, a qualified licensed plumber, or certified gas installer. 1 20° Open door approximately 20°, then slowly pull upward until the door stop pops out of door socket. 2 CAUTION To avoid risk of personal injury or property damage, verify door stops are engaged before removing door. Gently close until the door rests against one of the stop notches. 3 Slide door completely from hinge arms. 20 Connecting Gas & Electrical (36"W.) DANGER Gas leak hazard. To avoid risk of personal injury or death; leak testing of the appliance must be conducted according to the manufacturer's instructions. Before placing appliance in operation, always check for gas leaks with soapy water solution. • DO NOT USE AN OPEN FLAME TO CHECK FOR GAS LEAKS. 1 WARNING Electrical shock hazard. To avoid the risk of electrical shock, personal injury or death; verify your appliance has been properly grounded in accordance with local codes or in absence of codes, with the National Electrical Code (NEC). ANSI/NFPA 70-latest edition. Note: Refer to "Electrical & Gas Requirements" section for proper installation information. Connect gas and electrical. Before placing appliance in operation, always check for gas leaks. This must be performed by your dealer, a qualified licensed plumber, or gas service company. 21
-
 1
1 -
2
-
3
-
4
-
5
-
 6
6 -
 7
7 -
 8
8 -
 9
9 -
 10
10 -
 11
11 -
 12
12 -
 13
13 -
 14
14 -
 15
15 -
 16
16
 |
 |
