Viking VGSO100SS Installation Instructions - Page 13
Final Preparatio, Performance Checklis, option
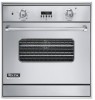 |
View all Viking VGSO100SS manuals
Add to My Manuals
Save this manual to your list of manuals |
Page 13 highlights
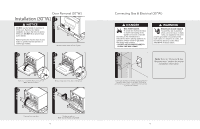
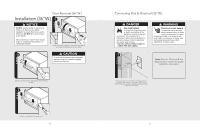
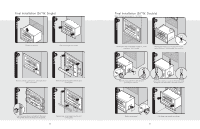
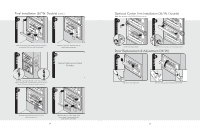
Final Installation (36"W. Double) (cont.) 7 8 Remove all knobs, push buttons, bezels, and lower access panel, side trim, and control panel. 9 2 1 3 Attach 8" pipe nipple through lower oven cabinet to upper oven pipe tee. Attach female connector to pipe nipple. Attach flex tubing to female connector. 11 Remove control box, disconnecting the three harness connectors. 10 Connect gas line and check for leaks. 12 Reconnect three harness connectors and replace control box. 24 Replace side trim, control panel, lower access panel, control panel knobs, push buttons, and bezels. Optional Center Trim Installation (36"W. Double) Note: With purchase of DCT-VGSO-SS center trim kit. 1 2 option option Install mounting brackets. Insert center trim piece over mounting brackets. Door Replacement & Adjustment (36"W.) 1 2 3 Place door onto hinge arms. 1 2 Pull door stops up and slowly slide door down. 25
-
 1
1 -
2
-
3
-
4
-
5
-
6
-
7
-
 8
8 -
 9
9 -
 10
10 -
 11
11 -
 12
12 -
 13
13 -
 14
14 -
 15
15 -
 16
16
 |
 |
