Viking VMOH330 Installation Instructions - Page 8
Mounting Oven To The Wall, Preparation Of Top Cabinet
 |
View all Viking VMOH330 manuals
Add to My Manuals
Save this manual to your list of manuals |
Page 8 highlights
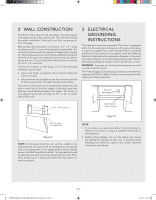
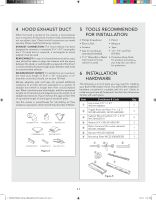
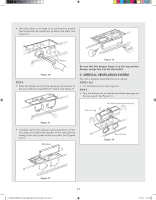
• Position mounting plate on wall and insert toggle bolt assemblies through the drywall holes or start the lag screw(s) through the wall stud(s). See Figure 20. Space more than wall thickness STEP 2 • Lift the microwave oven and tilt it forward. • Hang the unit on two tabs at the bottom of the mounting plate. See Figure 22. Dry Wall Figure 20 • Next, secure mounting plate to the wall by tightening toggle bolt assemblies or lag screw(s). See Figure 21. Figure 22 Figure 21 • Drill 3/16" diameter lag screw hole(s), into one or more wall studs. (Remember, you must have at least one lag screw secured to a wall stud.) For stud location refer to WALL CONSTRUCTION, see page 3. • Tighten the lag screw(s) into wall stud(s). MOUNTING OVEN TO THE WALL NOTE: IT IS VERY IMPORTANT THAT THIS OVEN BE INSTALLED BY TWO PEOPLE. IMPORTANT: DO NOT GRIP OR USE HANDLE DURING INSTALLATION. PREPARATION OF TOP CABINET You need to drill holes for the top support screws and a hole large enough for the power cord to fit through. • Read the instructions on the TOP CABINET TEMPLATE. • Tape it underneath the top cabinet. • Drill the holes, following the instructions on the template. NOTE: TOP CABINET TEMPLATE instruction must be installed to proceed. STEP 1 • Protect the top of your range by placing a portion of the carton or some other heavy material over the cooking surface before mounting your oven. STEP 3 • Thread power cord through the hole at the bottom of the top cabinet. • Swing the unit upward to meet the top of the mounting plate and hold it securely. See Figure 23. Figure 23 1.TINSKB278MRR0_Viking_VMOH330SS_OTR_Install_E,S,F.indd 8 E 8 1/31/19 11:07 AM
-
 1
1 -
2
-
 3
3 -
 4
4 -
 5
5 -
 6
6 -
 7
7 -
 8
8 -
 9
9 -
 10
10 -
 11
11 -
 12
12 -
 13
13 -
14
-
15
-
16
-
17
-
18
-
19
-
20
-
21
-
22
-
23
-
24
-
25
-
26
-
27
-
28
-
29
-
30
-
31
-
32
-
33
-
34
-
35
-
36
 |
 |
