Vivitar DVR 508HD DVR 508 Camera Manual - Page 59
Get started
 |
View all Vivitar DVR 508HD manuals
Add to My Manuals
Save this manual to your list of manuals |
Page 59 highlights
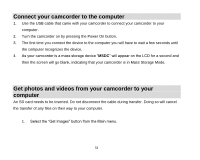
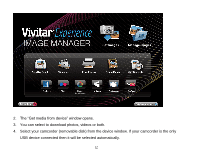
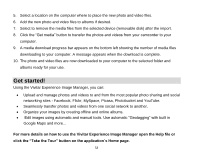
5. Select a location on the computer where to place the new photo and video files. 6. Add the new photo and video files to albums if desired. 7. Select to remove the media files from the selected device (removable disk) after the import. 8. Click the "Get media" button to transfer the photos and videos from your camcorder to your computer. 9. A media download progress bar appears on the bottom left showing the number of media files downloading to your computer. A message appears when the download is complete. 10. The photo and video files are now downloaded to your computer to the selected folder and albums ready for your use. Get started! Using the Vivitar Experience Image Manager, you can: Upload and manage photos and videos to and from the most popular photo sharing and social networking sites - Facebook, Flickr, MySpace, Picasa, Photobucket and YouTube. Seamlessly transfer photos and videos from one social network to another. Organize your images by creating offline and online albums. Edit images using automatic and manual tools. Use automatic "Geotagging" with built in Google Maps and more... For more details on how to use the Vivitar Experience Image Manager open the Help file or click the "Take the Tour" button on the application`s Home page. 58
-
 1
1 -
2
-
3
-
4
-
5
-
6
-
7
-
8
-
9
-
10
-
11
-
12
-
13
-
14
-
15
-
16
-
17
-
18
-
19
-
20
-
21
-
22
-
23
-
24
-
25
-
26
-
27
-
28
-
29
-
30
-
31
-
32
-
33
-
34
-
35
-
36
-
37
-
38
-
39
-
40
-
41
-
42
-
43
-
44
-
45
-
46
-
47
-
48
-
49
-
50
-
51
-
52
-
53
-
 54
54 -
 55
55 -
 56
56 -
 57
57 -
 58
58 -
 59
59 -
 60
60 -
 61
61 -
 62
62 -
 63
63 -
 64
64 -
65
 |
 |