Vivitar DVR 610 Camera Manual - Page 11
Powering ON/OFF Your Digital Camcorder, Changing Camera Mode
 |
View all Vivitar DVR 610 manuals
Add to My Manuals
Save this manual to your list of manuals |
Page 11 highlights
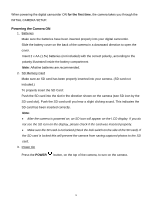
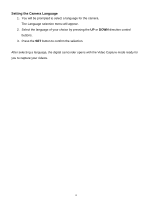
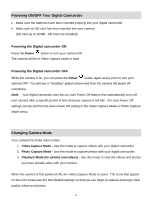
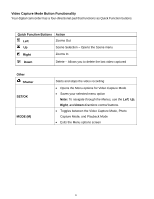
Powering ON/OFF Your Digital Camcorder Make sure the batteries have been inserted properly into your digital camcorder. Make sure an SD card has been inserted into your camera. (SD card up to 16 MB - SD Card not included) Powering the Digital camcorder ON Press the Power button to turn your camera ON. The camera will be in Video Capture mode to start. Powering the Digital camcorder OFF While the camera is on, you can press the Power button again at any point to turn your camera OFF. You will see a "Goodbye" splash screen and then the camera will power off completely. Note: Your digital camcorder also has an Auto Power Off feature that automatically turns off your camera after a specific period of time that your camera is left idle. The Auto Power Off settings can be set from the Auto Power Off setting in the Video Capture Mode or Photo Capture Mode menu. Changing Camera Mode Your camera has three main modes: 1. Video Capture Mode - Use this mode to capture videos with your digital camcorder 2. Photo Capture Mode - Use this mode to capture photos with your digital camcorder. 3. Playback Mode (for photos and videos) - Use this mode to view the videos and photos you have already taken with your camera. When the camera is first powered ON, the Video Capture Mode is active. The icons that appear on the LCD screen are the best default settings so that you can begin to capture and enjoy clear quality videos and photos. 10
-
 1
1 -
2
-
3
-
4
-
5
-
 6
6 -
 7
7 -
 8
8 -
 9
9 -
 10
10 -
 11
11 -
 12
12 -
 13
13 -
 14
14 -
 15
15 -
 16
16 -
17
-
18
-
19
-
20
-
21
-
22
-
23
-
24
-
25
-
26
-
27
-
28
-
29
-
30
-
31
-
32
-
33
-
34
-
35
-
36
-
37
-
38
-
39
-
40
-
41
-
42
-
43
-
44
-
45
-
46
-
47
-
48
-
49
-
50
 |
 |
