Vivitar DVR 910HD DVR 910 Camera Manual - Page 35
LED Flash Option, Photo Capture Mode Menus
 |
View all Vivitar DVR 910HD manuals
Add to My Manuals
Save this manual to your list of manuals |
Page 35 highlights
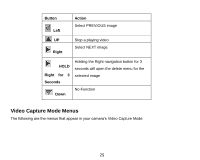
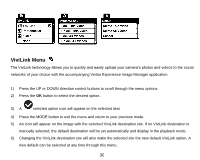
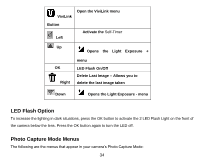
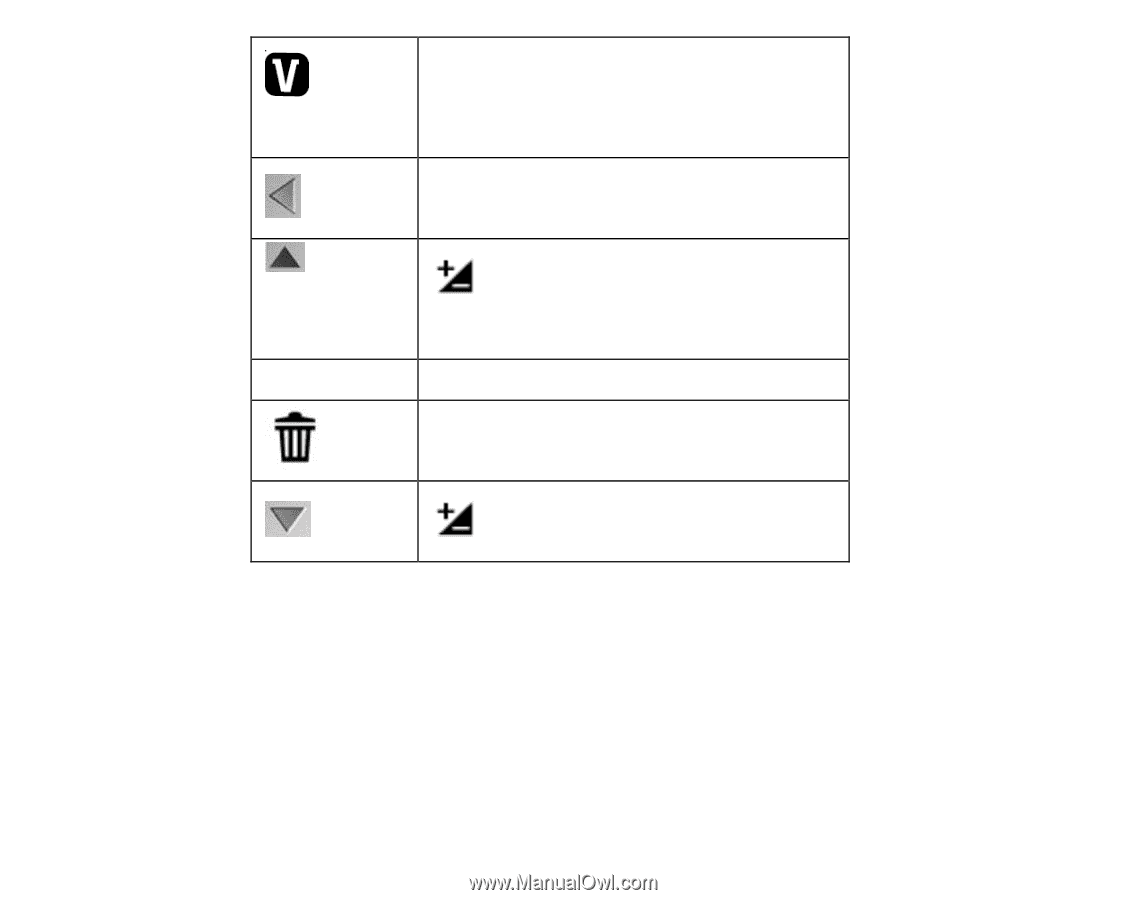
Open the ViviLink menu ViviLink Button Activate the Self-Timer Left Up Opens the Light Exposure + OK Right menu LED Flash On/Off Delete Last Image - Allows you to delete the last image taken Down Opens the Light Exposure - menu LED Flash Option To increase the lighting in dark situations, press the OK button to activate the 2 LED Flash Light on the front of the camera below the lens. Press the OK button again to turn the LED off. Photo Capture Mode Menus The following are the menus that appear in your camera‟s Photo Capture Mode: 34
-
 1
1 -
2
-
3
-
4
-
5
-
6
-
7
-
8
-
9
-
10
-
11
-
12
-
13
-
14
-
15
-
16
-
17
-
18
-
19
-
20
-
21
-
22
-
23
-
24
-
25
-
26
-
27
-
28
-
29
-
 30
30 -
 31
31 -
 32
32 -
 33
33 -
 34
34 -
 35
35 -
 36
36 -
 37
37 -
 38
38 -
 39
39 -
 40
40 -
41
-
42
-
43
-
44
-
45
-
46
-
47
-
48
-
49
-
50
-
51
-
52
-
53
-
54
-
55
-
56
-
57
-
58
-
59
-
60
-
61
-
62
-
63
-
64
-
65
-
66
-
67
-
68
-
69
-
70
-
71
-
72
-
73
-
74
 |
 |
34
ViviLink
Button
Open the ViviLink menu
Left
Activate the
Self-Timer
Up
Opens
the
Light
Exposure
+
menu
OK
LED Flash On/Off
Right
Delete Last Image
–
Allows you to
delete the last image taken
Down
Opens the Light Exposure - menu
LED Flash Option
To increase the lighting in dark situations, press the OK button to activate the 2 LED Flash Light on the front of
the camera below the lens. Press the OK button again to turn the LED off.
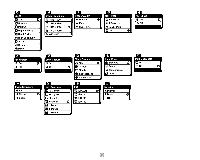
Photo Capture Mode Menus
The following are the menus that appear in your camera‟s Photo Capture Mode: