Weber Genesis Jr LP Owner Manual - Page 12
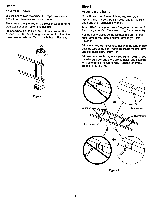
Continue, frame, assembly, Complete, Insert, bottom, tubing, plugs
 |
View all Weber Genesis Jr LP manuals
Add to My Manuals
Save this manual to your list of manuals |
Page 12 highlights
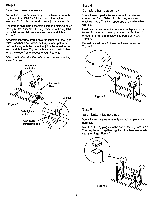
Step 4 Continue frame assembly You will need: frame assembly, wheel frame assembly, leg frame, four 1/4-20 x 1/2 inch bolts, four nylon washers, 7/16 inch open-end or an adjustable wrench. The frames should be assembled with the dimpled holes facing inward. Assemble the leg frame onto the leg tabs of the left frame. Add washers and bolts and tighten. Figure 3. Assemble the wheel frame onto the leg tabs of the right frame. Add bolts and washers. Only finger tighten the bolt on the leg with the decal that joins the wheel frame and the right frame. Tighten with a wrench the bolt that joins the wheel frame closest to you. Figure 3. Note - Tank scale decal on wheel frame must be facing away from you. Dimples to the inside Step 5 Complete frame assembly You will need: partial frame assembly, two frame connectors, four 1/4-20 x 2 inch bolts, four nylon washers, and a 7/16 inch open-end or an adjustable wrench. Hold one frame connector between the leg and wheel frame. Add the nylon washer to the bolt. Put the bolt through the frame and screw into frame connector. Tighten. Repeat procedure with the other frame connector. Figure 4. 0 Tank scale decal Figure 3 Fully tighten this bolt Only finger tighten this bolt Leg tab 0 O z Figure 4 Step 6 Insert bottom tubing plugs You will need: frame assembly, two tubing plugs, and hammer. Insert the tubing plugs into the end of the leg frame only. You may have to tap them lightly with a hammer to fully seat the plugs. Figure 5. Figure 5 12
-
 1
1 -
2
-
3
-
4
-
5
-
6
-
 7
7 -
 8
8 -
 9
9 -
 10
10 -
 11
11 -
 12
12 -
 13
13 -
 14
14 -
 15
15 -
 16
16 -
 17
17 -
18
-
19
-
20
-
21
-
22
-
23
-
24
-
25
-
26
-
27
-
28
-
29
-
30
-
31
-
32
-
33
-
34
-
35
-
36
 |
 |
