Weber Genesis Jr LP Owner Manual - Page 17
Connect, filled
 |
View all Weber Genesis Jr LP manuals
Add to My Manuals
Save this manual to your list of manuals |
Page 17 highlights
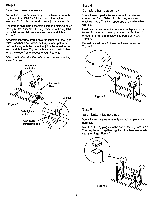
Step 16 Connect LP tank (filled) WARNING: Make sure that the LP tank valve is closed. Close by turning clockwise. Hook the LP tank onto the tank scale. Loosen the tank lock wing nut. Swing the tank lock down. Tighten the wing nut. Figure 17. Figure 17 Route the hose so that it will not interfere with the tank scale indicator rod. Remove the protective plastic cap from the POL fitting. WARNING: The POL fitting has a left-hand thread. Tighten counterclockwise. Use your fingers to start the POL fitting in the LP tank valve. Figure 18 (a). Turn nut counterclockwise. Use an adjustable or 7/8 inch wrench to tighten the POL nut. Figure 18 (b). Regulator vent hole should be at 3, 6, or 9 o'clock. It should not be pointed up. Figure 18 (c). WARNING: No sealant is required on the POL fitting. Do not use pipe dope, tape or any other sealant on the POL fitting or LP tank. Hose POL nut tighten counterclockwise Regulator Valve handwheel / close clockwise Tank valve Pressure relief valve Regulator vent (a) (b) (c) 5 a Turn so regulator vent hole does not collect water Figure 18 17
-
 1
1 -
2
-
3
-
4
-
5
-
6
-
7
-
8
-
9
-
10
-
11
-
 12
12 -
 13
13 -
 14
14 -
 15
15 -
 16
16 -
 17
17 -
 18
18 -
 19
19 -
 20
20 -
 21
21 -
 22
22 -
23
-
24
-
25
-
26
-
27
-
28
-
29
-
30
-
31
-
32
-
33
-
34
-
35
-
36
 |
 |
