Weber Genesis Jr LP Owner Manual - Page 15
stror
 |
View all Weber Genesis Jr LP manuals
Add to My Manuals
Save this manual to your list of manuals |
Page 15 highlights
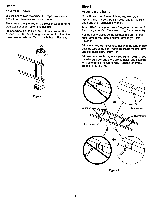
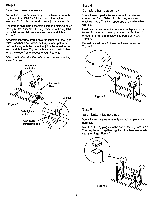
Step 11 Install front/igniter panel You will need: front/igniter panel, 7/16 inch open-end or an adjustable wrench. Facing front of barbecue, remove the top right front 1/4-20 x 1/2 inch bolt joining the right frame and wheel frame. From left to right, slide front panel between manifold and "front" leg of wheel frame. Figure 12 (a). Slip the cut out front panel over the narrowed part of the burner, Figure 12 (b). Slide front panel over burner to the cooking box, and reinstall 1/4-20 x 1/2 inch bolt. Tighten. Figure 12 (c). Step 12 Install igniter You wilt need: igniter, lock nut and gasket. (The lock nut and gasket are preassembled on the igniter.) Note - The igniter wires are already attached to the Gas Catcher Ignition Chamber. This was done to factory test the ignition chamber. With the gasket on the igniter insert the igniter from the front into the hole in the front panel. Screw on lock nut from behind and tighten by hand. Figure 13. Lock nut (a) 0 0 0 0 (b) (c) Figure 13 stror* 00 Igniter and gasket Note - If the igniter works loose, carefully tighten the igniter lock nut with an adjustable wrench or pliers. Push the round connector of the black igniter wire onto round post of the igniter. Next, push the flattened end of the white wire onto the ground point (silver tab) of the igniter. Figure 14. Figure 12 Figure 14 Ground point (silver tab) Round post 15
-
 1
1 -
2
-
3
-
4
-
5
-
6
-
7
-
8
-
9
-
 10
10 -
 11
11 -
 12
12 -
 13
13 -
 14
14 -
 15
15 -
 16
16 -
 17
17 -
 18
18 -
 19
19 -
 20
20 -
21
-
22
-
23
-
24
-
25
-
26
-
27
-
28
-
29
-
30
-
31
-
32
-
33
-
34
-
35
-
36
 |
 |
