Weber Genesis Jr LP Owner Manual - Page 14
Install, manifold, bracket, panel, assembly, scale
 |
View all Weber Genesis Jr LP manuals
Add to My Manuals
Save this manual to your list of manuals |
Page 14 highlights
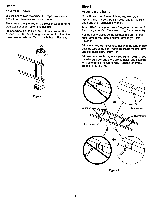
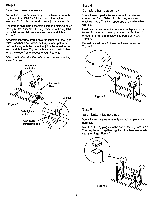
Step 8 Install manifold bracket You will need: the manifold bracket Hook the bracket onto the manifold at approximately the center of the length of the manifold. Figure 9. Place your hand underneath the bracket. Lift the bracket, manifold and cooking box slightly as a unit, and hook onto the frame brace. Figure 9 (a). View from below and behind the cooking box Frame brace (a) Step 10 Add tank scale assembly You will need: tank scale assembly, two 1/4-20 wing nuts, and two nylon washers. Slip the bolts on the back of the tank scale assembly through the two small holes in the tank panel. Add washers, then wing nuts and tighten. Figure 11. Figure 9 Step 9 Install tank panel assembly You will need: tank panel assembly, 1 1/4 inch bolt, 1/4-20 hex nut, 1/4 inch nylon washer, 7/16 inch openend or an adjustable wrench. Insert the tank panel tabs into the slots in the frame brace. Slide up until the notch at the bottom of the tank panel fits over the cross brace. Figure 10 (a). Add washer to bolt. Put bolt through panel and frame brace, add hex nut and tighten with the 7/16 inch open-end or an adjustable wrench. Figure 10 (b). Slot in frame brace (a) Frame brace Figure 11 View from front of barbecue View from back of barbecue Figure 10 Cross brace Tabs on tank panel (b) 14
-
 1
1 -
2
-
3
-
4
-
5
-
6
-
7
-
8
-
 9
9 -
 10
10 -
 11
11 -
 12
12 -
 13
13 -
 14
14 -
 15
15 -
 16
16 -
 17
17 -
 18
18 -
 19
19 -
20
-
21
-
22
-
23
-
24
-
25
-
26
-
27
-
28
-
29
-
30
-
31
-
32
-
33
-
34
-
35
-
36
 |
 |
