Weider 8507 Training User Manual - Page 12
Note: The 5/16 Nylon Jam Nut
 |
View all Weider 8507 Training manuals
Add to My Manuals
Save this manual to your list of manuals |
Page 12 highlights
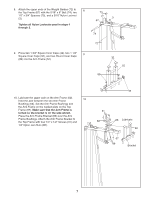
21. Attach the 5/16" x 3" Bolt (17), two 5/16" Washers (8), and a 5/16" Nylon Jam Nut (2) to the indicated hole in the Top Frame (67). Slide the end of the Long Cable (66) onto the 5/16" x 3" Bolt (17). Tighten another 5/16" Nylon Jam Nut (2) onto the Bolt. Note: The 5/16" Nylon Jam Nut should not be fully tightened against the end of the Cable. There must be enough room between the Nylon Jam Nuts for the end of the Cable to pivot. 21 67 8 17 2 66 22. See the inset drawing. Assemble the two "I" Plates (78), two 3 1/2" Pulleys (15), the Long Cable (66), 22 and the Short Cable (23) with the two 3/8" x 1 3/4" Bolts (48) and two 3/8" Nylon Jam Nuts (5) as shown. 66 15 78 48 78 5 15 23 12
-
 1
1 -
2
-
3
-
4
-
5
-
6
-
 7
7 -
 8
8 -
 9
9 -
 10
10 -
 11
11 -
 12
12 -
 13
13 -
 14
14 -
 15
15 -
 16
16 -
 17
17 -
18
-
19
-
20
-
21
-
22
-
23
-
24
-
25
-
26
-
27
 |
 |

12
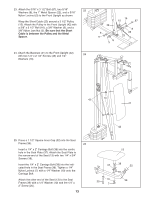
21. Attach the 5/16” x 3” Bolt (17), two 5/16” Washers
(8), and a 5/16” Nylon Jam Nut (2) to the indicated
hole in the Top Frame (67).
Slide the end of the Long Cable (66) onto the 5/16”
x 3” Bolt (17). Tighten another 5/16” Nylon Jam Nut
(2) onto the Bolt.
Note: The 5/16” Nylon Jam Nut
should not be fully tightened against the end of
the Cable. There must be enough room between
the Nylon Jam Nuts for the end of the Cable to
pivot.
22. See the inset drawing. Assemble the two “I” Plates
(78), two 3 1/2” Pulleys (15), the Long Cable (66),
and the Short Cable (23) with the two 3/8” x 1 3/4”
Bolts (48) and two 3/8” Nylon Jam Nuts (5) as
shown.
22
21
67
8
17
2
66
78
23
66
15
15
48
5
78