Weider Cjxt3 Master Trainer User Manual - Page 16
Weider Cjxt3 Master Trainer Manual
 |
View all Weider Cjxt3 Master Trainer manuals
Add to My Manuals
Save this manual to your list of manuals |
Page 16 highlights
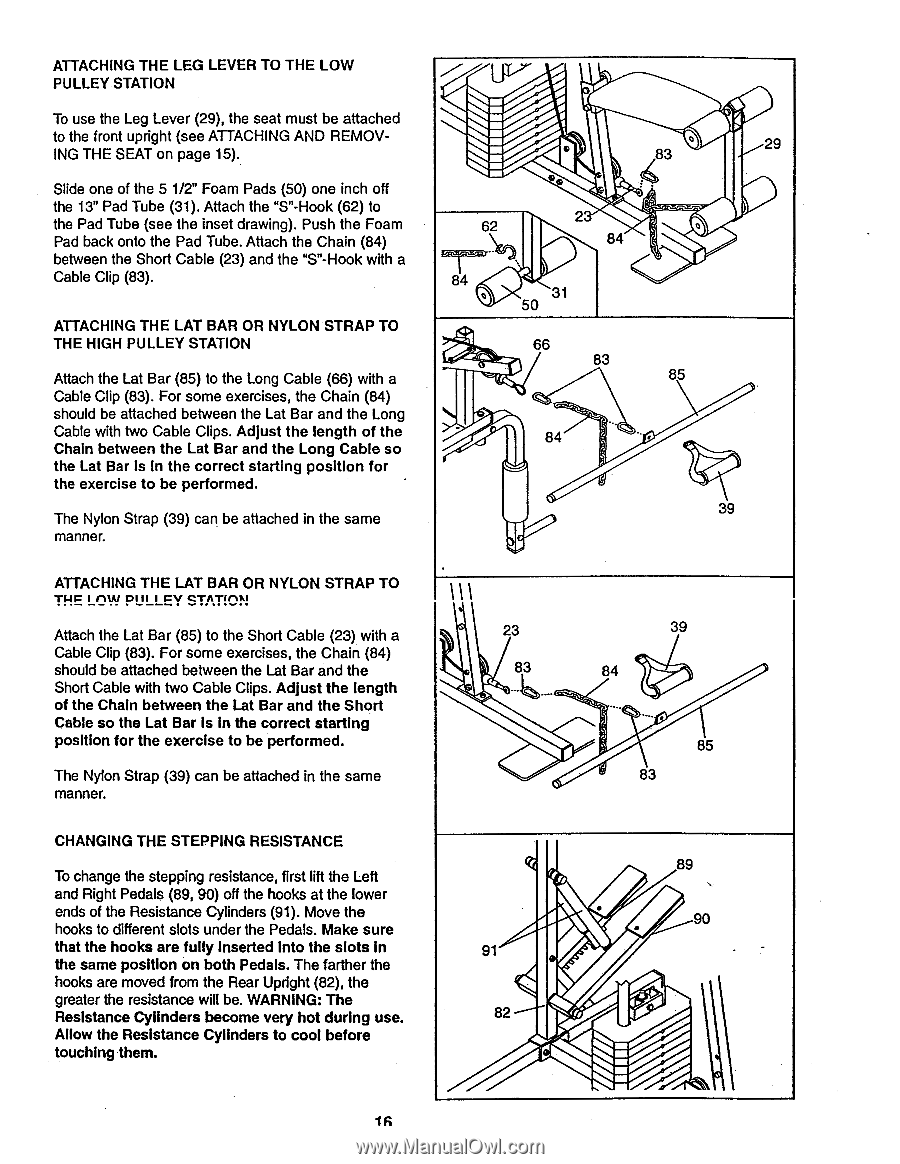
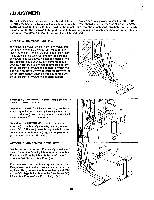
ATTACHING THE LEG LEVER TO THE LOW PULLEY STATION To use the Leg Lever (29), the seat must be attached to the front upright (see ATTACHING AND REMOVING THE SEAT on page 15). Slide one of the 5 1/2" Foam Pads (50) one inch off the 13" Pad Tube (31). Attach the "S"-Hook (62) to the Pad Tube (see the inset drawing). Push the Foam Pad back onto the Pad Tube. Attach the Chain (84) between the Short Cable (23) and the "S"-Hook with a Cable Clip (83). ATTACHING THE LAT BAR OR NYLON STRAP TO THE HIGH PULLEY STATION Attach the Lat Bar (85) to the Long Cable (66) with a Cable Clip (83). For some exercises, the Chain (84) should be attached between the Lat Bar and the Long Cable with two Cable Clips. Adjust the length of the Chain between the Lat Bar and the Long Cable so the Lat Bar is In the correct starting position for the exercise to be performed. The Nylon Strap (39) can be attached in the same manner. ATTACHING THE LAT BAR OR NYLON STRAP TO THP I ^IA' D111 1 GV QTATVIN Attach the Lat Bar (85) to the Short Cable (23) with a Cable Clip (83). For some exercises, the Chain (84) should be attached between the Lat Bar and the Short Cable with two Cable Clips. Adjust the length of the Chain between the Lat Bar and the Short Cable so the Lat Bar is in the correct starting position for the exercise to be performed. The Nylon Strap (39) can be attached in the same manner. CHANGING THE STEPPING RESISTANCE To change the stepping resistance, first lift the Left and Right Pedals (89, 90) off the hooks at the lower ends of the Resistance Cylinders (91). Move the hooks to different slots under the Pedals. Make sure that the hooks are fully Inserted into the slots in the same position on both Pedals. The farther the hooks are moved from the Rear Upright (82), the greater the resistance will be. WARNING: The Resistance Cylinders become very hot during use. Allow the Resistance Cylinders to cool before touching them. LIT 0 83 29 62 2 84 84 31 50 66 83 0 85 84 • 39 \\\ 23 83 39 84 85 83 89 90 91 . - 82 1R
-
 1
1 -
2
-
3
-
4
-
5
-
6
-
7
-
8
-
9
-
10
-
 11
11 -
 12
12 -
 13
13 -
 14
14 -
 15
15 -
 16
16 -
 17
17 -
 18
18 -
 19
19 -
 20
20 -
 21
21 -
22
-
23
-
24
-
25
-
26
-
27
 |
 |