Weider Cjxt3 Master Trainer User Manual - Page 8
Weider Cjxt3 Master Trainer Manual
 |
View all Weider Cjxt3 Master Trainer manuals
Add to My Manuals
Save this manual to your list of manuals |
Page 8 highlights
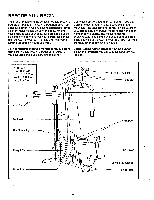
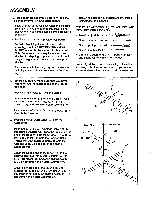
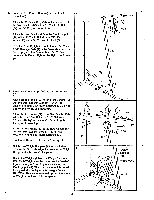
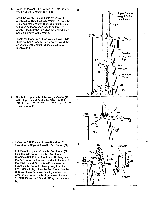
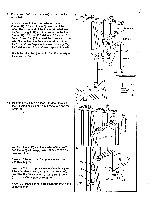
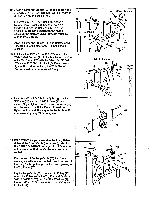
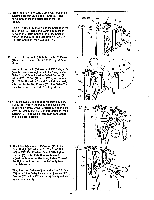
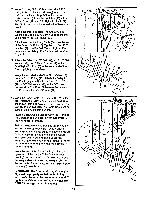
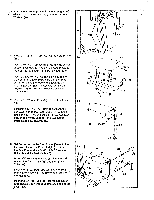
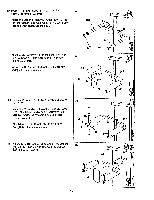
12. Attach a Large "V Bracket (56) to one of the Arms (46) with a 3/8" x 2 3/4" Bolt (70), 318" Flat Washer (9) and 3/8" Nylon Locknut (21). Lubricate a 5/16" x 2 1/4" Bolt (33). Attach a Narrow Swivel Bracket (58) to the Large "U" Bracket (56) with the Bolt and a 5/16" Nylon Locknut (3). Do not overtIghten the Nylon Locknut; the Narrow Swivel Bracket must be able to swivel freely. Attach a Large "U" Bracket (56) and Narrow Swivel Bracket (58) to the other Arm (46) in the same manner. 13. Lubricate the 5/16" x 3 1/4" Bolt (76). Attach the Wide Swivel Bracket (71) to the bracket on the side of the Top Frame (67) with the 5/16" x 3 1/4" Bolt (76) and a 5/16" Nylon Locknut (3). Do not overtighten the Nylon Locknut; the Wide Swivel Bracket must be able to swivel freely. 12 58 33-Lubricate , ( < 21 ; Uz-.--56 . . . ..."-* 33-Lubricate 21 58__ft..• 0-( - 3 -r3•I , 46 9 56 4 3 11 • 9 . -4. **--.6(._ 70 46 70 13 76-Lubricate 67 : . . . - .. 3 71 • . 1 1 14. Insert two 3/8" x 1 3/4" Bolts (48) through the two "I" Plates (78) and two 4 1/2" Pulleys (77) as 14 shown. Finger lighten two 3iti' Nylon Locknuts (21) 77 onto the ends of the Bolts. Do not thread the Nylon Locknuts all the way onto the Bolts until o 48 after assembly step 22 is completed. 0 A (610 78 21 0 77 78 15. IMPORTANT: As you assemble the Long Cable (66) and the Short Cable (not shown), refer to 15 the CABLE DIAGRAM on page 19 of this manu- al to make sure that the Cables are properly routed. Find the end of the Long Cable (66) that has a metal eyelet without a rubber ball. Insert that end of the Long Cable up through the Indicated opening in the Top Frame (67). Lay the Long Cable (66) over a 4 1/2" Pulley (77). Attach the Pulley inside the Top Frame (67) with a 3/8" x 2 3/4" Bolt (70), two 3/8" Flat Washers (9), the two 1/2" x 1/2" Spacers (65), and a 3/8" Nylon Locknut (21). 8 66 77 65 65 . • .*-21 - .. 9 70 9 67 - I
-
 1
1 -
2
-
 3
3 -
 4
4 -
 5
5 -
 6
6 -
 7
7 -
 8
8 -
 9
9 -
 10
10 -
 11
11 -
 12
12 -
 13
13 -
14
-
15
-
16
-
17
-
18
-
19
-
20
-
21
-
22
-
23
-
24
-
25
-
26
-
27
 |
 |
