Weider Viper 2000 Uk Manual - Page 6
Slide the Right and Left Pedals 89, 90 onto
 |
View all Weider Viper 2000 manuals
Add to My Manuals
Save this manual to your list of manuals |
Page 6 highlights
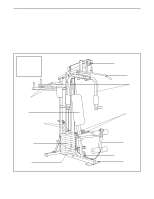
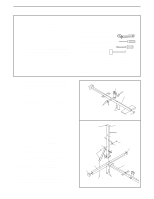
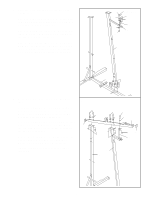
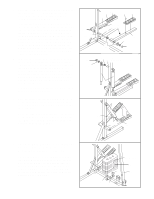
5. Press two 1 1/2" Bushings (93) into the Left Pedal (90); press two 1 1/2" Bushings (93) into the Right Pedal (89). Attach a Pedal Cover (92) to each Pedal with a 1/2" Tap Screw (6). Lubricate the pedal axles on the Rear Upright (82). Slide the Right and Left Pedals (89, 90) onto the right and left pedal axles. Note: Make sure that the Pedals are on the correct sides; the slotted brackets must be on the insides of the Pedals. Hold a 1" Retainer (54) and 1" Round Cover Cap (55) against the left pedal axle. The teeth on the Retainer must bend toward the Round Cover Cap. Tap the Retainer and Round Cover Cap onto the pedal axle. Attach the Right Pedal in the same manner. 6. Lubricate the cylinder axles on the Rear Upright (82). Slide a 5/8" Spacer (97) and a Resistance Cylinder (91) onto the right cylinder axle. Be sure that the Spacer is turned as shown. Hold a 5/8" Retainer (95) and 5/8" Round Cover Cap (96) against the right cylinder axle. The teeth on the Retainer must bend toward the Round Cover Cap. Tap the Retainer and Round Cover Cap onto the cylinder axle. Attach a Resistance Cylinder (91) to the left cylinder axle in the same manner. 5 93 82 Lubricate 6 96 95 92 6 89 6 92 Slotted Brackets 90 54 93 55 97 82-Lubricate 91 7. Raise the Left Pedal (90) and rest it on the hook at the lower end of the left Resistance Cylinder 7 (91). The hook must be in one of the slots under the Left Pedal. Raise the Right Pedal (89) and rest it on the hook at the lower end of the right Resistance Cylinder (91). Make sure that the hooks are in the same position under both Pedals. 91 89 Hooks 90 8. Set the two Weight Bumpers (19) on the indicated 8 plate on the Base (4). Align the holes in the Weight Bumpers with the holes in the plate. Stack nine Weights (25) on the Weight Bumpers (19). Each Weight must be turned so the pin groove is facing the Front Upright (42). The holes in the Weights must be aligned with the holes in the Weight Bumpers. CAUTION: Be careful to avoid tipping the stack of Weights until step 9 is completed. 6 Pin Groove 25 19 42 19 4
-
 1
1 -
 2
2 -
 3
3 -
 4
4 -
 5
5 -
 6
6 -
 7
7 -
 8
8 -
 9
9 -
 10
10 -
 11
11 -
 12
12 -
13
-
14
-
15
-
16
-
17
-
18
-
19
-
20
-
21
-
22
-
23
-
24
-
25
-
26
-
27
 |
 |
