Weslo Body Shop 9 English Manual - Page 11
Press, Weight, Sleeve, Grooves
 |
View all Weslo Body Shop 9 manuals
Add to My Manuals
Save this manual to your list of manuals |
Page 11 highlights
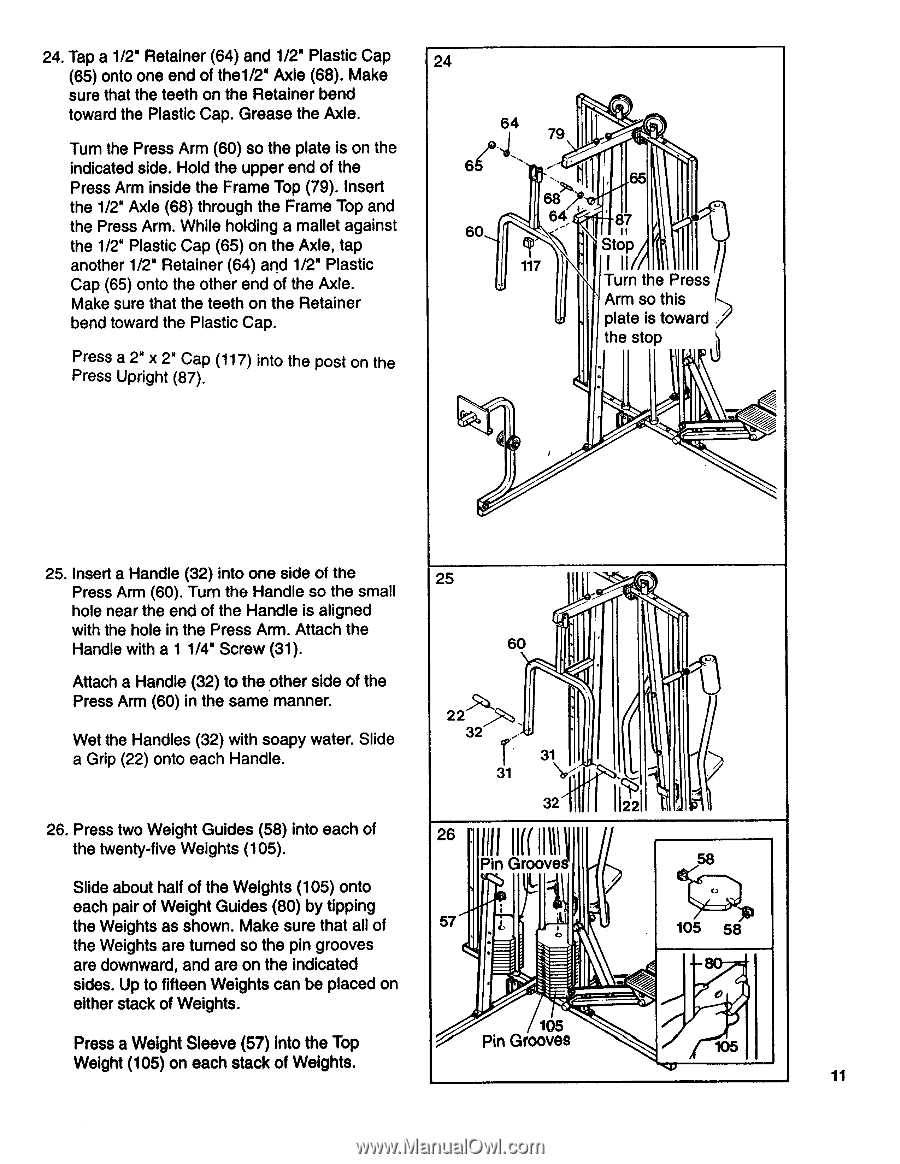
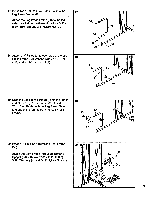
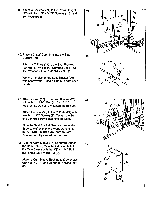
24. Tap a 1/2" Retainer (64) and 1/2" Plastic Cap (65) onto one end of thel/2" Axle (68). Make sure that the teeth on the Retainer bend toward the Plastic Cap. Grease the Axle. Turn the Press Arm (60) so the plate is on the indicated side. Hold the upper end of the Press Arm inside the Frame Top (79). Insert the 1/2" Axle (68) through the Frame Top and the Press Arm. While holding a mallet against the 1/2" Plastic Cap (65) on the Axle, tap another 1/2" Retainer (64) and 1/2" Plastic Cap (65) onto the other end of the Axle. Make sure that the teeth on the Retainer bend toward the Plastic Cap. Press a 2" x 2" Cap (117) into the post on the Press Upright (87). 24 .'6414 79 6 68 64 117 65 87 Stop I Turn the Press Arm so this plate is toward the stop 25. Insert a Handle (32) into one side of the Press Arm (60). Turn the Handle so the small hole near the end of the Handle is aligned with the hole in the Press Arm. Attach the Handle with a 1 1/4" Screw (31). Attach a Handle (32) to the other side of the Press Arm (60) in the same manner. Wet the Handles (32) with soapy water. Slide a Grip (22) onto each Handle. 26. Press two Weight Guides (58) into each of the twenty-five Weights (105). Slide about half of the Weights (105) onto each pair of Weight Guides (80) by tipping the Weights as shown. Make sure that all of the Weights are turned so the pin grooves are downward, and are on the indicated sides. Up to fifteen Weights can be placed on either stack of Weights. Press a Weight Sleeve (57) into the Top Weight (105) on each stack of Weights. 25 60 22 32 31 31 32 26 IIII PinG(r(oolliD 57 • 105 Pin Grooves 58 105 58 105 11
-
 1
1 -
2
-
3
-
4
-
5
-
 6
6 -
 7
7 -
 8
8 -
 9
9 -
 10
10 -
 11
11 -
 12
12 -
 13
13 -
 14
14 -
 15
15 -
 16
16 -
17
-
18
-
19
-
20
-
21
-
22
-
23
-
24
 |
 |