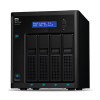
Western Digital My Cloud EX4100 User Manual - Page 19
Accessing Content, Backup PC/Mac
 |
View all Western Digital My Cloud EX4100 manuals
Add to My Manuals
Save this manual to your list of manuals |
Page 19 highlights
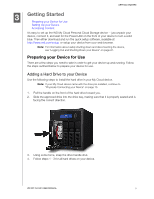
GETTING STARTED 9. Click Next. The next final Getting Started screen appears: The screen provides three links to important processes, which are discussed in later chapters: Upload Content: See "Accessing Content" on page 13. Backup PC/Mac: See "Backing Up and Retrieving Files" on page 47. Access Mobile App: See "Access Your Files with iOS and Android Mobile Apps" on page 42. 10. Do the following (optional): To have your device's firmware updated automatically, click the Automatically update device firmware when available check box. To register your device, click the Register the WD My Cloud device to receive continuous product support check box. To participate in the product improvement program, click Participate in Product Improvement Program check box. 11. Click Finish to display the WD My Cloud dashboard. For instructions on using the dashboard, see "The Dashboard Home Page" on page 17. Accessing Content The WD My Cloud device's Public folder contains Shared Music, Shared Pictures, and Shared Videos subfolders. The existing content of the subfolders are files that you dragged and dropped or files that have been backed up from your computer or an attached USB drive. Note: Any of the folders can hold any file type. Once you've physically connected your WD My Cloud device (see "Preparing your Device for Use" on page 9), use the following steps to access the contents of your device. If your operating systems is... Then... Windows 8 / Windows 8.1.1 1. On the Start page, type Computer. 2. Click Computer. 3. In the left pane, click Network. 4. Double-click the WD My Cloud device (see "Appendix D: WD My Cloud Device URLs and Names" on page 111 for a list of device names) and locate the device's Public folder. 5. Double-click the Public folder to display the Shared Music, Shared Pictures, and Shared Videos subfolders. You can now drag and drop files into (and from) the shared media folders using Windows Explorer. Windows Vista / Windows 7 1. Click or Start > Computer > Network > WD My Cloud device (see "Appendix D: WD My Cloud Device URLs and Names" on page 111 for a list of device names) and, if required, enter your share credentials. The device's Public and private folders (shares) appear. 2. Double-click the Public folder to display the Shared Music, Shared Pictures, and Shared Videos subfolders. You can now drag and drop files into (and from) the shared media folders using Windows Explorer. WD MY CLOUD USER MANUAL 13
-
 1
1 -
2
-
3
-
4
-
5
-
6
-
7
-
8
-
9
-
10
-
11
-
12
-
13
-
 14
14 -
 15
15 -
 16
16 -
 17
17 -
 18
18 -
 19
19 -
 20
20 -
 21
21 -
 22
22 -
 23
23 -
 24
24 -
25
-
26
-
27
-
28
-
29
-
30
-
31
-
32
-
33
-
34
-
35
-
36
-
37
-
38
-
39
-
40
-
41
-
42
-
43
-
44
-
45
-
46
-
47
-
48
-
49
-
50
-
51
-
52
-
53
-
54
-
55
-
56
-
57
-
58
-
59
-
60
-
61
-
62
-
63
-
64
-
65
-
66
-
67
-
68
-
69
-
70
-
71
-
72
-
73
-
74
-
75
-
76
-
77
-
78
-
79
-
80
-
81
-
82
-
83
-
84
-
85
-
86
-
87
-
88
-
89
-
90
-
91
-
92
-
93
-
94
-
95
-
96
-
97
-
98
-
99
-
100
-
101
-
102
-
103
-
104
-
105
-
106
-
107
-
108
-
109
-
110
-
111
-
112
-
113
-
114
-
115
-
116
-
117
-
118
-
119
-
120
-
121
-
122
-
123
-
124
-
125
-
126
-
127
 |
 |
