Western Digital WD10000G032 User Manual (pdf) - Page 10
Hardware Setup, before installing WD Anywhere Access. - power supply
 |
View all Western Digital WD10000G032 manuals
Add to My Manuals
Save this manual to your list of manuals |
Page 10 highlights
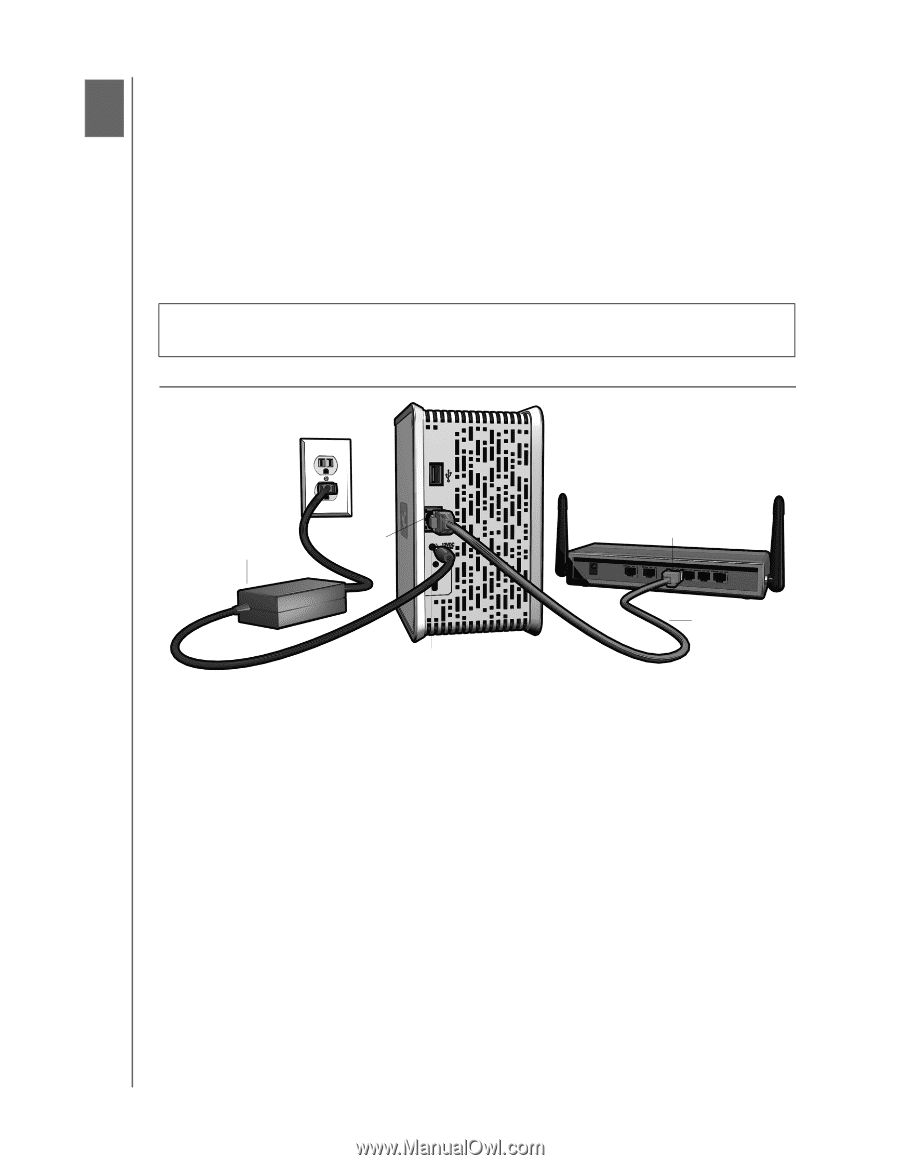
MY BOOK WORLD EDITION USER MANUAL 4 Hardware Setup 1. Connect one end of the Ethernet cable into the Ethernet port located on the back of the unit. 2. Connect the other end of the Ethernet cable directly into a router or network switch port. 3. Plug the AC adapter into an electrical outlet. 4. Connect the other end of the adapter into the DC power supply socket located on the back of the unit. The unit powers up automatically after approximately 30 seconds indicated by an LED illuminated on the outer ring. Important: Wait for the drive to finish powering up (approximately three minutes) before installing WD Anywhere Access. AC adapter Ethernet port Power Port Router Port Ethernet Cable HARDWARE SETUP - 7
-
 1
1 -
2
-
3
-
4
-
 5
5 -
 6
6 -
 7
7 -
 8
8 -
 9
9 -
 10
10 -
 11
11 -
 12
12 -
 13
13 -
 14
14 -
 15
15 -
16
-
17
-
18
-
19
-
20
-
21
-
22
-
23
-
24
-
25
-
26
-
27
-
28
-
29
-
30
-
31
-
32
-
33
-
34
-
35
-
36
-
37
-
38
-
39
-
40
-
41
-
42
-
43
-
44
-
45
-
46
-
47
-
48
-
49
-
50
-
51
-
52
 |
 |
MY BOOK WORLD EDITION
USER MANUAL
HARDWARE SETUP – 7
Hardware Setup
1.
Connect one end of the Ethernet cable into the Ethernet port located on the back
of the unit.
2.
Connect the other end of the Ethernet cable directly into a router or network
switch port.
3.
Plug the AC adapter into an electrical outlet.
4.
Connect the other end of the adapter into the DC power supply socket located on
the back of the unit. The unit powers up automatically after approximately 30
seconds indicated by an LED illuminated on the outer ring
.
Important:
Wait for the drive to finish powering up (approximately three minutes)
before installing WD Anywhere Access.
4
Ethernet port
AC adapter
Router Port
Power Port
Ethernet Cable