Whirlpool SF265LXTT Installation Instructions - Page 11
Gas Conversions - washers
 |
UPC - 883049054919
View all Whirlpool SF265LXTT manuals
Add to My Manuals
Save this manual to your list of manuals |
Page 11 highlights
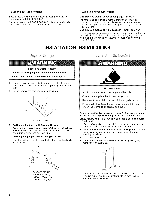
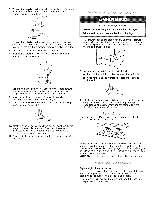
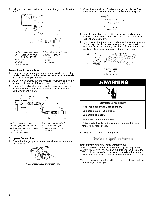
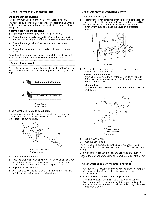
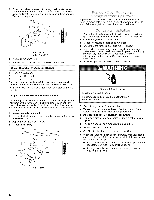
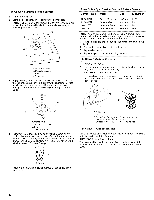
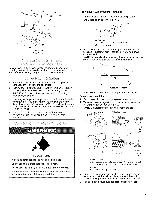
GAS CONVERSIONS Remove storage drawer or warming drawer. Locate gas pressure regulator at rear of storage or warming drawer compartment. NOTE: On models with a warming drawer, an access cover must be removed from the gas pressure regulator. Explosion Hazard Use a new CSA _nternationam approved gas supply line, Install a shut=off valve° Securemy tighten aH gas connections, tf connected to LP, have a qualified person make sure gas pressure does not exceed 14" (36 cm) water comumn° ExampBes of a quamified person incmude: licensed heating personneB, author}zed gas company personnel, and author}zed service personnel Failure to do so can resumt in death, explosion, or fire, A. Gas pressure regulator IMPORTANT: Do not remove the gas pressure regulator. Gas pressure regulator 3. Remove plastic cover from gas pressure regulator cap, 4. Turn gas pressure regulator cap counterclockwise with a %" combination wrench to remove. NOTE: Do not remove the spring beneath the cap. Side viewbefore A B Tip Over Hazard A child or adumt can tip the range and be killed. Connect anti-tip bracket to rear range foot, Reconnect the anti-tip bracket, if the range is moved, Failure to follow these instructions can result in death or serious burns to chimdren and adumte, To Convert Gas Pressure Regulator 1. Turn the manual shutoff valve to the closed position. Unplug range or disconnect power. S A i1 SJ .......C......... A. Torange B. Manual shutoff valve "closed" position C. Gassupply line C Side view after A. Plastic cover B. Gas pressure regulator cap with solid end facing out C. Gas pressure regulator cap with hollow end facing out D. Washer E. Gas pressure regulator cap 5. Turn over the gas pressure regulator cap and reinstall on regulator so that the hollow end faces out and the marking "
-
 1
1 -
2
-
3
-
4
-
5
-
 6
6 -
 7
7 -
 8
8 -
 9
9 -
 10
10 -
 11
11 -
 12
12 -
 13
13 -
 14
14 -
 15
15 -
 16
16
 |
 |
