Whirlpool WDT730HAM Installation Instructions - Page 14
Power Cord Connection, Slide clamp onto connector, Hose clamp final position
 |
View all Whirlpool WDT730HAM manuals
Add to My Manuals
Save this manual to your list of manuals |
Page 14 highlights
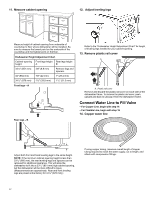
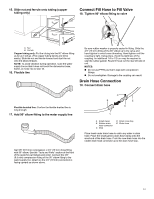
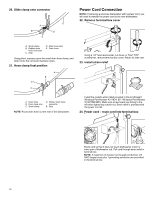
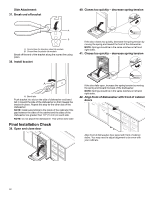
20. Slide clamp onto connector A B C E D Power Cord Connection NOTE: If removing a previous dishwasher with a power cord, you will need to transfer the power cord to the new dishwasher. 22. Remove terminal box cover A. Small clamp B. Rubber drain hose connector C. Stop D. Drain hose stop E. Drain hose Using pliers, squeeze open the small drain hose clamp, and slide it onto the connector between stops. 21. Hose clamp final position A B C D E A. Drain hose B. Drain hose stop C. Small clamp D. Rubber drain hose connector E. Stop NOTE: Route drain hose out the rear of the dishwasher. Using a 1/4" hex-head socket, nut driver, or Torx® T20® screwdriver, remove terminal box cover. Retain for later use. 23. Install strain relief Install the metallic strain relief provided in this kit (Straight: Whirlpool Part Number 4317824, 90°: Whirlpool Part Number W10278923RP). Make sure screw heads are facing to the left when tightening conduit nut. Strain relief is provided with the power cord kit. 24. Power cord - route cord into terminal box Route cord so that it does not touch dishwasher motor or lower part of dishwasher tub. Pull cord through strain relief in terminal box. NOTE: A maximum of 2 power cord supply conductors (12 AWG largest size) plus 1 grounding conductor are permitted in the terminal box. 14
-
 1
1 -
2
-
3
-
4
-
5
-
6
-
7
-
8
-
 9
9 -
 10
10 -
 11
11 -
 12
12 -
 13
13 -
 14
14 -
 15
15 -
 16
16 -
 17
17 -
 18
18 -
 19
19 -
20
-
21
-
22
-
23
-
24
-
25
-
26
-
27
-
28
-
29
-
30
-
31
-
32
-
33
-
34
-
35
-
36
-
37
-
38
-
39
-
40
-
41
-
42
-
43
-
44
-
45
-
46
-
47
-
48
-
49
-
50
-
51
-
52
-
53
-
54
-
55
-
56
 |
 |
