Whirlpool WDT730HAM Installation Instructions - Page 17
Choose Anchor Attachment Method, Route power cord, Secure installation blanket
 |
View all Whirlpool WDT730HAM manuals
Add to My Manuals
Save this manual to your list of manuals |
Page 17 highlights
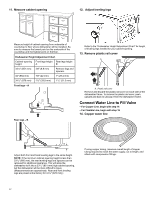
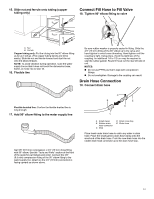
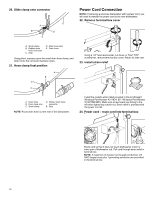
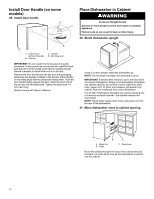
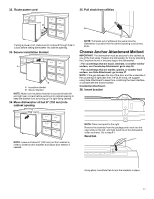
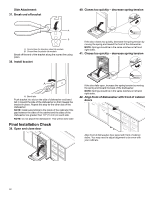
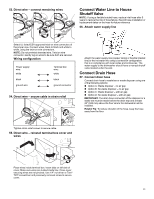
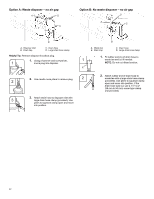
32. Route power cord. 35. Pull slack from utilities If using a power cord, make sure to route end through hole in cutout before sliding dishwasher into cabinet opening. 33. Secure installation blanket A B A. Insulation blanket B. Secure blanket NOTE: Make sure insulation blanket is secured at both left and right rear corners before pushing into cabinet opening to keep the blanket from bunching up in a tight-fitting cabinet. 34. Move dishwasher all but 6" (152 mm) into cabinet opening 6" (152 mm) NOTE: Pull slack out of utilities at the same time the dishwasher is pushed into the cabinet opening to avoid any kinks. Choose Anchor Attachment Method IMPORTANT: The dishwasher must be secured to the cabinet as one of the final steps. Prepare the dishwasher for this by attaching the 2 brackets found in the parts bag to the dishwasher. - For countertops that are wood, laminate, or another similar surface, use Countertop Attachment: go to step 36 - For countertops that are marble, granite, or another hard surface, use Side Attachment: go to step 37 NOTE: If the gap between the top of the door and the underside of the countertop is tight (less than 1/4" [6.35 mm]), we suggest using Side Attachment to keep from scratching the User Interface or console with the anchor screws. Countertop Attachment: 36. Insert bracket NOTE: Leave unit about 6" (152 mm) out from cabinet in order to install anchor brackets and adjust door tension if needed. NOTE: Tabs must point to the right. Remove the brackets from the package and insert into the open slots on the left- and right-hand top of the dishwasher collar as shown. Go to step 41. Bend tab Using pliers, bend/twist tab to lock the brackets in place. 17
-
 1
1 -
2
-
3
-
4
-
5
-
6
-
7
-
8
-
9
-
10
-
11
-
 12
12 -
 13
13 -
 14
14 -
 15
15 -
 16
16 -
 17
17 -
 18
18 -
 19
19 -
 20
20 -
 21
21 -
 22
22 -
23
-
24
-
25
-
26
-
27
-
28
-
29
-
30
-
31
-
32
-
33
-
34
-
35
-
36
-
37
-
38
-
39
-
40
-
41
-
42
-
43
-
44
-
45
-
46
-
47
-
48
-
49
-
50
-
51
-
52
-
53
-
54
-
55
-
56
 |
 |
