Xerox 3210 User Guide - Page 28
Locating the WorkCentre 3210 or WorkCentre 3220 IP Address - mac
 |
UPC - 095205754322
View all Xerox 3210 manuals
Add to My Manuals
Save this manual to your list of manuals |
Page 28 highlights
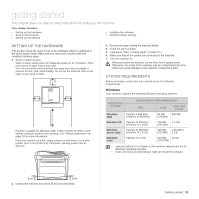
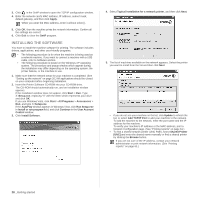
Locating the WorkCentre 3210 or WorkCentre 3220 IP Address 1. Press Menu on the control panel, until you see Network on the bottom line of the display. 2. Press OK to access the menu. 3. Press the left/right arrow until Network Info. appears and press OK. 4. Print appears and press OK. 5. Press the left/right arrow to select Yes and press OK. The Network Configuration page prints out. 6. On the Network Configuration page note the IP Address (Example 169.123.21.23) Accessing CentreWare Internet Services (CWIS) 1. On your PC open a web browser such as Internet Explorer. 2. In the URL or Address field enter http;//xxx.xxx.xxx.xxx where x is your IP address and click Go to access the web site of your machine. 3. Select a tab to view. Configuring network protocol via the machine You can set up TCP/IP network parameters, follow the steps listed below. 1. Make sure your machine is connected to the network with an RJ-45 Ethernet cable. 2. Make sure you have turned on the machine. 3. Press Menu on the control panel, until you see Network on the bottom line of the display. 4. Press OK to access the menu. 5. Press the left/right arrow until TCP/IPv4 appears and press OK. 6. Press the left/right arrow until Static appears and press OK. 7. Press the left/right arrow until IP Address appears and press OK. Enter a byte between 0 and 255 using the number keypad and press the left/right arrow to move between bytes. Repeat this to complete the address from the 1st byte to the 4th byte. 8. When you have finished, press OK. Repeat steps 9 and 10 to configure the other TCP/IP parameters: subnet mask and gateway address. Contact the network administrator if you are not sure how to configure. 9. If you would like to turn on IPv6 repeat step 3. to 4. 10. Then press left/right arrow until IPv6 appears and press OK. 11. Press the left/right arrow until On appears and press OK. You can also set up the network settings through the network administration programs. • CentreWare Internet Services: Web-based printer management solution for network administrators. CentreWare Internet Services provides you with an efficient way of managing network devices and lets you remotely monitor and troubleshoot network machines from any site with corporate internet access. • CentreWare Internet Services: Web server embedded on your network print server, which allows you to: - Configure the network parameters necessary for the machine to connect to various network environments. - Customize machine settings. • SetIP: Utility program allowing you to select a network interface and manually configure the IP addresses for use with the TCP/IP protocol. You can only use IPv4 setting for SetIP. See "Using SetIP program" on page 27. Setting Ethernet speed You can select the communication speed for Ethernet connections. 1. Press Menu on the control panel, until you see Network on the bottom line of the display. 2. Press OK to access the menu. 3. Press the left/right arrow until Ethernet Speed appears and press OK. 4. Press the left/right arrow until the speed you want appears and press OK. 5. Press Stop/Clear to return to ready mode. Restoring the network configuration You can return the network configuration to its default settings. 1. Press Menu on the control panel, until you see Network on the bottom line of the display. 2. Press OK to access the menu. 3. Press the left/right arrow until Clear Setting appears and press OK. 4. Press OK when Yes appears to restore the network configuration. 5. Power the machine off and back on. Printing a network configuration page The Network Configuration page shows how the network interface card on your machine is configured. 1. Press Menu on the control panel, until you see Network on the bottom line of the display. 2. Press OK to access the menu. 3. Press the left/right arrow until Network Info appears and press OK. 4. Press OK when Yes appears. The Network Configuration page prints out. Using SetIP program This program is for the network IP setting using the MAC address which is the hardware serial number of the network printer card or interface. Especially, it is for the network administrator to set several network IPs at the same time. • You can only use SetIP program when your machine is connected to a network. • The following procedure is based on the Windows XP operating system. • You can only use IPv4 setting for SetIP. Installing the program 1. Insert the driver CD provided along with your machine. When the driver CD runs automatically, close the window. 2. Start Windows Explorer and open the X drive. (X represents your CDROM drive.) 3. Double click Application > SetIP. 4. Open the folder of the language you plan to use. 5. Double click Setup.exe to install this program. 6. Follow the instruction on the window to complete the installation. Starting the program 1. Print the machine's network information report which includes your machine's MAC address. See "Printing reports" on page 61. 2. From the Windows Start menu, select All Programs > your printer driver name > SetIP > SetIP. Getting started_ 27
-
 1
1 -
2
-
3
-
4
-
5
-
6
-
7
-
8
-
9
-
10
-
11
-
12
-
13
-
14
-
15
-
16
-
17
-
18
-
19
-
20
-
21
-
22
-
 23
23 -
 24
24 -
 25
25 -
 26
26 -
 27
27 -
 28
28 -
 29
29 -
 30
30 -
 31
31 -
 32
32 -
 33
33 -
34
-
35
-
36
-
37
-
38
-
39
-
40
-
41
-
42
-
43
-
44
-
45
-
46
-
47
-
48
-
49
-
50
-
51
-
52
-
53
-
54
-
55
-
56
-
57
-
58
-
59
-
60
-
61
-
62
-
63
-
64
-
65
-
66
-
67
-
68
-
69
-
70
-
71
-
72
-
73
-
74
-
75
-
76
-
77
-
78
-
79
-
80
-
81
-
82
-
83
-
84
-
85
-
86
-
87
-
88
-
89
-
90
-
91
-
92
-
93
-
94
-
95
-
96
-
97
-
98
-
99
-
100
-
101
-
102
-
103
-
104
-
105
-
106
-
107
-
108
-
109
-
110
-
111
-
112
-
113
-
114
-
115
-
116
-
117
-
118
-
119
-
120
-
121
-
122
-
123
-
124
-
125
-
126
-
127
-
128
-
129
-
130
-
131
-
132
-
133
-
134
-
135
-
136
-
137
-
138
-
139
-
140
 |
 |
