Xerox 6125N User Guide - Page 110
Setting the E-mail Environment, Properties, Apply, Use Password
 |
UPC - 095205739275
View all Xerox 6125N manuals
Add to My Manuals
Save this manual to your list of manuals |
Page 110 highlights
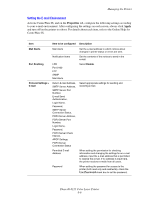
Managing the Printer Setting the E-mail Environment Activate CentreWare IS, and on the Properties tab, configure the following settings according to your e-mail environment. After configuring the settings on each screen, always click Apply and turn off/on the printer to reboot. For details about each item, refer to the Online Help for CentreWare IS. Item Item to be configured Description Mail Alerts Port Enabling Protocol Settings > E-mail Mail Alerts Notification Items LPR Port 9100 FTP SNMP Mail Alerts Return E-mail Address, SMTP Server Address, SMTP Server Port Number, E-mail Send Authentication, Login Name, Password, SMTP Server Connection Status, POP3 Server Address, POP3 Server Port Number, Login Name, Password, POP3 Server Check Interval, APOP Settings, POP3 Server Connection Status Permitted E-mail Address Password Set the e-mail address to which notices about changes in printer status or errors are sent. Set the contents of the notices to send in the e-mail. Select Enable. Select appropriate settings for sending and receiving e-mail. When setting the permission for checking information and changing the settings for an e-mail address, input the e-mail address that is permitted to receive the e-mail. If no address is input here, the printer receives e-mails from all users. When setting the password for access to the printer (both read only and read/write), check the Use Password check box to set the password. Phaser® 6125 Color Laser Printer 8-6
-
 1
1 -
2
-
3
-
4
-
5
-
6
-
7
-
8
-
9
-
10
-
11
-
12
-
13
-
14
-
15
-
16
-
17
-
18
-
19
-
20
-
21
-
22
-
23
-
24
-
25
-
26
-
27
-
28
-
29
-
30
-
31
-
32
-
33
-
34
-
35
-
36
-
37
-
38
-
39
-
40
-
41
-
42
-
43
-
44
-
45
-
46
-
47
-
48
-
49
-
50
-
51
-
52
-
53
-
54
-
55
-
56
-
57
-
58
-
59
-
60
-
61
-
62
-
63
-
64
-
65
-
66
-
67
-
68
-
69
-
70
-
71
-
72
-
73
-
74
-
75
-
76
-
77
-
78
-
79
-
80
-
81
-
82
-
83
-
84
-
85
-
86
-
87
-
88
-
89
-
90
-
91
-
92
-
93
-
94
-
95
-
96
-
97
-
98
-
99
-
100
-
101
-
102
-
103
-
104
-
 105
105 -
 106
106 -
 107
107 -
 108
108 -
 109
109 -
 110
110 -
 111
111 -
 112
112 -
 113
113 -
 114
114 -
 115
115 -
116
-
117
-
118
-
119
-
120
-
121
-
122
 |
 |