Xerox M118 OmniPage SE User Guide - Page 44
Get button., Start manually and finish automatically
 |
UPC - 095205219258
View all Xerox M118 manuals
Add to My Manuals
Save this manual to your list of manuals |
Page 44 highlights
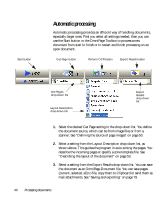
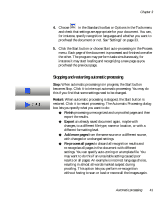
can process it automatically and view results in the Text Editor. You can determine which pages are in order, and which need different settings or some manual zoning. After adjusting settings and/or modifying zones, use manual processing to re-recognize just those pages. 1. Prepare the document and perform automatic processing, as already described. 2. If you close or finish proofing you will be invited to save the document. This is recommended, even if it is not in its final form. 3. Select a page needing rezoning and delete or modify the existing zones in the Image Panel. You can also load a template to let its zones replace existing ones. Draw new zones as desired. See "Zones and backgrounds" on page 55. 4. Change other settings as required for the current page. See "Settings" on page 33. 5. Click the Perform OCR button to re-recognize the current page. Confirm that the previous recognition results should be overwritten. Alternatively, you can use on-the-fly processing to handle zoning changes without re-recognizing the whole page. See "On-the-fly editing" on page 76. 6. To re-recognize more than one page, select the required pages in the thumbnails or Document Manager before clicking the Perform OCR button. 7. When all pages have been re-recognized with acceptable results, save the document again. Start manually and finish automatically: 1. Prepare settings and acquire images for the document by clicking the Get Page button. 2. Examine the pages for suitable brightness, orientation and content. Rescan or rotate unsuitable images. Reorder pages as desired. 44 Processing documents
-
 1
1 -
2
-
3
-
4
-
5
-
6
-
7
-
8
-
9
-
10
-
11
-
12
-
13
-
14
-
15
-
16
-
17
-
18
-
19
-
20
-
21
-
22
-
23
-
24
-
25
-
26
-
27
-
28
-
29
-
30
-
31
-
32
-
33
-
34
-
35
-
36
-
37
-
38
-
 39
39 -
 40
40 -
 41
41 -
 42
42 -
 43
43 -
 44
44 -
 45
45 -
 46
46 -
 47
47 -
 48
48 -
 49
49 -
50
-
51
-
52
-
53
-
54
-
55
-
56
-
57
-
58
-
59
-
60
-
61
-
62
-
63
-
64
-
65
-
66
-
67
-
68
-
69
-
70
-
71
-
72
-
73
-
74
-
75
-
76
-
77
-
78
-
79
-
80
-
81
-
82
-
83
-
84
-
85
-
86
-
87
-
88
-
89
-
90
-
91
-
92
-
93
-
94
-
95
-
96
-
97
-
98
-
99
-
100
-
101
-
102
 |
 |