Xerox M118 OmniPage SE User Guide - Page 59
Working with zones, Draw a single zone, resize, Make an irregular zone by addition
 |
UPC - 095205219258
View all Xerox M118 manuals
Add to My Manuals
Save this manual to your list of manuals |
Page 59 highlights
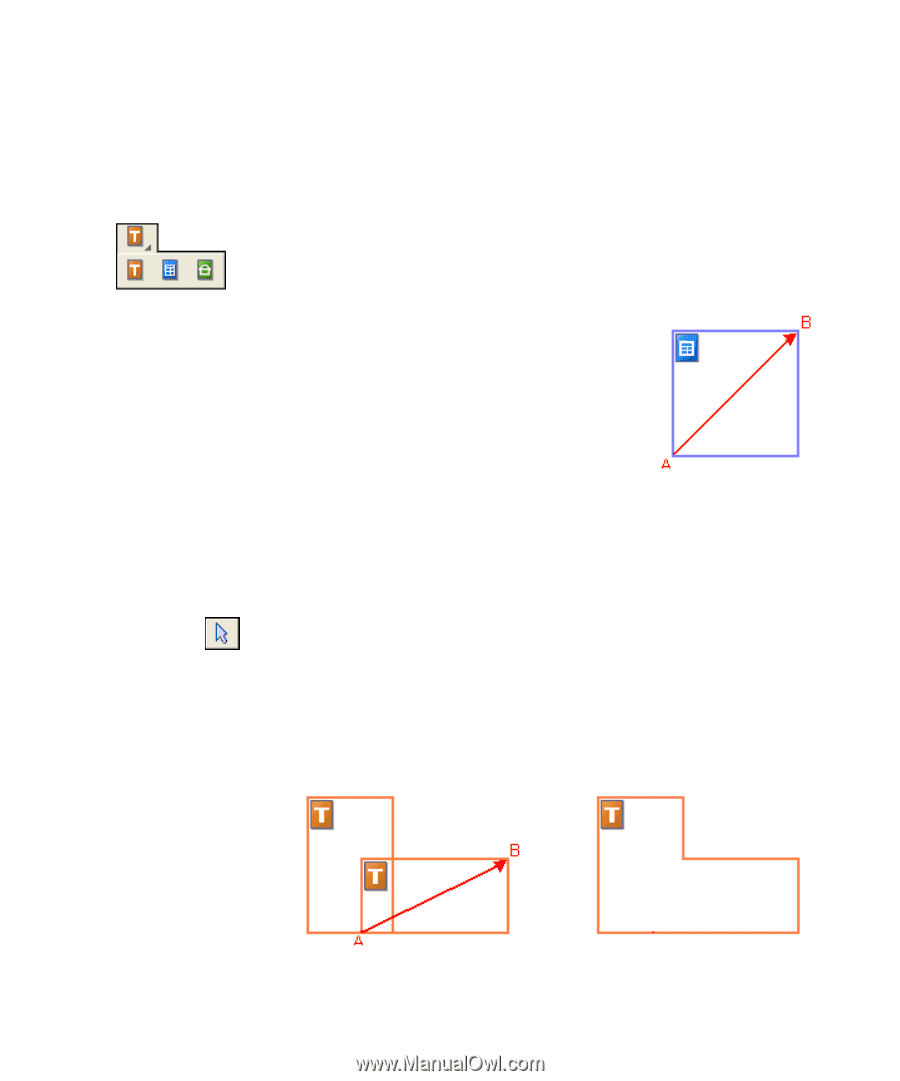
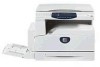
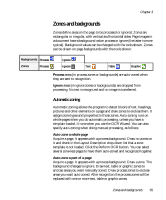
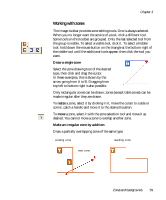
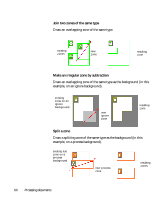
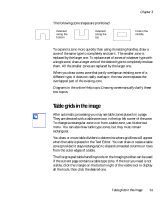
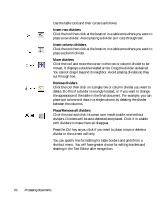
Chapter 3 Working with zones The Image toolbar provides zone editing tools. One is always selected. When you no longer want the service of a tool, click a different tool. Some tools on this toolbar are grouped. Only the last selected tool from the group is visible. To select a visible tool, click it. To select a hidden tool, hold down the mouse button on the triangle at the bottom right of the visible tool until the additional tools appear, then click the tool you want. Draw a single zone Select the zone drawing tool of the desired type, then click and drag the cursor. In these examples, this is shown by the arrow going from A to B. Dragging from top left to bottom right is also possible. Only rectangular zones can be drawn; zones (except table zones) can be made irregular after they are drawn. To resize a zone, select it by clicking in it, move the cursor to a side or corner, catch a handle and move it to the desired location. To move a zone, select it with the zone selection tool and move it as desired. You cannot move a zone to overlap another zone. Make an irregular zone by addition Draw a partially overlapping zone of the same type: existing zone resulting zone new zone Zones and backgrounds 59
-
 1
1 -
2
-
3
-
4
-
5
-
6
-
7
-
8
-
9
-
10
-
11
-
12
-
13
-
14
-
15
-
16
-
17
-
18
-
19
-
20
-
21
-
22
-
23
-
24
-
25
-
26
-
27
-
28
-
29
-
30
-
31
-
32
-
33
-
34
-
35
-
36
-
37
-
38
-
39
-
40
-
41
-
42
-
43
-
44
-
45
-
46
-
47
-
48
-
49
-
50
-
51
-
52
-
53
-
 54
54 -
 55
55 -
 56
56 -
 57
57 -
 58
58 -
 59
59 -
 60
60 -
 61
61 -
 62
62 -
 63
63 -
 64
64 -
65
-
66
-
67
-
68
-
69
-
70
-
71
-
72
-
73
-
74
-
75
-
76
-
77
-
78
-
79
-
80
-
81
-
82
-
83
-
84
-
85
-
86
-
87
-
88
-
89
-
90
-
91
-
92
-
93
-
94
-
95
-
96
-
97
-
98
-
99
-
100
-
101
-
102
 |
 |