Yamaha 01V96 Studio Manager Installation Guide - Page 14
Windows XP
 |
View all Yamaha 01V96 manuals
Add to My Manuals
Save this manual to your list of manuals |
Page 14 highlights
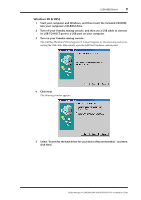
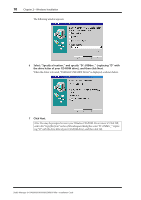
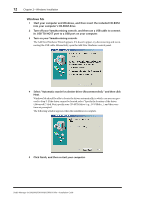
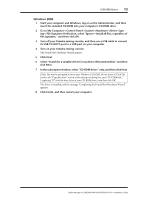
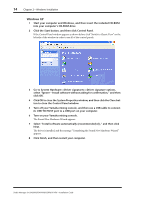
14 Chapter 2-Windows Installation Windows XP 1 Start your computer and Windows, and then insert the included CD-ROM into your computer's CD-ROM drive. 2 Click the Start button, and then click Control Panel. If the Control Panel window appears as shown below, click "Switch to Classic View" on the left side of the window in order to see all of the control panels. 3 Go to System Hardware->Driver signatures->Driver signature options, select "Ignore-Install software without asking for confirmation," and then click OK. 4 Click OK to close the System Properties window, and then click the Close button to close the Control Panel window. 5 Turn off your Yamaha mixing console, and then use a USB cable to connect its USB TO HOST port to a USB port on your computer. 6 Turn on your Yamaha mixing console. The Found New Hardware Wizard appears. 7 Select "Install software automatically (recommended) (I)," and then click Next. The driver is installed, and the message "Completing the Found New Hardware Wizard" appears. 8 Click Finish, and then restart your computer. Studio Manager for DM2000/DM1000/02R96/01V96-Installation Guide
-
 1
1 -
2
-
3
-
4
-
5
-
6
-
7
-
8
-
 9
9 -
 10
10 -
 11
11 -
 12
12 -
 13
13 -
 14
14 -
 15
15 -
 16
16 -
 17
17 -
 18
18 -
 19
19 -
20
-
21
-
22
-
23
-
24
-
25
-
26
-
27
-
28
 |
 |
