Yamaha CDR-D651 Owner's Manual - Page 14
Getting Started, Playback, Additional, Information, English, Recording, To Start Recording - 2 disc cd recorder
 |
View all Yamaha CDR-D651 manuals
Add to My Manuals
Save this manual to your list of manuals |
Page 14 highlights
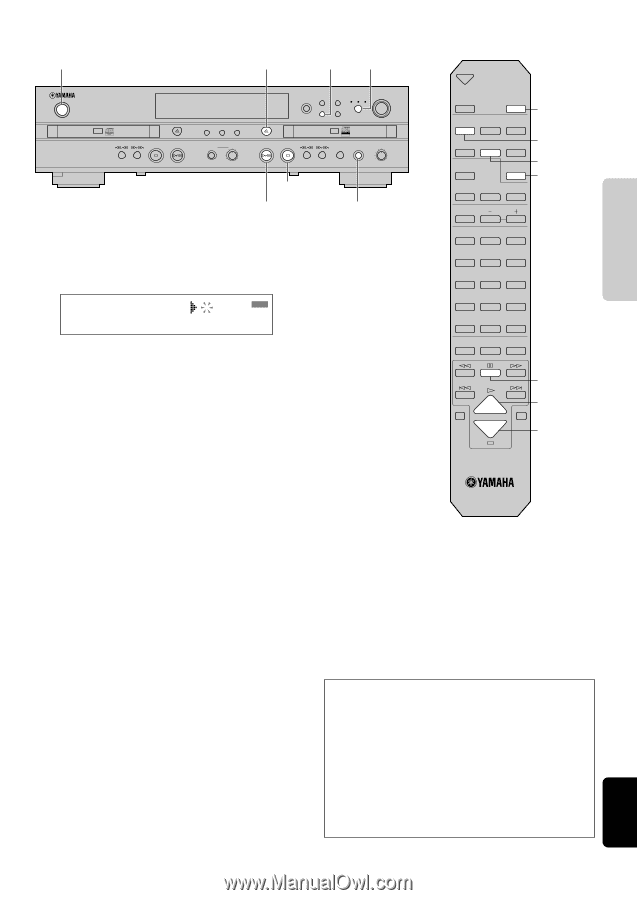
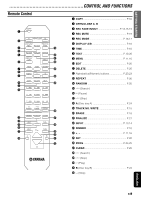
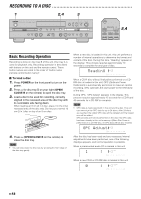
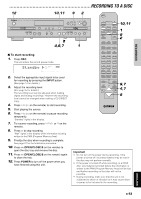
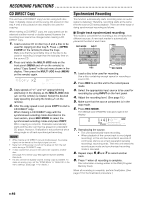
GETTING STARTED RECORDING PLAYBACK RECORDING TO A DISC 12 10,11 9 2 COPY NATURAL SOUND CD RECORDER CDR-D651 POWER A DISC DISPLAY A TEXT/TIME DISPLAY B PHONES LEVEL MIN MAX COPY REC MODE TRACK NO. INPUT DISC A DIGITAL ANALOG MULTI JOG PUSH MODE FINALIZE ERASE DIGITAL REC LEVEL B DISC Recordable ReWritable REC MUTE REC ANALOG REC LEVEL FADE IN/OUT MIN MAX 8 4,6,7 1 A OPEN/CLOSE B FADE IN/OUT TRACK NO. REC REC MUTE WRITE REC MODE FINALIZE ERASE DISPLAY A/B INPUT TIME TEXT DIMMER 10,11 1 9 2 MENU I To start recording 1. Press REC. This unit enters the record pause mode. Standby CD-R REC L dB -60 -30 -I0 R -6 -4 -2 -I 0 OVER 2. Select the appropriate input signal to be used for recording by pressing the INPUT button. (See page 14 for details.) 3. Adjust the recording level. (See page15 for details.) The recording level can be adjusted when making digital and analog recordings. However the recording level cannot be changed when making a CD DIRECT copy. 4. Press w/d (w on the remote) to start recording. 5. Start playing the source. 6. Press w/d (d on the remote) to pause recording temporarily. "Standby" lights in the display. 7. To resume recording, press w/d (w or d on the remote). 8. Press a to stop recording. "Wait" lights in the display while information is being written to the PMA (Program Memory Area). 9. Finalize the disc when recording is complete. See page 21 for the finalization procedure. 10. Press v (OPEN/CLOSE B on the remote) to open the disc tray and remove the disc. 11. Press v (OPEN/CLOSE B on the remote) again to close the tray. 12. Press POWER to turn off the power when you have finished using this unit. EDIT DELETE SET 1 ABC 2 DEF 3 GHI 4 JKL 5 MNO 6 PQR 7 STU 8 VWX 9 YZ 0 +10 SPACE SYMBOL PROG REPEAT RANDOM CLEAR 6,7 4,7 A B 8 Important • Do not turn off the power during recording. If the power is turned off, recorded material may be lost or the disc may not perform normally. • If the power is turned off while recording on a CD-R disc, any material recorded before the information is written to the PMA (Program Memory Area) will be lost and further recording on that disc will not be possible. • During recording, make sure that this unit is not subjected to shock or vibration as it may cause skips or jumps to be included in the recording. ADDITIONAL INFORMATION ENGLISH E-13
-
 1
1 -
2
-
3
-
4
-
5
-
6
-
7
-
8
-
 9
9 -
 10
10 -
 11
11 -
 12
12 -
 13
13 -
 14
14 -
 15
15 -
 16
16 -
 17
17 -
 18
18 -
 19
19 -
20
-
21
-
22
-
23
-
24
-
25
-
26
-
27
-
28
-
29
-
30
-
31
-
32
-
33
 |
 |