Yamaha CDR-D651 Owner's Manual - Page 17
RECORDING FUNCTIONS, CD DIRECT Copy, Synchronized Recording
 |
View all Yamaha CDR-D651 manuals
Add to My Manuals
Save this manual to your list of manuals |
Page 17 highlights
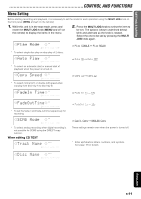
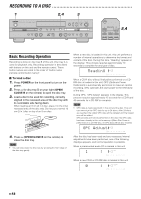
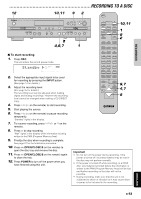
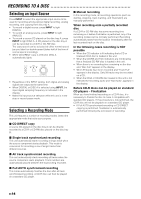
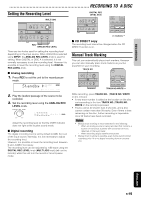
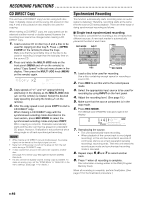
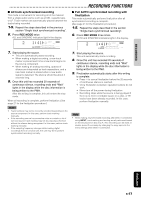
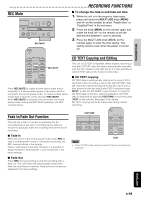
RECORDING FUNCTIONS CD DIRECT Copy This unit has a CD DIRECT copy function using both disc trays. It digitally copies an entire source CD placed on disc tray A onto a disc placed on disc tray B to be used for copying. When making a CD DIRECT copy, the copy speed can be selected at either normal or double speed. However the recording level cannot be changed when making a CD DIRECT copy. 1. Load a source CD on disc tray A and a disc to be used for copying on disc tray B. Press v (OPEN/ CLOSE on the remote) to close the trays. Make sure that the recordable time on the disc to be used for recording is longer than the total play time on the source CD. 2. Press and rotate the MULTI JOG knob on the front panel (MENU and +/- on the remote) to select "Copy Speed" in the set menu shown in the display. Then press the MULTI JOG knob (MENU on the remote) again. Copy x2 CD-R L dB -60 -30 -I0 R -6 -4 -2 -I 0 OVER 3. Copy speeds of "x1" and "x2" appear blinking alternately in the display as the MULTI JOG knob (+/- on the remote) is rotated. Select the desired copy speed by pressing the knob (+/- on the remote). 4. After the copy speed is set, press COPY to start a CD DIRECT copy. When making a CD DIRECT copy with the synchronized recording mode described in the next section, press REC MODE to select the synchronized recording mode and press COPY. When copying is complete, finalization automatically starts and the disc can then be played on a standard CD player. However, finalization is not performed when doing single or all track synchronized recording. Notes • While making a CD DIRECT copy at double speed, the analog signal can be heard but the digital signal can not. • Never turn off the power or pull out the plug out from the wall outlet during a CD DIRECT copy. • A disc copied from a source CD cannot be copied to another disc. See page 28 for Serial Copy Management System (SCMS) standards. • If a disc cannot be digitally copied, analog copy is possible. To make an analog copy, set the "SCMS Mode" to "ANALOG" in the menu settings. (See page 11 for details.) Synchronized Recording This function automatically starts recording when an audio signal is detected. Therefore, recording starts at the same time the source CD starts playback. There are three ways of doing synchronized recording as follows: I Single track synchronized recording This mode is convenient for recording a mix of tracks from different sources. A new track marker is automatically placed at the start of each track. REC MODE INPUT COPY REC MODE TRACK NO. INPUT DISC A DIGITAL ANALOG MULTI JOG PUSH MODE FINALIZE ERASE DIGITAL REC LEVEL B DISC Recordable ReWritable REC MUTE REC ANALOG REC LEVEL REC COPY A OPEN/CLOSE B FADE IN/OUT TRACK NO. REC REC MUTE WRITE FADE IN/OUT MIN MAX REC MODE FINALIZE ERASE REC REC MODE 1. Load a disc to be used for recording. Use a disc containing enough space for recording a source CD. 2. Press REC to set this unit to the record pause mode. 3. Select the appropriate input source to be used for recording by using INPUT on the front panel. 4. Adjust the recording level. (See page 15.) 5. Make sure that the source component is in the stop mode. 6. Press REC MODE. The SINGLE and SYNCHRO indicators light in the display. 2 1:41 CD-R REC 44.I SINGLE L dB -60 -30 -I0 SYNCHRO R -6 -4 -2 -I 0 OVER 7. Start playing the source. • This unit automatically starts recording. • When playback of the current track is over (digital recording), or this unit has recorded 4 seconds of continuous silence as a track separation (analog recording), recording ends. Then this unit enters the record pause mode and synchronized recording mode is canceled. 8. Repeat steps 5, 6 and 7 to record another track. 9. Press a when all recording is complete. Disc information is being written to the PMA (Program Memory Area). When all recording is complete, perform finalization. (See page 21 for the finalization procedure.) E-16
-
 1
1 -
2
-
3
-
4
-
5
-
6
-
7
-
8
-
9
-
10
-
11
-
 12
12 -
 13
13 -
 14
14 -
 15
15 -
 16
16 -
 17
17 -
 18
18 -
 19
19 -
 20
20 -
 21
21 -
 22
22 -
23
-
24
-
25
-
26
-
27
-
28
-
29
-
30
-
31
-
32
-
33
 |
 |
