Yamaha CDR-D651 Owner's Manual - Page 18
RECORDING, All track synchronized recording, Full AUTO synchronized recording with, finalization
 |
View all Yamaha CDR-D651 manuals
Add to My Manuals
Save this manual to your list of manuals |
Page 18 highlights
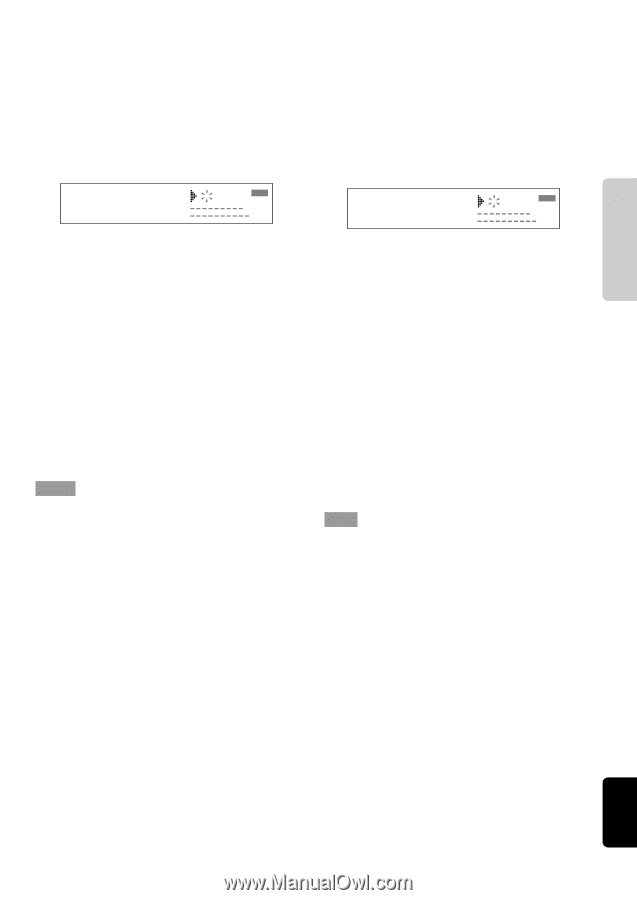
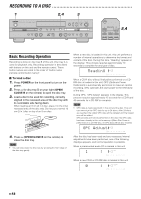
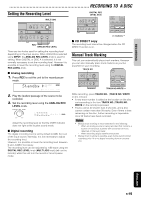
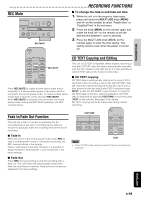
GETTING STARTED RECORDING RECORDING FUNCTIONS I All track synchronized recording This mode is convenient for recording all of the material from a single audio source such as an MD, cassette tape, or LP. Track markers are automatically placed between the tracks being recorded. 1-5. Repeat the steps described in the previous section "Single track synchronized recording". 6. Press REC MODE twice. ALL and SYNCHRO indicators light in the display. 2 1:41 CD-R REC 44.I L dB -60 -30 -I0 ALL SYNCHRO R -6 -4 -2 -I 0 OVER 7. Start playing the source. • This unit automatically starts recording. • When making a digital recording, a new track marker is placed each time a new track begins on the source component. • When making an analog recording, spaces of silence are interpreted as track separations, and a new track marker is placed when a new audio signal is detected. The silence should be about 4 seconds long. 8. Once this unit has recorded 20 seconds of continuous silence, recording ends and "Wait" lights in the display while the disc information is being written to the PMA. After this writing is complete, this unit enters the stop mode. When all recording is complete, perform finalization. (See page 21 for the finalization procedure.) Notes • Track numbers may not be correctly recorded depending on the source component. In this case, perform track marking manually. • If the recording source has excessive noise or contains a lot of low level sound, track marking may not be properly performed without the silence being recognized. In this case, perform track marking manually. • If the sampling frequency changes while making digital recordings from an external unit, this unit may fail to perform synchronized recording normally. I Full AUTO synchronized recording with finalization This mode automatically performs finalization after all synchronized recording is complete. (See page 21 for the finalization procedure.) 1-5. Repeat the steps described in the section "Single track synchronized recording". 6. Press REC MODE three times. AUTO and SYNCHRO indicators light in the display. 2 1:41 CD-R REC 44.I AUTO L dB -60 -30 -I0 SYNCHRO R -6 -4 -2 -I 0 OVER 7. Start playing the source. This unit automatically starts recording. 8. Once this unit has recorded 20 seconds of continuous silence, recording ends and "Wait" lights in the display while the disc information is being written to the PMA. 9. Finalization automatically starts after this writing is complete. • Press a to cancel finalization before the 20 seconds of continuous silence is reached. • Once finalization is started, operation buttons do not work. • Never turn off the power during finalization. • Recording stops while the source is being played if there is no more recordable space on a disc, or 99 tracks have been already recorded. In this case, perform finalization manually. Note • When making a synchronized recording after DISC A is selected using INPUT, track marking and ending are all performed based on the CD placed on disc tray A. Also recording can be done at double speed if necessary by changing the copy speed in the menu settings when DISC A is selected. PLAYBACK ADDITIONAL INFORMATION ENGLISH E-17
-
 1
1 -
2
-
3
-
4
-
5
-
6
-
7
-
8
-
9
-
10
-
11
-
12
-
 13
13 -
 14
14 -
 15
15 -
 16
16 -
 17
17 -
 18
18 -
 19
19 -
 20
20 -
 21
21 -
 22
22 -
 23
23 -
24
-
25
-
26
-
27
-
28
-
29
-
30
-
31
-
32
-
33
 |
 |