Yamaha CVP-709 CVP-709/705 Reference Manual - Page 54
Step Recording, Assembly — Assigning the Source Pattern to Each Channel
 |
View all Yamaha CVP-709 manuals
Add to My Manuals
Save this manual to your list of manuals |
Page 54 highlights
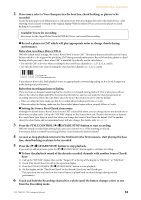
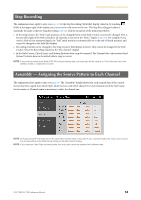
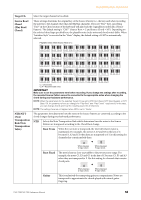
Creating/Editing Styles (Style Creator) Step Recording The explanations here apply to step 4 on page 49. In the Step Recording (Style Edit) display called up by touching (Edit) at the upper right of the display, you can record or edit notes one by one. This Step Recording procedure is essentially the same as that for Song Recording (page 62) with the exception of the points listed below: • In the Song Creator, the "End" mark position can be changed freely; in the Style Creator, it cannot be changed. This is because the length of the Style is fixed for all channels as you set in the "Basic" display (page 50). For example, if you create a Style of four measures length, the "End" mark position is automatically set to the end of fourth measure, and cannot be changed in the Style Edit display. • Recording channels can be changed in the Song Creator's Edit display; however, they cannot be changed in the Style Creator. Select the Recording channel in the "Rec channel" display. • In the Style Creator, Chord, Lyrics, and System Exclusive data cannot be entered. The Channel data can be entered and System Exclusive data can be edited (delete, copy or move). NOTE If you select a preset Audio Style (CVP-709 only) as starting data, the Audio part will be used as is. The Audio part cannot be deleted, edited or created from scratch. Assembly - Assigning the Source Pattern to Each Channel The explanations here apply to step 4 on page 49. The "Assembly" display shows that each channel data of the current Section has been copied from which Style, which Section, and which channel. For each channel, touch the Style name, Section name, or Channel name as necessary to select the desired one. NOTE An Audio part (CVP-709 only) cannot be copied from another Style. If you want to use a specific Audio part, make sure to select the corresponding Audio Style before calling up the Style Creator display. NOTE If you select an Audio Style as starting data, the Audio part cannot be replaced with different data. CVP-709/CVP-705 Reference Manual 54
-
 1
1 -
2
-
3
-
4
-
5
-
6
-
7
-
8
-
9
-
10
-
11
-
12
-
13
-
14
-
15
-
16
-
17
-
18
-
19
-
20
-
21
-
22
-
23
-
24
-
25
-
26
-
27
-
28
-
29
-
30
-
31
-
32
-
33
-
34
-
35
-
36
-
37
-
38
-
39
-
40
-
41
-
42
-
43
-
44
-
45
-
46
-
47
-
48
-
 49
49 -
 50
50 -
 51
51 -
 52
52 -
 53
53 -
 54
54 -
 55
55 -
 56
56 -
 57
57 -
 58
58 -
 59
59 -
60
-
61
-
62
-
63
-
64
-
65
-
66
-
67
-
68
-
69
-
70
-
71
-
72
-
73
-
74
-
75
-
76
-
77
-
78
-
79
-
80
-
81
-
82
-
83
-
84
-
85
-
86
-
87
-
88
-
89
-
90
-
91
-
92
-
93
-
94
-
95
-
96
-
97
-
98
-
99
-
100
-
101
-
102
-
103
-
104
-
105
-
106
-
107
-
108
-
109
-
110
-
111
-
112
-
113
-
114
-
115
-
116
-
117
 |
 |
