Yamaha DGC1B Disklavier Mark III Series DGC1B Basic Operation Manual - Page 16
Names of Parts and Their Functions, Control Unit — Front Panel
 |
View all Yamaha DGC1B manuals
Add to My Manuals
Save this manual to your list of manuals |
Page 16 highlights
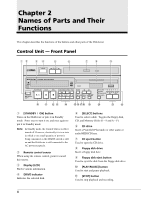
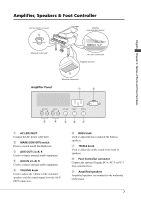
Chapter 2 Names of Parts and Their Functions This chapter describes the functions of the buttons and other parts of the Disklavier. Control Unit - Front Panel 12 34 5 6 DRIVE SELECT 7 8 9 CONTROL UNIT DKC60RCD GENERAL INSTRUMENT PLAY/PAUSE STOP REC STANDBY ON PART L R ENTER VOICE FUNC. METRONOME TEMPO TRANSPOSE BALANCE +/YES 0 q we r t y ui o p a s 1 [STANDBY / ON] button Turns on the Disklavier or puts it in Standby mode. Press once to turn it on, and once again to put it in Standby mode. Note: In Standby mode, the Control Unit is in effect turned off. However, electrically it is in a state in which a very small quantity of power is being consumed, as the MAINS switch is still on and the Disklavier is still connected to the AC power receptacle. 2 Remote control sensor When using the remote control, point it toward this sensor. 3 Display (LCD) Shows various information. 4 DRIVE indicator Indicates the selected disk. 5 [SELECT] buttons Used to select a disk. Toggles the floppy disk, CD, and Memory Disks (0 ~ 9 and A ~ F). 6 CD drive Insert a PianoSoft.PlusAudio or other audio or audio/MIDI CD here. 7 CD eject button Used to open the CD drive. 8 Floppy disk drive Insert a floppy disk here. 9 Floppy disk eject button Used to eject the disk from the floppy disk drive. 0 [PLAY/PAUSE] button Used to start and pause playback. q [STOP] button Used to stop playback and recording. 4
-
 1
1 -
2
-
3
-
4
-
5
-
6
-
7
-
8
-
9
-
10
-
 11
11 -
 12
12 -
 13
13 -
 14
14 -
 15
15 -
 16
16 -
 17
17 -
 18
18 -
 19
19 -
 20
20 -
 21
21 -
22
-
23
-
24
-
25
-
26
-
27
-
28
-
29
-
30
-
31
-
32
-
33
-
34
-
35
-
36
-
37
-
38
-
39
-
40
-
41
-
42
-
43
-
44
-
45
-
46
-
47
-
48
-
49
-
50
-
51
-
52
-
53
-
54
-
55
-
56
-
57
-
58
-
59
-
60
-
61
-
62
-
63
-
64
-
65
-
66
-
67
-
68
-
69
-
70
-
71
-
72
-
73
-
74
 |
 |
