Yamaha DGC1B Disklavier Mark III Series DGC1B Basic Operation Manual - Page 5
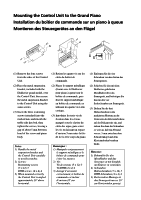
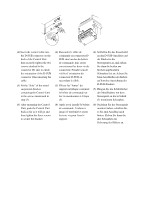
Mounting the Control Unit to the Grand Piano
 |
View all Yamaha DGC1B manuals
Add to My Manuals
Save this manual to your list of manuals |
Page 5 highlights
Mounting the Control Unit to the Grand Piano Installation du boîtier de commande sur un piano à queue Montieren des Steuergerätes an den Flügel GENERAL INSTRUMENT GENERAL INSTRUMENT (1) Remove the four screws from the sides of the Control Unit. (2) Place the metal suspension bracket, included with the Disklavier grand model, over the Control Unit, then secure the metal suspension bracket to the Control Unit using the same screws. (3) Insert the three restraining screws (attached) into the marked nuts underneath the treble side key bed, then tighten the screws, leaving a gap of about 5 mm between head of the screw and piano body. Notes: 1) Handle the metal suspension bracket and the Control Unit carefully to avoid scratches. 2) Screws: Restraining screws (5 × 12) 3 BWH screws (4 × 4) 4 3) When mounted correctly, the Control Unit is angled approximately 18˚ above horizontal. (1) Retirer les quatre vis sur les côtés du boîtier de commande. (2) Placer le support métallique (fourni avec le Disklavier pour piano à queue) sur le boîtier de commande, puis fixer le support métallique au boîtier de commande en utilisant les quatre vis à tête conique. (3) Introduire les trois vis de fixation dans les écrous marqués sous le clavier du côtés des aigus, puis serrer les vis en laissant un espace d'environ 5 mm entre la tête de la vis et le corps du piano. Remarques : 1) Manipuler soigneusement le support métallique et le boîtier de commande pour éviter les rayures. 2) Vis : Vis de retenue (5 × 12) 3 Vis BWH (4 × 4) 4 3) Lorsqu'il est monté correctement, le boîtier de commande est incliné d'environ 18˚ sur l'horizontale. (1) Entfernen Sie die vier Schrauben von den Seiten des Steuergerätes. (2) Schieben Sie den mit dem Disklavier gelieferten Metallhalter über das Steuergerät, und befestigen Sie ihn mit den vier Senkschrauben am Steuergerät. (3) Drehen Sie die drei Halteschrauben in die markierten Muttern an der Unterseite des Klaviaturbodens auf der Diskantseite ein, und ziehen Sie dann die Schrauben so weit an, daß ein Abstand von ca. 5 mm zwischen dem Schraubenkopf und dem Klaviaturboden bestehen bleibt. Hinweise: 1) Behandeln Sie den Metallhalter und das Steuerger:at mit Sorgfalt, um Kratzer zu vermeiden. 2) Schrauben: Halteschrauben (5 × 12) 3 BWH-Schrauben (4 × 4) 4 3) Bei korrekter Montage ist das Steuergerät um ca. 18˚ zur Horizontalen geneigt.
-
 1
1 -
 2
2 -
 3
3 -
 4
4 -
 5
5 -
 6
6 -
 7
7 -
 8
8 -
 9
9 -
 10
10 -
 11
11 -
12
-
13
-
14
-
15
-
16
-
17
-
18
-
19
-
20
-
21
-
22
-
23
-
24
-
25
-
26
-
27
-
28
-
29
-
30
-
31
-
32
-
33
-
34
-
35
-
36
-
37
-
38
-
39
-
40
-
41
-
42
-
43
-
44
-
45
-
46
-
47
-
48
-
49
-
50
-
51
-
52
-
53
-
54
-
55
-
56
-
57
-
58
-
59
-
60
-
61
-
62
-
63
-
64
-
65
-
66
-
67
-
68
-
69
-
70
-
71
-
72
-
73
-
74
 |
 |
