Yamaha DGC1B Disklavier Mark III Series DGC1B Basic Operation Manual - Page 23
Memory Disks, English, Disks Used with the Disklavier
 |
View all Yamaha DGC1B manuals
Add to My Manuals
Save this manual to your list of manuals |
Page 23 highlights
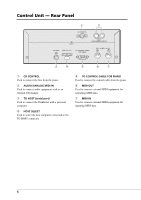
English Chapter 3: Disks Used with the Disklavier Inserting & Removing CDs Press the CD eject button so that the CD tray pops out about 1 cm. Then, carefully pull it out as far as it will go. To insert a CD, place the CD on the tray and gently press down on it so that the center of the CD is clamped in place. To remove the CD, slowly lift the CD. Note: The CD eject button can be used only when the Control Unit is turned on. DRIVE SELECT CONTROL UNIT DKC60RCD PLAY/PAUSE STOP REC SONG SELECT/REV • FWD PART R L ENTER VOICE FUNC. MNOETMREO- STANDBY ON VOLUME 10 -8 -6 TTERMANPSOPOSE -/NO -4 -2 0 +/YES BALANCE Note: Always place the CD with the label side facing up. Then, gently push the tray back in until it clicks into place. Memory Disks Besides floppy disks and CDs, the Disklavier has 64 megabytes (4 megabytes × 16 Memory Disks) of internal flash memory for storing song data. They are numbered from 0 to 9 and A to F. They can be used in the same way that you use floppy disks to store songs. Memory Disks are ideal for storing many songs, especially when you want to program your Disklavier to automatically play back many songs with the Chain Play or Timer Play features. (See Chapter 2 "Chain Play - Playing Back Memory Disks in a Group" and Chapter 3 "Timer Play" in the Advanced Operation Manual for details.) ☛ See also Chapter 1 "Storing & Managing Songs on Disks" in the Advanced Operation Manual for more information on using Memory Disks. DRIVE SELECT CONTROL UNIT DKC60RCD PLAY/PAUSE STOP REC SONG SELECT/REV • FWD PART R L ENTER VOICE FUNC. MNOETMREO- STANDBY ON VOLUME 10 -8 -6 TTERMANPSOPOSE -/NO -4 -2 0 +/YES BALANCE 11
-
 1
1 -
2
-
3
-
4
-
5
-
6
-
7
-
8
-
9
-
10
-
11
-
12
-
13
-
14
-
15
-
16
-
17
-
 18
18 -
 19
19 -
 20
20 -
 21
21 -
 22
22 -
 23
23 -
 24
24 -
 25
25 -
 26
26 -
 27
27 -
 28
28 -
29
-
30
-
31
-
32
-
33
-
34
-
35
-
36
-
37
-
38
-
39
-
40
-
41
-
42
-
43
-
44
-
45
-
46
-
47
-
48
-
49
-
50
-
51
-
52
-
53
-
54
-
55
-
56
-
57
-
58
-
59
-
60
-
61
-
62
-
63
-
64
-
65
-
66
-
67
-
68
-
69
-
70
-
71
-
72
-
73
-
74
 |
 |
