Yamaha DGC1B Disklavier Mark III Series DGC1B Basic Operation Manual - Page 6
Nachdem Sie das Steuergerät, Schließen Sie das Steuerkabel
 |
View all Yamaha DGC1B manuals
Add to My Manuals
Save this manual to your list of manuals |
Page 6 highlights
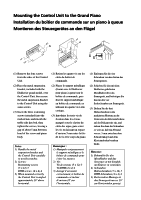
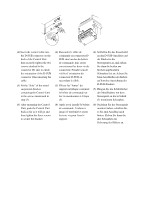
CD CONTROL L R AUDIO/ANALOG MIDI IN TO CFOONRTRPOIALNOCABLE HOST TO HOST SELECT PMCA2C MPCID1I MIDI IN OUT GENERAL INSTRUMENT (4) Insert the control cable into the D-SUB connector on the back of the Control Unit, then securely tighten the two screws attached to the connector. Be sure to check the orientation of the D-SUB connector when inserting the cable. (5) Fit the "slots" of the metal suspension bracket containing the Control Unit to the screws mentioned in step (3). (6) After mounting the Control Unit, push the Control Unit back as far as it will go and then tighten the three screws to secure the bracket. (4) Raccorder le câble de commande au connecteur DSUB situé au dos du boîtier de commande, puis serrer correctement les deux vis du connecteur. Prendre soin de vérifier l'orientation du connecteur D-SUB en raccordant le câble. (5) Glisser les "fentes" du support métallique contenant le boîtier de commande sur les vis mentionnées à l'étape (3). (6) Après avoir installé le boîtier de commande, l'enfoncer jusqu'à l'extrémité et serrer les trois vis pour fixer le support. (4) Schließen Sie das Steuerkabel an den D-SUB-Anschluss auf der Rückseite des Steuergerätes an, und ziehen Sie dann die beiden am Stecker angebrachten Schrauben fest an. Achten Sie beim Anschließen des Kabels auf korrekte Ausrichtung des D-SUB-Steckers. (5) Hängen Sie die Schlitzlöcher des Metallhalters mit dem Steuergerät an die in Schritt (3) montierten Schrauben. (6) Nachdem Sie das Steuergerät montiert haben, schieben Sie es bis zum Anschlag nach hinten. Ziehen Sie dann die drei Schrauben zur Sicherung des Halters an.
-
 1
1 -
 2
2 -
 3
3 -
 4
4 -
 5
5 -
 6
6 -
 7
7 -
 8
8 -
 9
9 -
 10
10 -
 11
11 -
 12
12 -
13
-
14
-
15
-
16
-
17
-
18
-
19
-
20
-
21
-
22
-
23
-
24
-
25
-
26
-
27
-
28
-
29
-
30
-
31
-
32
-
33
-
34
-
35
-
36
-
37
-
38
-
39
-
40
-
41
-
42
-
43
-
44
-
45
-
46
-
47
-
48
-
49
-
50
-
51
-
52
-
53
-
54
-
55
-
56
-
57
-
58
-
59
-
60
-
61
-
62
-
63
-
64
-
65
-
66
-
67
-
68
-
69
-
70
-
71
-
72
-
73
-
74
 |
 |
