Yamaha HTR-5540 Owners Manual - Page 48
Yamaha HTR-5540 Manual
 |
View all Yamaha HTR-5540 manuals
Add to My Manuals
Save this manual to your list of manuals |
Page 48 highlights
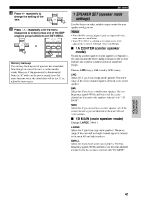
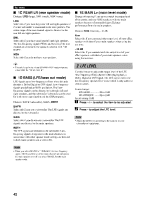
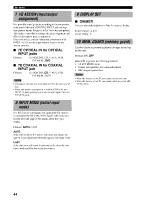
SET MENU 7 I/O ASSIGN (input/output assignment) It is possible to assign jacks according to the component to be used if this unit's DIGITAL INPUT jack settings (component names for jacks) differ from that component. This makes it possible to change the jack assignment and effectively connect more components. Once you assign, you can select that component with INPUT l / h (or the input selector buttons on the remote control). 9 DISPLAY SET I DIMMER You can adjust the brightness of the front panel display. Control range: -4 to 0 Initial setting: 0 10 MEM. GUARD (memory guard) Use this feature to prevent accidental changes to settings on this unit. Choices: ON, OFF Select ON to protect the following features: • All SET MENU items • Center, rear speakers, and subwoofer levels • DSP program parameters I 7C OPTICAL IN for OPTICAL INPUT jacks Choices: (1) MD/CD-R, CD, V-AUX, VCR, D-TV/CBL, DVD I 7D COAXIAL IN for COAXIAL INPUT jack Choices: (2) MD/CD-R, CD, V-AUX, VCR, D-TV/CBL, DVD Notes • When this item is set to ON, you cannot use the test tone. • When this item is set to ON, you cannot select any other SET MENU items. Notes • You cannot select an item more than once for the same type of jack. • When you connect a component to both the COAXIAL and OPTICAL jacks, priority is given to the input signals from the COAXIAL jack. 8 INPUT MODE (initial input mode) Use this feature to designate the input mode for sources connected to the DIGITAL INPUT jacks when you turn on this unit (see page 25 for details about the input mode). Choices: AUTO, LAST AUTO Select this to allow this unit to automatically detect the type of input signal and select the appropriate input mode. LAST Select this to set this unit to automatically select the last input mode used for the respective source. 44
-
 1
1 -
2
-
3
-
4
-
5
-
6
-
7
-
8
-
9
-
10
-
11
-
12
-
13
-
14
-
15
-
16
-
17
-
18
-
19
-
20
-
21
-
22
-
23
-
24
-
25
-
26
-
27
-
28
-
29
-
30
-
31
-
32
-
33
-
34
-
35
-
36
-
37
-
38
-
39
-
40
-
41
-
42
-
 43
43 -
 44
44 -
 45
45 -
 46
46 -
 47
47 -
 48
48 -
 49
49 -
 50
50 -
 51
51 -
 52
52 -
 53
53 -
54
-
55
-
56
-
57
-
58
-
59
 |
 |