Yamaha HTR-5940 Owners Manual - Page 33
CHECK OK?, Press SET MENU to exit from BASIC - subwoofer
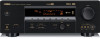 |
View all Yamaha HTR-5940 manuals
Add to My Manuals
Save this manual to your list of manuals |
Page 33 highlights
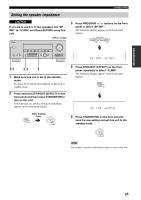
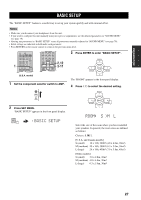
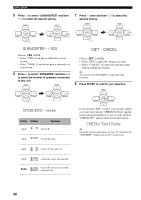
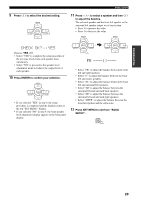
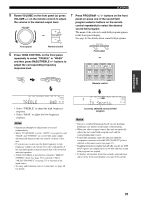
PREPARATION 9 Press j / i to select the desired setting. PRESET/CH A-E/CAT. ENTER A-E/CAT. BASIC SETUP 11 Press d / u to select a speaker and then j / i to adjust the balance. The selected speaker and the front left speaker or the surround left speaker output a test tone in turn. • Press i to increase the value. • Press j to decrease the value. PRESET/CH PRESET/CH CHECK OK? ..YES Choices: YES, NO • Select "YES" to complete the setup procedure if the test tone levels from each speaker were satisfactory. • Select "NO" to proceed to the speaker level adjustment menu to balance the output level of each speaker. 10 Press ENTER to confirm your selection. PRESET/CH A-E/CAT. ENTER A-E/CAT. • If you selected "YES" in step 9, the setup procedure is completed and the display returns to the top "SET MENU" display. • If you selected "NO" in step 9, the front speaker level adjustment display appears in the front panel display. A-E/CAT. ENTER A-E/CAT. A-E/CAT. ENTER A-E/CAT. FR ----||---- • Select "FR" to adjust the balance between the front left and right speakers. • Select "C" to adjust the balance between the front left and center speakers. • Select "SL" to adjust the balance between the front left and surround left speakers. • Select "SB" to adjust the balance between the surround left and surround back speakers. • Select "SR" to adjust the balance between the surround left and surround right speakers. • Select "SWFR" to adjust the balance between the front left speaker and the subwoofer. 12 Press SET MENU to exit from "BASIC SETUP". SET MENU MENU SRCH MODE 29
-
 1
1 -
2
-
3
-
4
-
5
-
6
-
7
-
8
-
9
-
10
-
11
-
12
-
13
-
14
-
15
-
16
-
17
-
18
-
19
-
20
-
21
-
22
-
23
-
24
-
25
-
26
-
27
-
 28
28 -
 29
29 -
 30
30 -
 31
31 -
 32
32 -
 33
33 -
 34
34 -
 35
35 -
 36
36 -
 37
37 -
 38
38 -
39
-
40
-
41
-
42
-
43
-
44
-
45
-
46
-
47
-
48
-
49
-
50
-
51
-
52
-
53
-
54
-
55
-
56
-
57
-
58
-
59
-
60
-
61
-
62
-
63
-
64
-
65
-
66
-
67
-
68
-
69
-
70
-
71
-
72
-
73
-
74
-
75
-
76
-
77
-
78
-
79
-
80
-
81
-
82
-
83
-
84
-
85
-
86
-
87
-
88
-
89
-
90
-
91
-
92
-
93
-
94
-
95
-
96
-
97
-
98
-
99
-
100
-
101
-
102
-
103
-
104
-
105
-
106
-
107
-
108
-
109
-
110
-
111
 |
 |
