Yamaha HTR-5940 Owners Manual - Page 91
Controlling other components, Remote, control, DVD player, recorder, Digital TV, Cable TV, MD/CD
 |
View all Yamaha HTR-5940 manuals
Add to My Manuals
Save this manual to your list of manuals |
Page 91 highlights
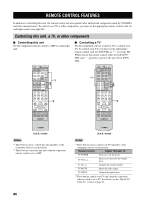
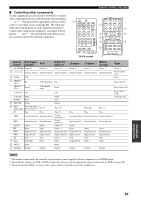
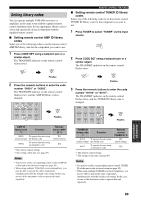
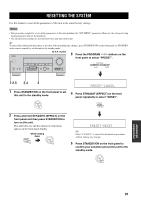
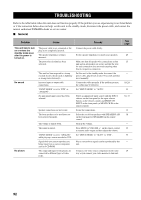
■ Controlling other components Set the component selector switch to SOURCE to control other components selected with the input selector buttons, , or . You must set the appropriate remote control code for each input source (see page 88). The following table shows the function of each control button used to control other components assigned to each input selector button, , and . Be advised that some buttons may not correctly operate the selected component. REMOTE CONTROL FEATURES 1 CODE SET TRANSMIT POWER TV POWER AV STANDBY POWER CD DVD MD CD-R CBL DTV SLEEP XM TUNER MULTI CH IN V-AUX DVR TV VOL TV CH AMP VOLUME SOURCE TV TV MUTE TV INPUT MUTE STEREO 1 MUSIC ENTERTAIN MOVIE 2 3 4 (U.S.A. model) 2 3 4 5 6 TV MUTE TV INPUT MUTE STEREO 1 MUSIC ENTERTAIN MOVIE 2 3 4 STANDARD SELECT EXTD SUR. DIRECT ST. 5 6 7 8 SPEAKERS 9 LEVEL TITLE BAND ENHANCER 0 NIGHT 10 PRESET/CH STRAIGHT ENT. EFFECT SET MENU MENU SRCH MODE A-E/CAT. RETURN XM MEMORY REC DISC SKIP ENTER A-E/CAT. DISPLAY AUDIO 7 8 9 Remote control DVD player/ recorder VCR Digital TV/ Cable TV LD player CD player MD/CD recorder Tuner 1 AV POWER Power *1 Power *1 Power *2 Power *1 Power *1 Power *1 Power *1 2 1-9, 0, +10 Numeric buttons Numeric buttons Numeric buttons Numeric buttons Numeric buttons Numeric buttons Preset stations (1-8) 3 TITLE Title Band 4 PRESET/ CH u Up VCR channel up Up Preset up (1-8) PRESET/ CH d Down VCR channel down Down Preset down (1-8) A-E/CAT. j Left Left Preset down (A-E) A-E/CAT. i Right Right Preset up (A-E) ENTER Enter Enter 5 RETURN Return Return 6 REC/ DISC SKIP Disc skip (player) Rec (recorder) *3 Rec *3 Rec *2*3 Disc skip Rec *3 p Play Play Play *2 Play Play Play w Search backward Search backward Search backward *2 Search backward Search backward Search backward f Search forward Search forward Search forward *2 Search forward Search forward Search forward AUDIO Audio Audio Audio *2 Sound e Pause Pause Pause *2 Pause Pause Pause b Skip backward Skip backward Skip backward *2 Skip backward Skip backward Skip backward a Skip forward Skip forward Skip forward *2 Skip forward Skip forward Skip forward s Stop Stop Stop *2 Stop Stop Stop 7 ENT. Title/Index Enter Enter Chapter/Time Index Index 8 MENU Menu Menu 9 DISPLAY Display Display Display Display Display Display Notes *1 This button is operational only when the original remote control supplied with the component has a POWER button. *2 These buttons control your VCR or DVD recorder only when you set the appropriate remote control code for DVR (see page 88). *3 When you use this button to record a source, press it twice repeatedly to prevent a malfunction. ADVANCED OPERATION 87
-
 1
1 -
2
-
3
-
4
-
5
-
6
-
7
-
8
-
9
-
10
-
11
-
12
-
13
-
14
-
15
-
16
-
17
-
18
-
19
-
20
-
21
-
22
-
23
-
24
-
25
-
26
-
27
-
28
-
29
-
30
-
31
-
32
-
33
-
34
-
35
-
36
-
37
-
38
-
39
-
40
-
41
-
42
-
43
-
44
-
45
-
46
-
47
-
48
-
49
-
50
-
51
-
52
-
53
-
54
-
55
-
56
-
57
-
58
-
59
-
60
-
61
-
62
-
63
-
64
-
65
-
66
-
67
-
68
-
69
-
70
-
71
-
72
-
73
-
74
-
75
-
76
-
77
-
78
-
79
-
80
-
81
-
82
-
83
-
84
-
85
-
 86
86 -
 87
87 -
 88
88 -
 89
89 -
 90
90 -
 91
91 -
 92
92 -
 93
93 -
 94
94 -
 95
95 -
 96
96 -
97
-
98
-
99
-
100
-
101
-
102
-
103
-
104
-
105
-
106
-
107
-
108
-
109
-
110
-
111
 |
 |
