Yamaha MGP16X Owner's Manual - Page 10
Rack Mounting, Precautions for Rack Mounting, Mounting the MGP16X/MGP12X - mixer case for
 |
View all Yamaha MGP16X manuals
Add to My Manuals
Save this manual to your list of manuals |
Page 10 highlights
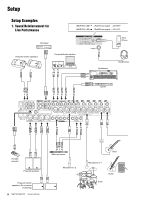
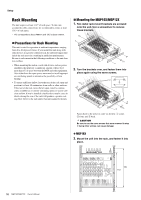
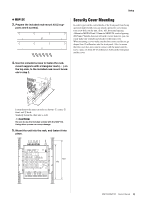
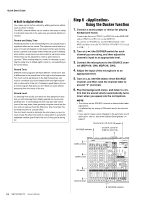
Setup Rack Mounting The unit requires at least 11U* of rack space. To take into account the cable connections, we recommend to ensure at least 13U* of rack space. * 11U corresponds to about 489mm and 13U is about 578mm. Mounting the MGP16X/MGP12X 1. Two metal rack-mount brackets are screwed onto the unit. Use a screwdriver to remove these brackets. Precautions for Rack Mounting This unit is rated for operation at ambient temperatures ranging from 0 to 40 degrees Celsius. If you install this unit along with other devices in a poorly ventilated rack, the ambient temperature inside the rack may rise, resulting in inefficient performance. Be sure to rack-mount in the following conditions so the unit does not overheat. • When mounting the unit in a rack with devices such as power amplifiers that generate a significant amount of heat, leave more than 1U of space between the MGP and other equipment. Also either leave the open spaces uncovered or install appropriate ventilating panels to minimize the possibility of heat buildup. • To ensure sufficient airflow, leave the rear of the rack open and position it at least 10 centimeters from walls or other surfaces. If the rear of the rack cannot be left open, install a commercially available fan or similar ventilating option to secure sufficient airflow. If you've installed a fan kit, there may be cases in which closing the rear of the rack will produce a greater cooling effect. Refer to the rack and/or fan unit manual for details. 2. Turn the brackets over, and fasten them into place again using the same screws. e q w e q w Fasten them to the mixer in order (as shown): q center, w front, and e back. CAUTION Be sure to use the same screws that were removed in step 1. Using other screws can cause damage. MGP16X 3. Mount the unit into the rack, and fasten it into place. 10 MGP16X/MGP12X Owner's Manual 13U 11U
-
 1
1 -
2
-
3
-
4
-
 5
5 -
 6
6 -
 7
7 -
 8
8 -
 9
9 -
 10
10 -
 11
11 -
 12
12 -
 13
13 -
 14
14 -
 15
15 -
16
-
17
-
18
-
19
-
20
-
21
-
22
-
23
-
24
-
25
-
26
-
27
-
28
-
29
-
30
-
31
-
32
-
33
-
34
-
35
-
36
 |
 |
