Yamaha MGP16X Owner's Manual - Page 18
Channel Control Block, Mono input Mono and stereo input - 16 channel mixer with effects
 |
View all Yamaha MGP16X manuals
Add to My Manuals
Save this manual to your list of manuals |
Page 18 highlights
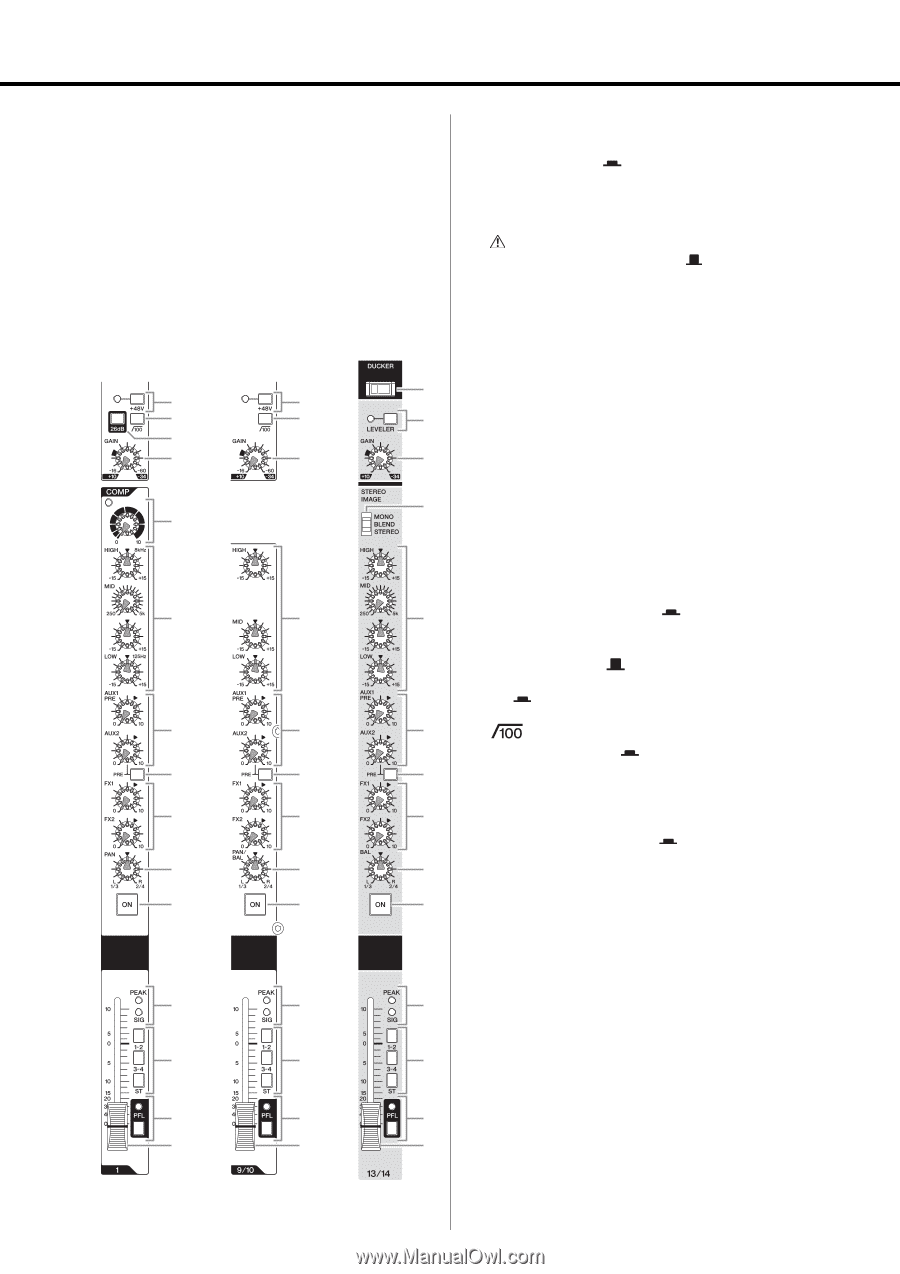
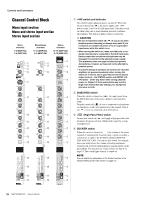
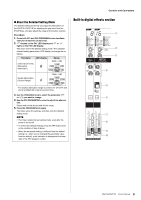
Controls and Connectors Channel Control Block Mono input section Mono and stereo input section Stereo input section Mono channels 1-8 (MGP16X), 1-4 (MGP12X) Mono/stereo channels 9-12 (MGP16X), 5-8 (MGP12X) Stereo channels 13-16 (MGP16X), 9-12 (MGP12X) r q q e e t w y y y i u o o o !0 !0 !0 !1 !1 !1 !2 !2 !2 !3 !3 !3 !4 !4 !4 !5 !5 !5 !6 !6 !6 q +48V switch and indicator This switch toggles phantom power on and off. When this switch is turned on ( ), the mixer supplies DC +48V power to pins 2 and 3 of all XLR input jacks. Turn this switch on when using one or more phantom-powered condenser microphones. The indicator lights when it is turned on. CAUTION • Be sure to leave this switch off ( ) if you do not need phantom power. Humming or damage may result if you connect to an unbalanced device or to an ungrounded transformer while this switch is on. • When turning the switch on, make sure that only a condenser microphone is connected to the XLR input jacks. Devices other than condenser microphones may be damaged if connected to the phantom power supply. This precaution does not apply to balanced dynamic microphones, however, as these will not be affected by phantom power. • To prevent damage to speakers, be sure to turn off power amplifiers (or powered speakers) before turning this switch on or off. It's also a good idea to turn the mixers output controls - the STEREO master and GROUP (1-2, 3-4) faders - all the way down when turning phantom power on. Neglect of these precautions may result in large noise bursts that may damage your equipment, your ears, or both. w 26dB (PAD) switch When this switch is turned on ( ), the input signal from the MIC/LINE jack of the mono channel is attenuated by 26dB. Turn this switch off ( ) if you've connected a microphone or other device with a low input level to the channel. Turn it on ( ) if you've connected a line-level device. e (High Pass Filter) switch Turning this switch on ( ) will apply a high-pass filter that attenuates frequencies below 100Hz in the signal by a slope of 12dB/octave. r DUCKER switch When this switch is turned on ( ), the volume of the stereo channels is automatically lowered when a signal exceeding a certain level is input to the SOURCE channel (MGP16X: CH8, MGP12X: CH4). You can use this switch, for example, when you want to have the volume of background music automatically lowered when making an announcement on the microphone. For effective use of this switch, see Step 6 on page 14. The switch lights when it is turned on. NOTE You can adjust the attenuation of the Ducker function in the detailed setting mode (see column on page 21). !7 !7 !7 !8 !8 !8 18 MGP16X/MGP12X Owner's Manual
-
 1
1 -
2
-
3
-
4
-
5
-
6
-
7
-
8
-
9
-
10
-
11
-
12
-
 13
13 -
 14
14 -
 15
15 -
 16
16 -
 17
17 -
 18
18 -
 19
19 -
 20
20 -
 21
21 -
 22
22 -
 23
23 -
24
-
25
-
26
-
27
-
28
-
29
-
30
-
31
-
32
-
33
-
34
-
35
-
36
 |
 |