Yamaha MGP16X Owner's Manual - Page 13
Step 4 Getting Sound to the Speakers, Step 5 Using the Built-in Digital Effects
 |
View all Yamaha MGP16X manuals
Add to My Manuals
Save this manual to your list of manuals |
Page 13 highlights
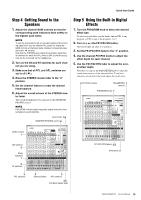
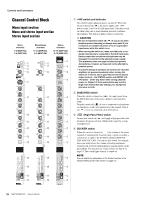
Quick Start Guide Step 4 Getting Sound to the Speakers 1. Adjust the channel GAIN controls so that the corresponding peak indicators flash briefly on the highest peak levels. NOTE To use the level meter to get an accurate reading of the incoming signal level, turn the channel PFL switch on. Adjust the GAIN controls so that level meter indication occasionally rises above the "
-
 1
1 -
2
-
3
-
4
-
5
-
6
-
7
-
 8
8 -
 9
9 -
 10
10 -
 11
11 -
 12
12 -
 13
13 -
 14
14 -
 15
15 -
 16
16 -
 17
17 -
 18
18 -
19
-
20
-
21
-
22
-
23
-
24
-
25
-
26
-
27
-
28
-
29
-
30
-
31
-
32
-
33
-
34
-
35
-
36
 |
 |
MGP16X/MGP12X
Owner’s Manual
13
Quick Start Guide
Step 4
Getting Sound to the
Speakers
1.
Adjust the channel GAIN controls so that the
corresponding peak indicators flash briefly on
the highest peak levels.
NOTE
To use the level meter to get an accurate reading of the incom-
ing signal level, turn the channel PFL switch on. Adjust the
GAI
N
controls so that level meter indication occasionally rises
above the “
<
” (0) level.
N
ote that the PHO
N
ES jack outputs the pre-fader signal from
all channels for which the PFL switch is O
N
, so that those sig-
nals can be monitored via the headphones.
2.
Turn on the ON and ST switches for each chan-
nel you are using.
3.
Make sure that all PFL and AFL switches are
set to off (
).
4.
Raise the STEREO master fader to the “0”
position.
5.
Set the channel faders to create the desired
initial balance.
6.
Adjust the overall volume of the STEREO mas-
ter fader.
The overall headphone level is adjusted by the MONITOR/
PHONES control.
NOTE
If the PEAK indicator lights frequently, slightly lower the chan-
nel faders to avoid distortion.
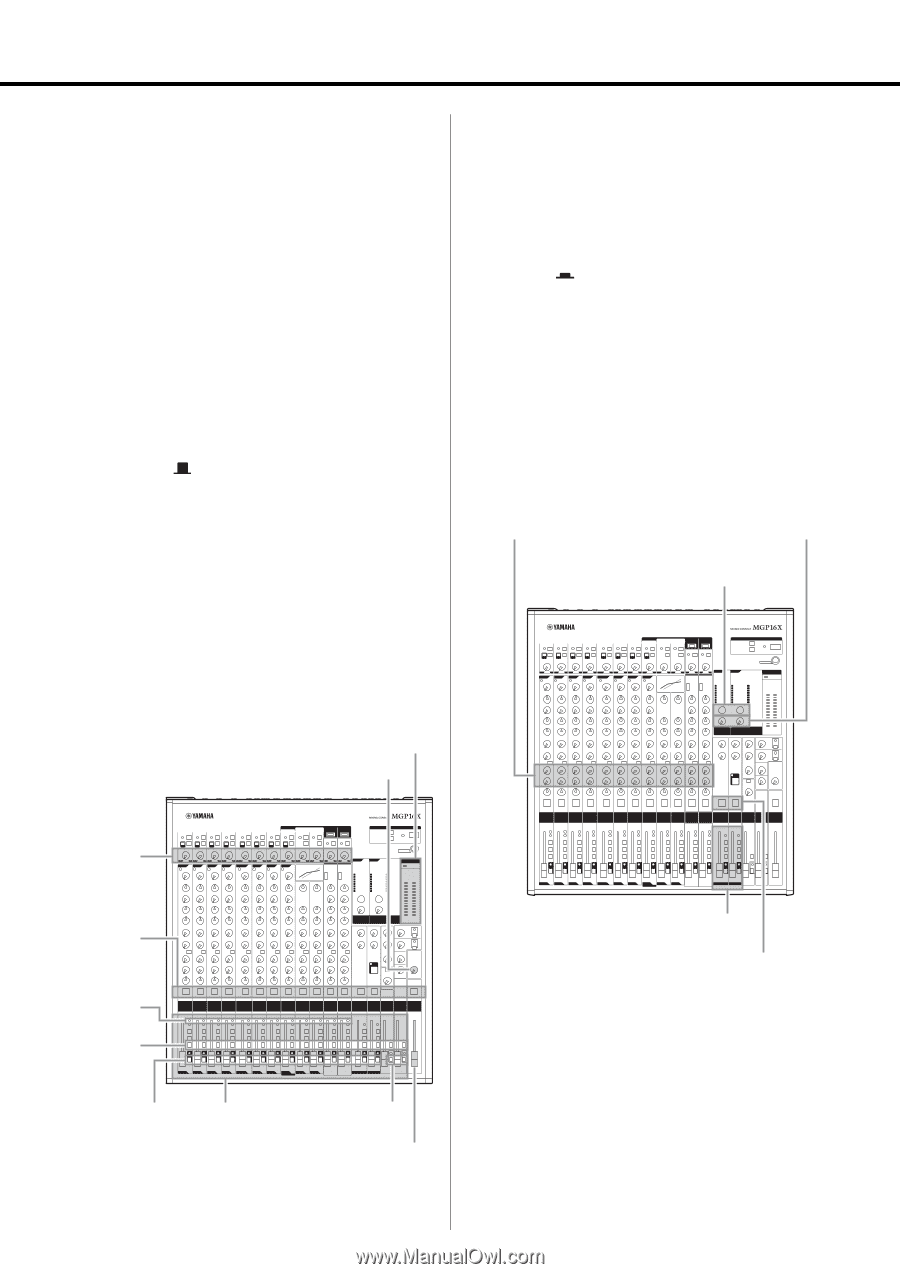
Step 5
Using the Built-in Digital
Effects
1.
Turn the PROGRAM knob to select the desired
effect type.
To select a reverb effect, use the knobs, and set FX1 to any
program, or FX2 to one of the programs 1 to 5.
2.
Turn on (
) the FX1/FX2 ON button.
The button lights up when it is turned on.
3.
Set the FX1/FX2 RTN fader to the “0” position.
4.
Use the channel FX1/FX2 knobs to adjust the
effect depth for each channel.
5.
Use the FX1/FX2 RTN fader to adjust the over-
all effect depth.
Note that you can use the PARAMETER knob to adjust the
sound characteristics of the selected effect. If you have
selected a reverb effect, the knob adjusts the reverb time.
1
2
1
2
4,6
3
1,6
6
5
3
Level meter
MO
N
ITOR PHO
N
ES control
GAI
N
controls
O
N
switches
PEAK
indicators
ST switches
PFL switches
Channel faders
AFL switches
STEREO master fader
4
5
1
3,5
2
PARAMETER
controls
FX1/FX2 controls
FX1/FX2 RT
N
faders
O
N
buttons
PROGRAM knobs